A Spoonful of Sugar

Make. Bake. Create.

Menu
  • Home
  • About
    • About Us
    • Press
    • FAQ
    • Disclosure Policy
    • Contact Us
  • Crafts
    • Crochet
    • DIY
    • Embroidery/Cross stitch
    • Gift Wrapping
    • Knitting
    • Miscellaneous
    • Paper Crafts
  • Holidays
    • New Year’s
    • Australia Day
    • Back to School
    • Valentines Day
    • Easter
    • ANZAC Day
    • Mother’s Day
    • Father’s Day
    • Halloween
    • Christmas
  • Recipes
    • Appetizers
    • Bars & Slices
    • Bread & Pastries
    • Cakes
    • Cookies
    • Confectionery
    • Cupcakes & Muffins
    • Desserts
    • Drinks
    • Ice Cream
    • Jams/Preserves
    • Main Meals
  • Sewing
    • Sewing Tutorials
    • Quilting
    • Sewing & Quilting Patterns
  • Family
    • Back to School
    • Family Fun
    • Our Home
    • Parenting
    • Travel
  • Shop
    • Pattern Store
    • Etsy Store

Easter Baskets to Make

February 16, 2013 By A Spoonful of Sugar - 34 Comments

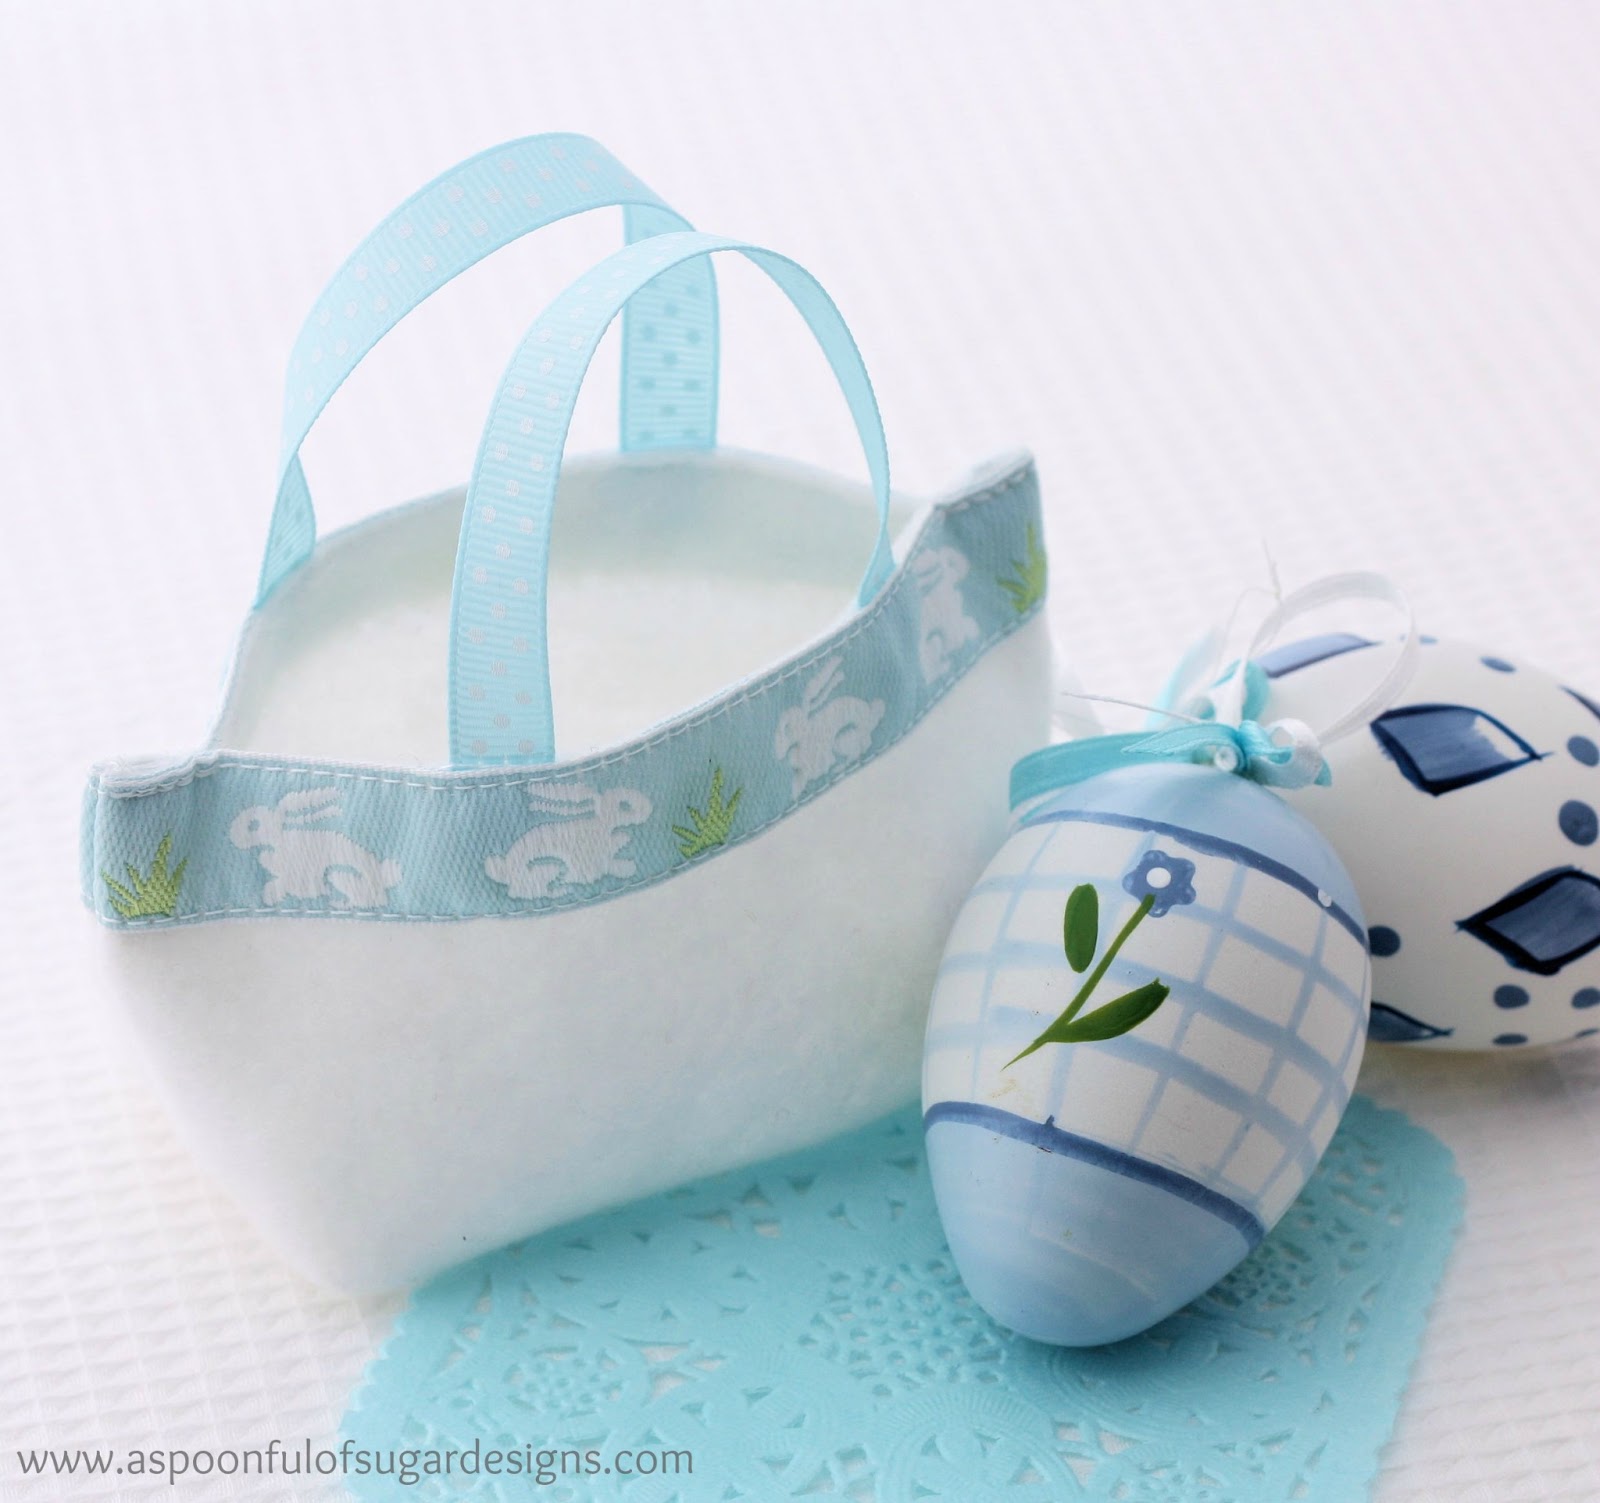
With Easter only 6 weeks away, we have been designing some Mini Easter Baskets to make using small pieces of  felt and ribbon from our stash.  We celebrate Easter in a fairly low key way. We usually have a lovely meal with our family and share some little Easter treats. We are always dreaming up new ways to gift a small package of chocolate eggs. We had some sweet Easter bunny ribbon in our stash so combined it with some felt to make little Easter Baskets.

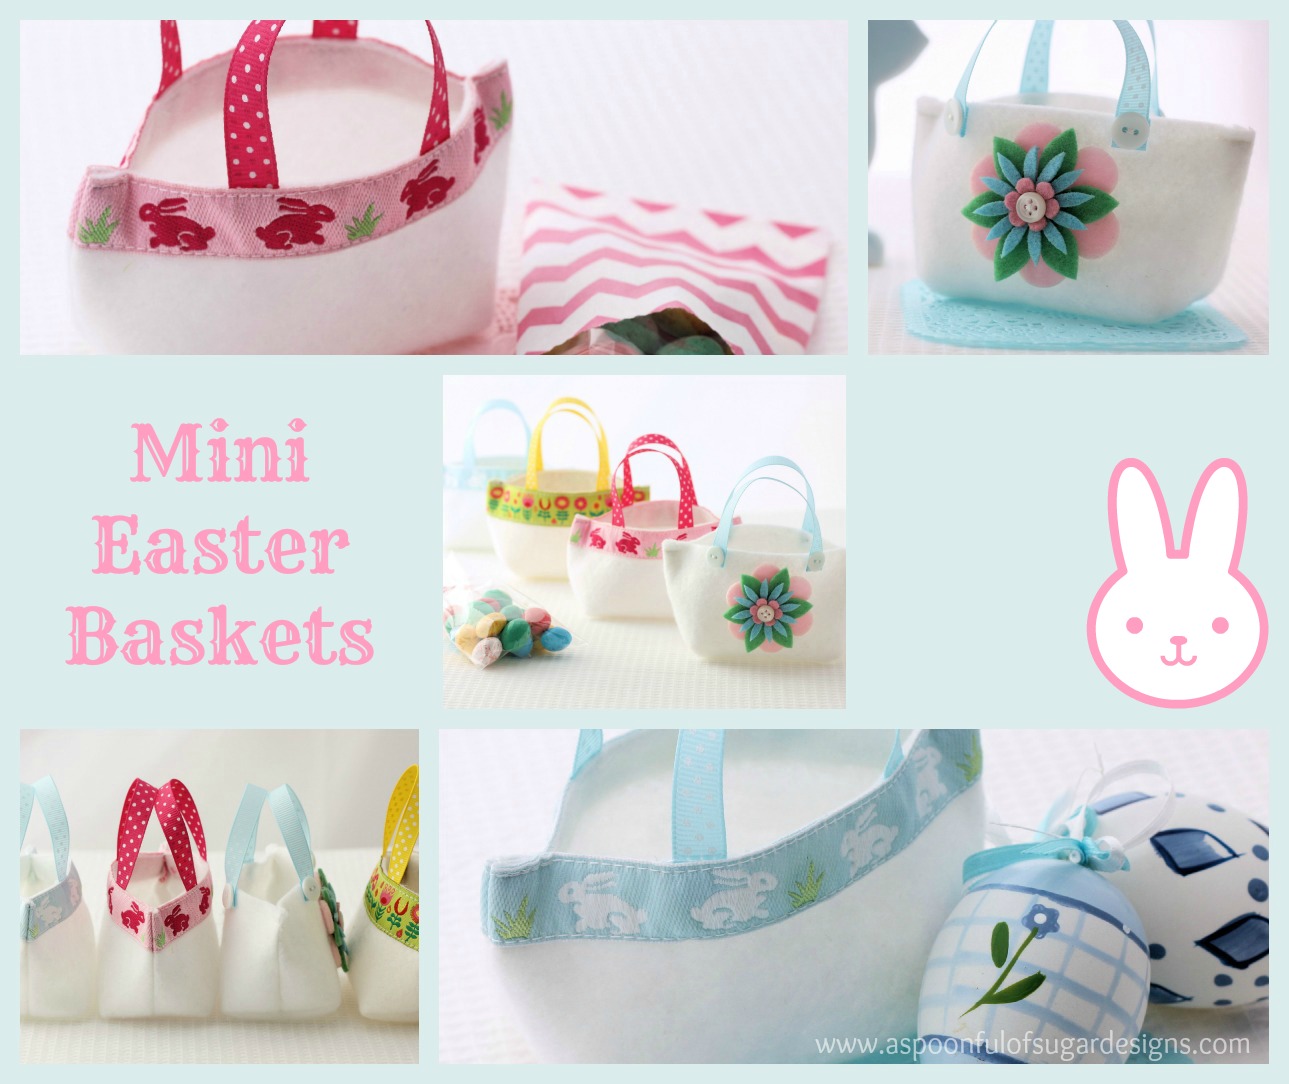
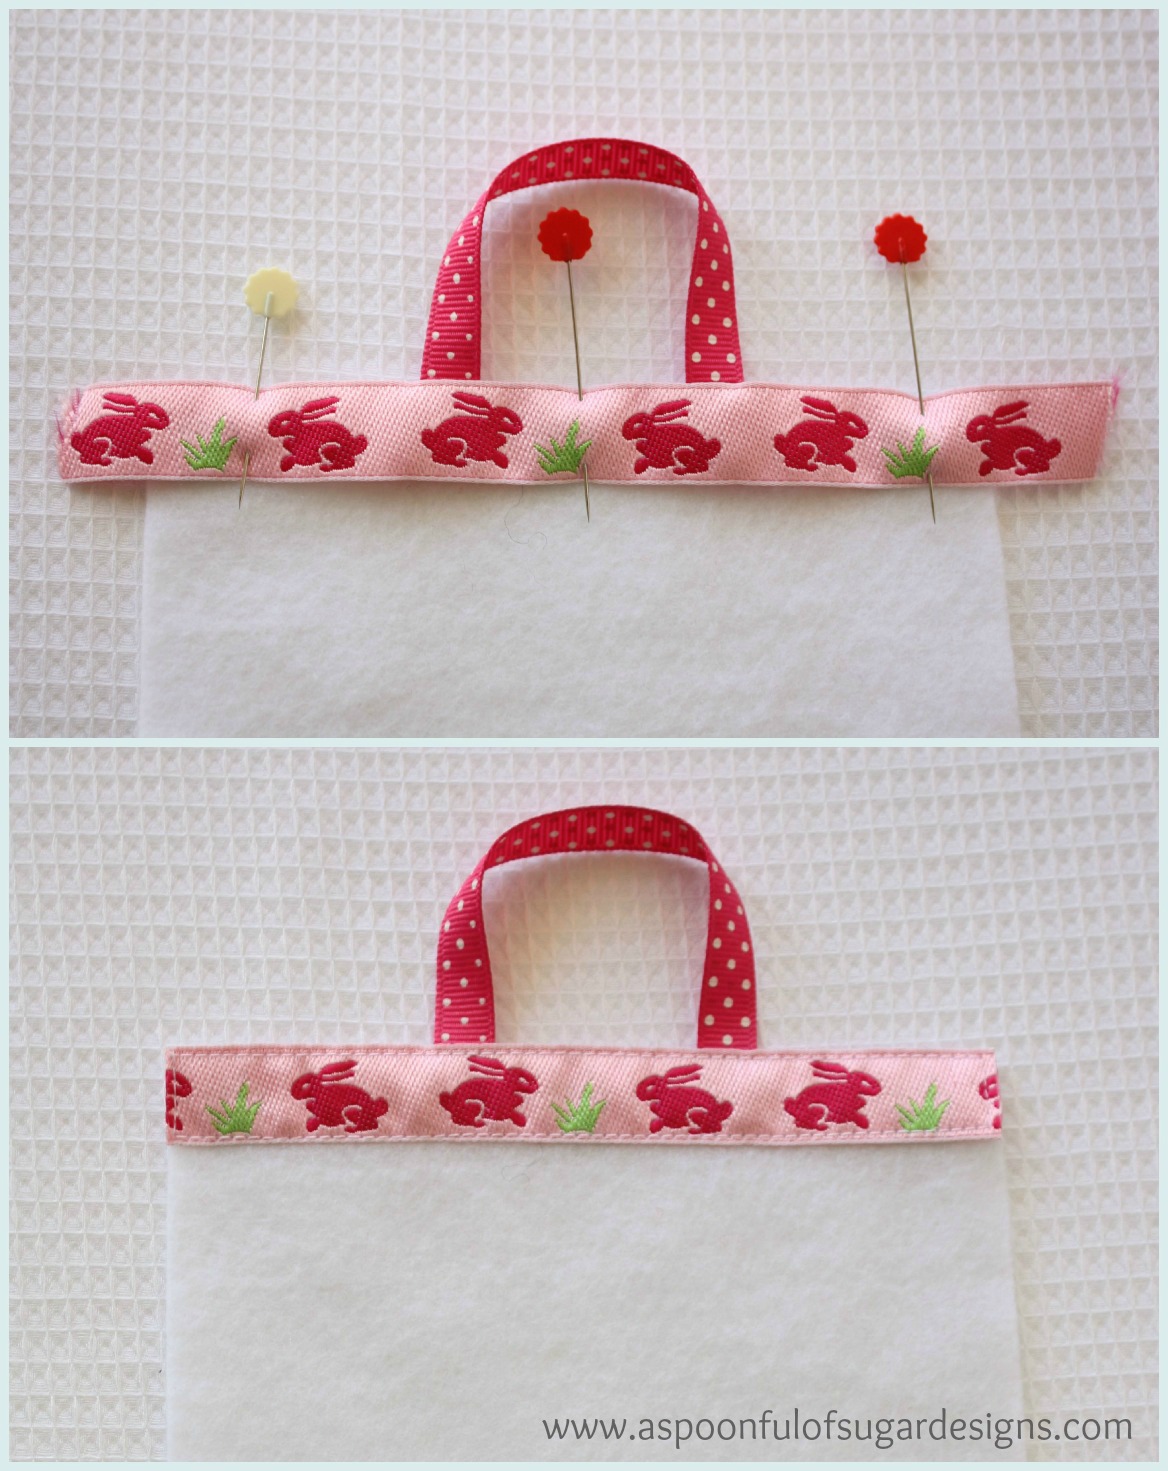
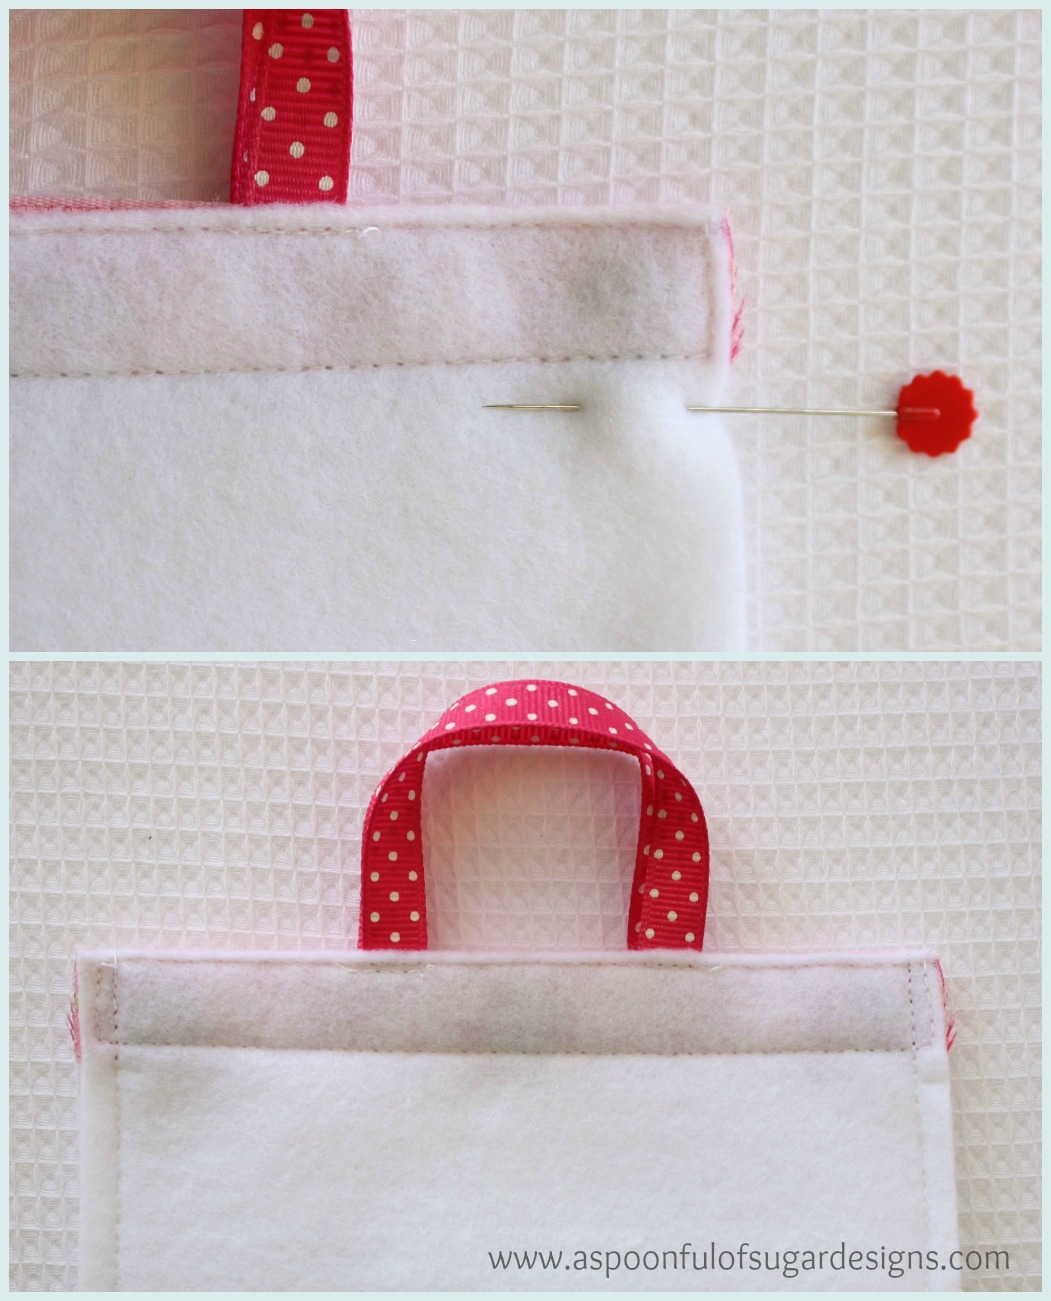
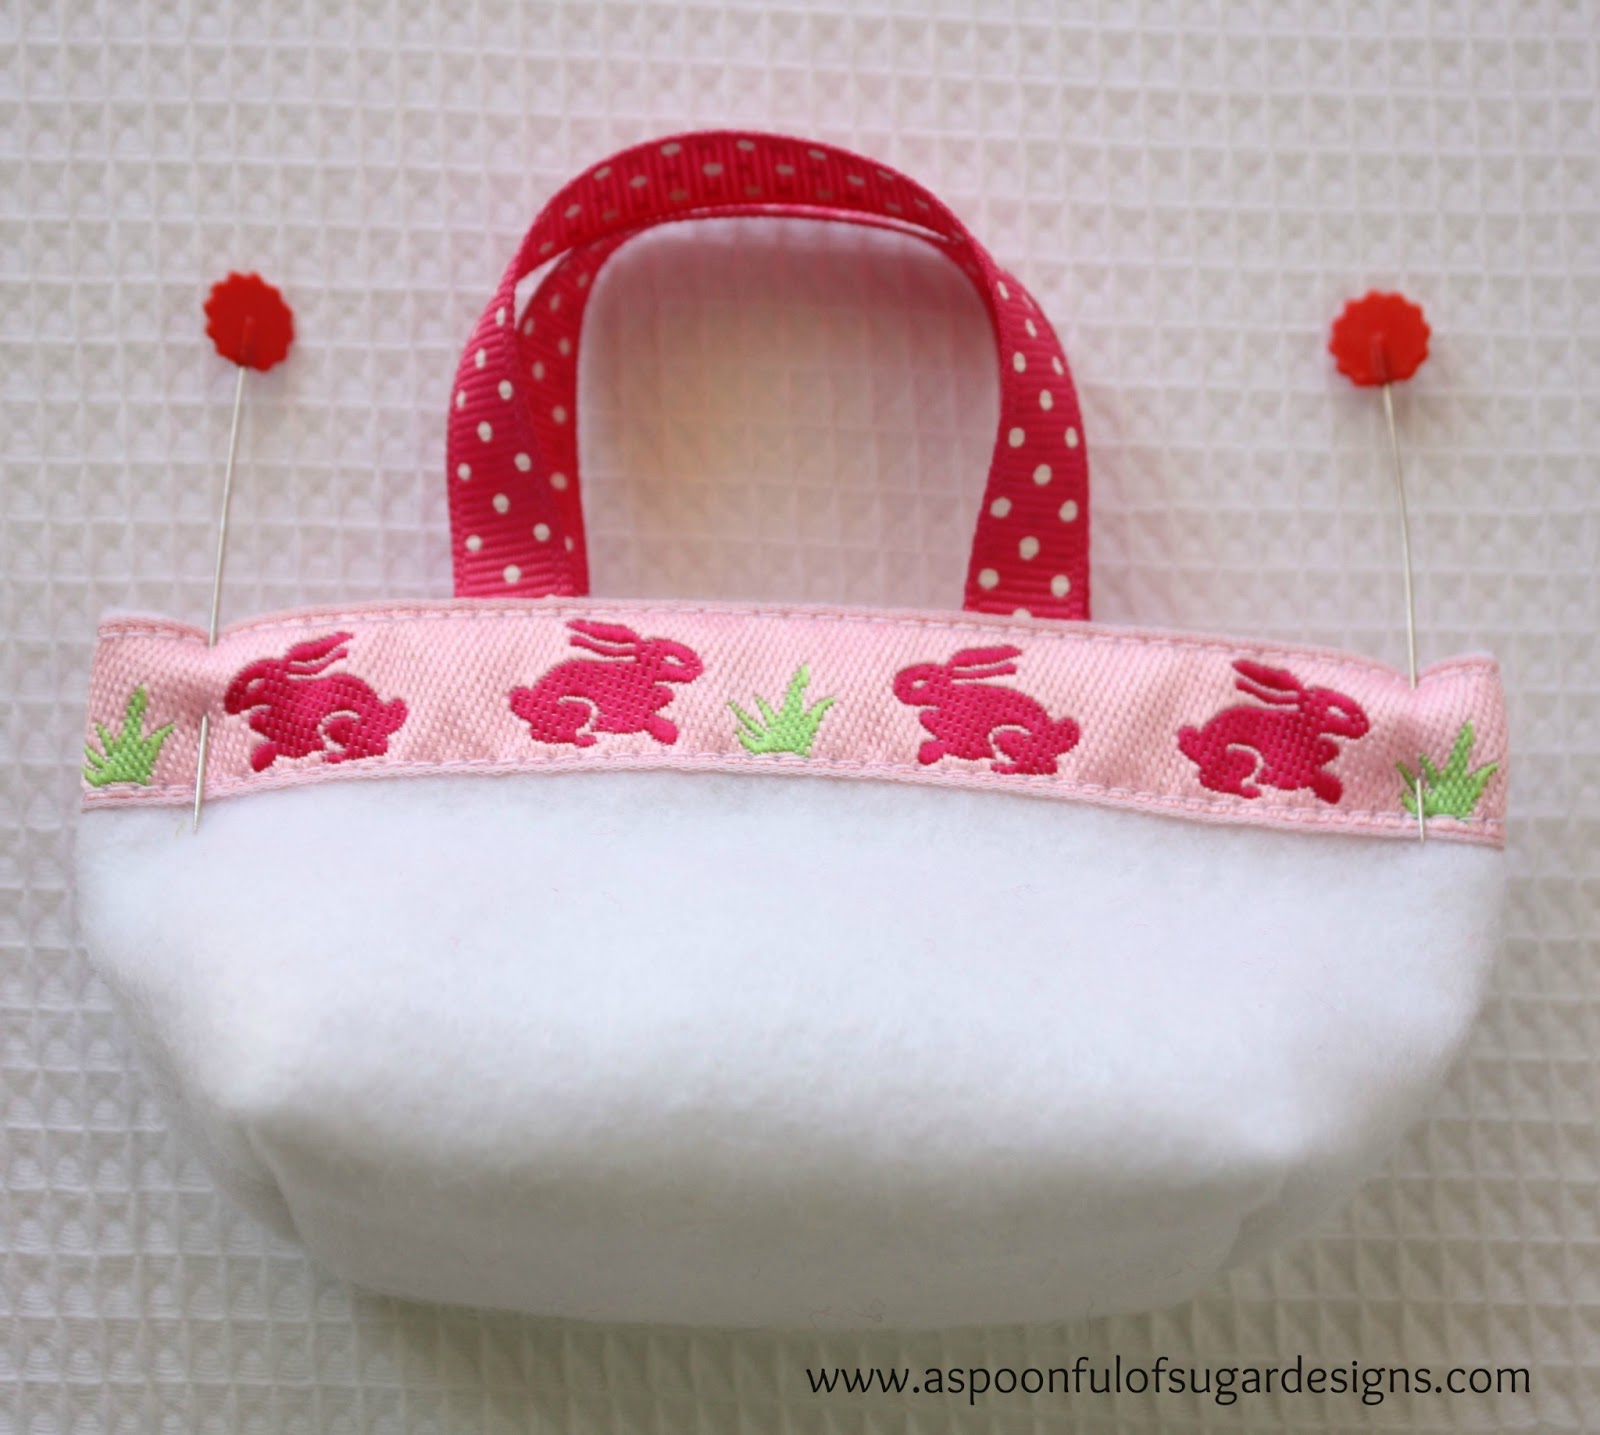
We found some coordinating polka dot ribbon for the handles.

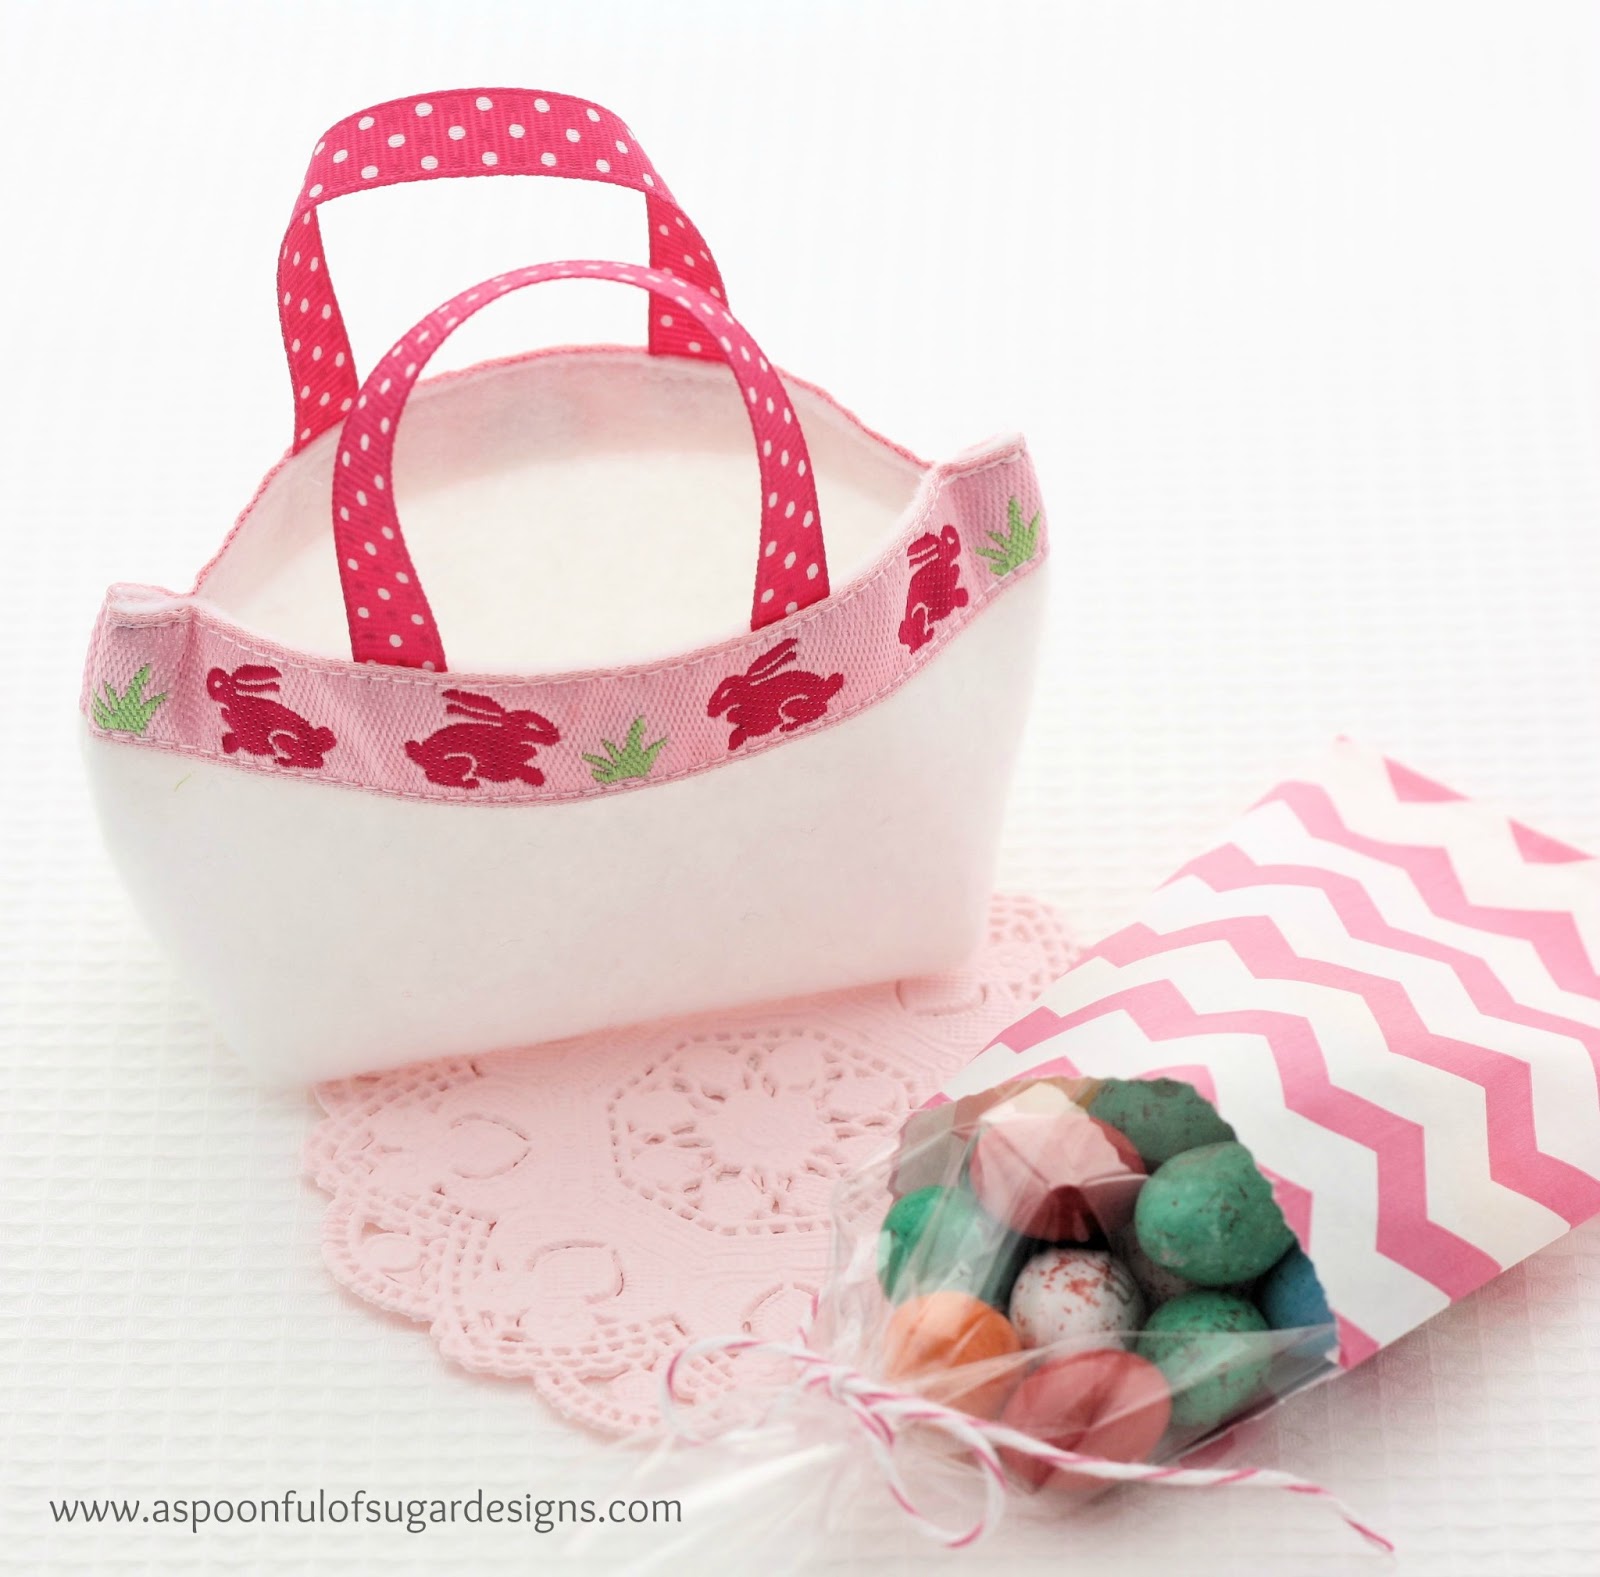
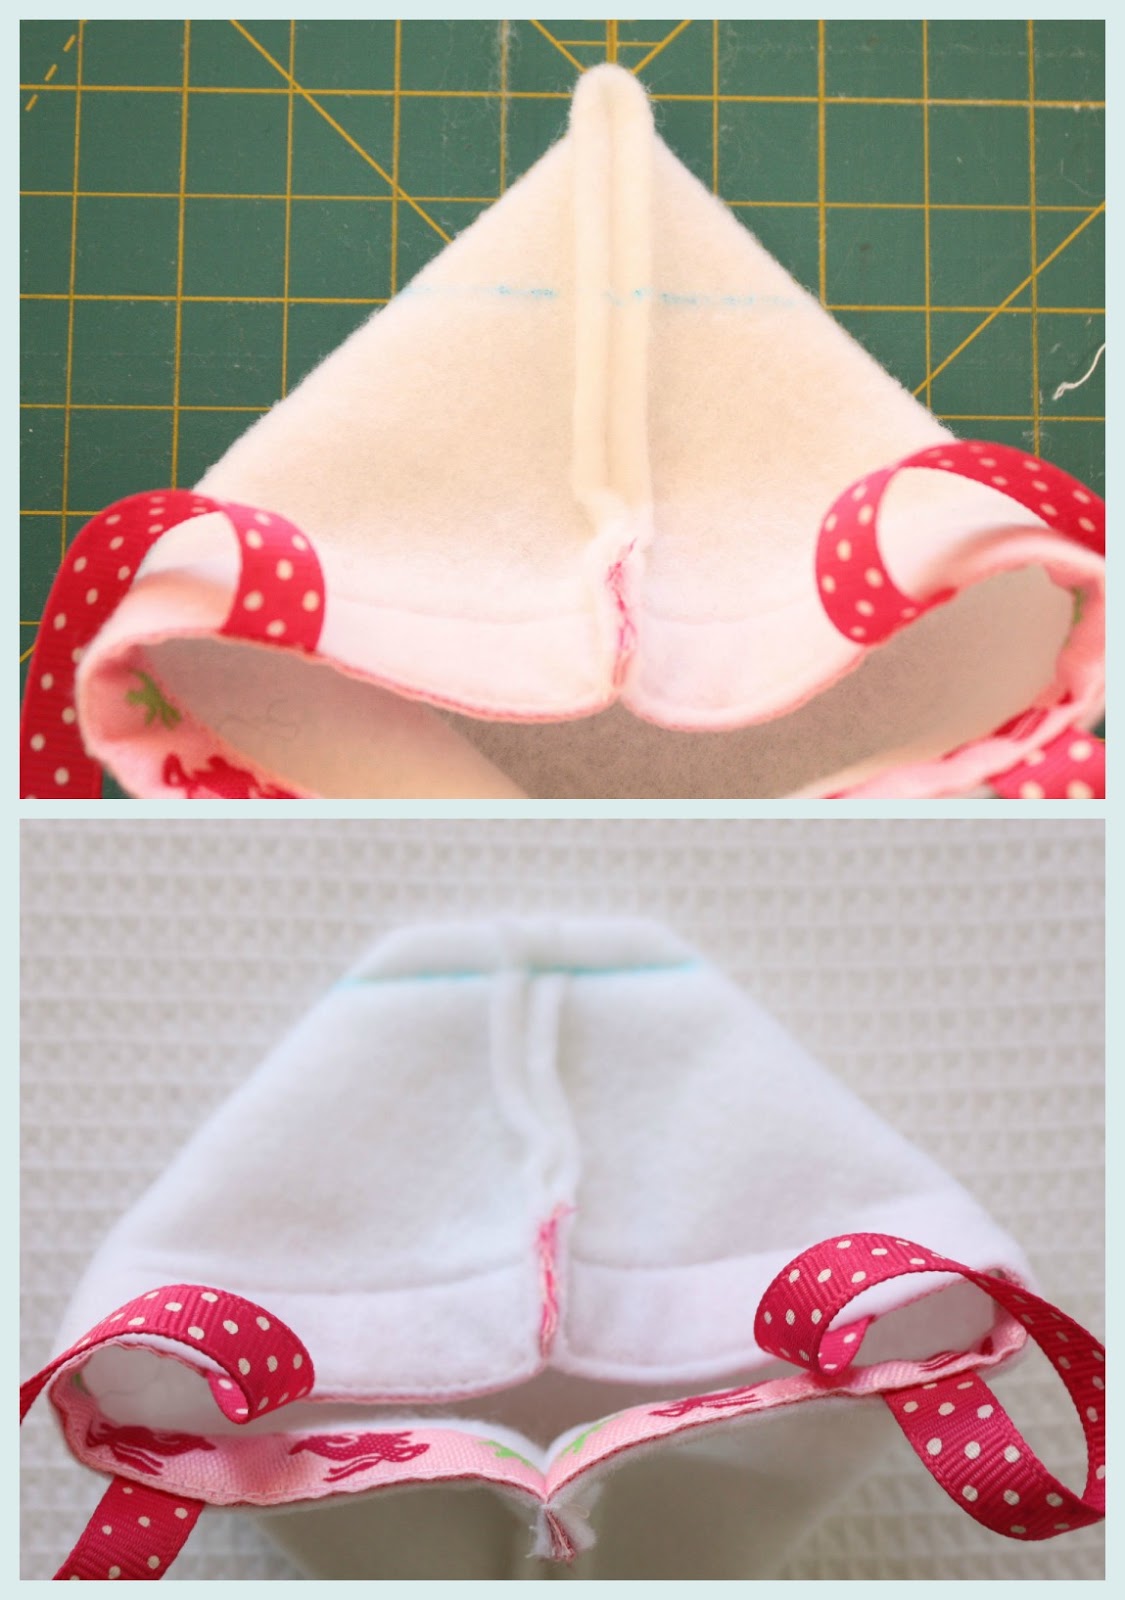
The baskets measure 5 inches wide x 2 1/4 inches high, and are the perfect size to hold a little bag of chocolate eggs.

We shared our first prototype over on our facebook page a few days ago and had lots of requests for a tutorial. So here are our instructions to make your own Easter Basket.

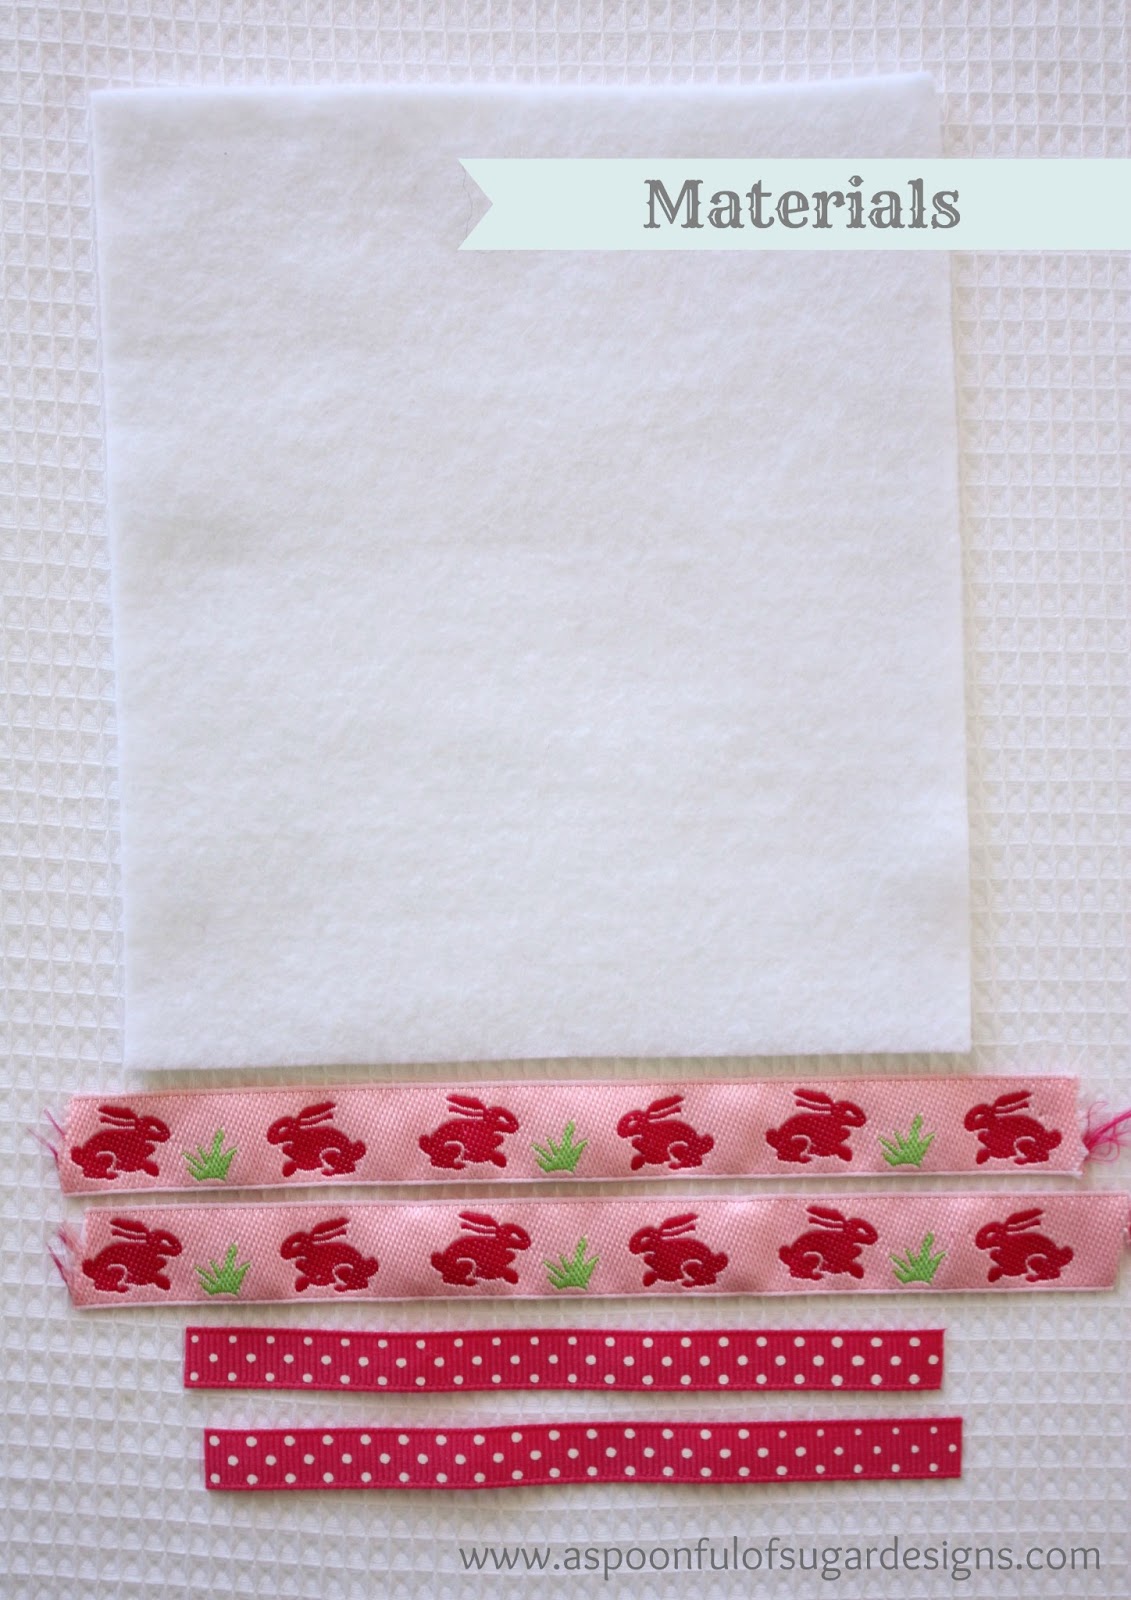
Materials(for one basket):

  • wool felt measuring 5 1/2 x 6 1/2 inches
  • Easter Bunny ribbon – two lengths measuring 5 1/2 inches (we cut our ribbon at 6 1/2 inches and trimmed it to fit during the construction)
  • polka dot ribbon – two lengths measuring 5 inches
1. Mark the mid point of the two short sides of the felt rectangle with a pin. Centre the ribbon handles so they are 1 1/2 inches apart. Baste in place.
2. Pin the Easter bunny ribbon along both of the short edges so that it is covering the bottom of the ribbon handles. Stitch the bunny ribbon in place along the top and bottom edges. Trim the ends so that it is the same size as the felt.
3. Fold the basket in half with the right sides together and the handles matching. Pin the side seams together. Stitch the side seams using a 1/4 inch seam allowance.
4. Box the corners: Using your cutting mat as a guide, fold the side seams as pictured along the 45 degree line. Using a water soluble pen, rule a line across the base that is 1 inch down from the peak, and 2 inches across. (the grid on our cutting mat is 1/2 inch x 1/2 inch). Stitch along the marked line, and then trim away the corner. Repeat for the other side. Remove the water soluble guide line.
5. Turn the basket out the right way. Pin the opening together at each end of the top edge, 1/4 inch from the side seam, as pictured. Stitch through both layers from the side seam to the pin, along the top line of stitching. This will hide the side seam and help the basket stand in a boat shape.
The Easter baskets can be made in approx 15 minutes. The project is suitable for beginner sewers and is a great way to use up small pieces of felt and ribbon.
Variation:
In this basket we stitched the ribbon handles on using buttons, and stitched some felt flowers to the front, and finished it off with a button centre.

For more inspiration on how to package Easter treats, check out our packaging ideas post and our Easter Pinterest board. 

For your daily sugar fix you can subscribe to our newsletter or follow us on facebook, pinterest, twitter,

Filed Under: Easter, Gift Wrapping, Sewing, Sewing Tutorials Tagged With: bag, felt, ribbon

« Lined Envelopes
Fold A Gift Box from a Sheet of Cardstock »

Comments

  1. Mandy Ferry says

    February 16, 2013 at 8:17 pm

    These look so cute and simple too. love them thank you.

    Reply
  2. Quilt Kitty says

    February 16, 2013 at 8:45 pm

    They are fabulous. The creative side of my brain is saying, quick run & get the felt & ribbon boxes. The logical side is saying what about the half made gift by the sewing machine that requires some reverse sewing & then finishing off…. Logic wins but will make some of these soon too. Tracee xx

    Reply
  3. Bettina Groh says

    February 16, 2013 at 10:33 pm

    thank you for the link to Ribbons Galore . It was new to me. They have GREAT ribbons!!

    Reply
    • Gloria says

      March 12, 2023 at 6:35 pm

      Very cute I definitely make some and give them for charity where do you buy the ribbons from beautiful ribbons thank you

      Reply
  4. Anonymous says

    February 16, 2013 at 11:48 pm

    This comment has been removed by a blog administrator.

    Reply
  5. Jos says

    February 17, 2013 at 1:39 am

    Simple & great! Thanks for sharing!

    Reply
  6. Melody says

    February 17, 2013 at 1:49 am

    I love these, they are fabulous

    Reply
  7. Annabellouise says

    February 17, 2013 at 1:51 am

    These are sweet. I’ve been thinking about making some little baskets and these could be just the thing. Lots of fabrics in my stash that could be used.

    Reply
  8. odette says

    February 17, 2013 at 1:57 am

    I love this bags, my grandchildren will love them too of course with the chocolates in.
    Thanks for sharings this pattern.

    Reply
  9. Montse says

    February 17, 2013 at 2:56 am

    Preciosaslas cestitas me gustan mucho, un saludo.

    Reply
  10. A. Luna says

    February 17, 2013 at 6:35 am

    Oh my Gosh !….this is wonderful, beautiful ,adorable and a great project for Easter.Thank you so much for helping and posting so many beautiful and useful ideas and projects.Love them all.
    Great blog !………Happy Sunday ! :0)

    Luna

    Reply
  11. kim leavens says

    February 17, 2013 at 7:11 am

    Thank you, thank you…super cute and easy peasy!! My daughter is just learning so this will be wonderful !! xo Kim [;)

    Reply
  12. Angelina- JoJoandEloise says

    February 17, 2013 at 9:37 am

    Oh, these are just as SWEET as can be. So very dainty and precious! These would be great for Little Flower Girls. Love them 🙂
    xo
    Angelina

    Reply
  13. Cheryl says

    February 17, 2013 at 11:36 am

    So cute and what a great tutorial!!! Thanks so much.

    Reply
  14. Quinn says

    February 17, 2013 at 12:38 pm

    This design is darling! What a sweet idea 🙂

    Reply
  15. Ana Sanches says

    February 17, 2013 at 1:35 pm

    Ownnnn so beautiful!!!!

    Reply
  16. Lani Padilla says

    February 17, 2013 at 2:29 pm

    These are absolutely adorable and the perfect size for a small treat! Thank you for the tutorial!

    Lani
    SimplyFreshVintage.com

    Reply
  17. Thimbleanna says

    February 18, 2013 at 6:12 am

    Very cute Lisa. I love how you’ve used the pretty little ribbons!

    Reply
  18. Crea-Nette says

    February 19, 2013 at 4:41 pm

    Wunderschön und vielen Dank für die tolle Anleitung.
    Liebe Grüße Janet

    Reply
  19. Marloes says

    February 20, 2013 at 11:51 am

    Thanks for sharing, they’re beautiful!

    Reply
  20. Pamela says

    February 20, 2013 at 2:15 pm

    Oh these are just too cute. Your tutorials are always so awesome. You make it easy for us to make them, too.

    Reply
  21. thesnailgarden says

    February 22, 2013 at 4:40 am

    Sweet little baskets! Thank you for the tutorial. Best wishes, Pj x

    Reply
  22. natascha says

    February 24, 2013 at 6:11 am

    What a cute little project! I just found your blog and I really like it! 🙂

    Reply
  23. Mary Ann says

    February 24, 2013 at 6:30 pm

    These are the cutest! I will have to try them for my granddaughter. She will love them! Thanks for the tutorial.

    Reply
  24. Alanay yıldırım says

    March 4, 2013 at 12:20 pm

    çok şirin olmuş bu çantalar.çok sevdim!

    Reply
  25. Zahra Salamat says

    March 10, 2013 at 10:05 pm

    بسیار زیباست

    Reply
  26. Princess Hamilton says

    March 25, 2014 at 7:29 am

    I Love it, I can not wait,I am definitely going to make one,thank you very much for sharing your talent.

    Reply
    • A Spoonful of Sugar says

      March 25, 2014 at 7:34 am

      Thanks – they are fun to make for Easter.

      Reply
  27. Princess Hamilton says

    March 25, 2014 at 7:32 am

    Thanks for sharing your talent,I am definitely going to make one.

    Reply
  28. Janine Evans says

    June 9, 2014 at 8:25 am

    Such pretty bags! Will save this for next year.

    Reply
    • A Spoonful of Sugar says

      June 9, 2014 at 4:31 pm

      Thanks Janine 🙂

      Reply
  29. Laura | Baking Outside the Box says

    March 27, 2015 at 1:08 am

    These little baskets are adorable. Nice tutorial too. Thank you so much. I may make these for the grandkids!

    Reply
    • A Spoonful of Sugar says

      March 27, 2015 at 7:01 am

      Thanks Laura! Happy Easter sewing.

      Reply

Leave a Reply Cancel reply

Your email address will not be published. Required fields are marked *

  • Email
  • Facebook
  • Instagram
  • Pinterest
  • Threads
  • TikTok
SUBSCRIBE TO NEWSLETTER
×

Categories

Archives

PURCHASE PDF PATTERNS

We offer over 100 affordable PDF sewing patterns available for download from our store website or Etsy store. Each pattern includes detailed instructions, numerous photos, and templates.

WEB STORE ETSY STORE

Instagram

Mug rugs are one of the most satisfying projects t Mug rugs are one of the most satisfying projects to sew — quick to finish, perfect for scraps, and such a lovely way to build your skills in small, low‑pressure steps. Little details like trimming curves, pressing well, and choosing the right batting can make a big difference to how flat and polished your mug rugs look.Swipe through for simple, beginner‑friendly tips that help your seams stay smooth, your corners turn neatly, and your finish feel more professional. Save this for the next time you need a quick, satisfying project.If you’re ready for your next make, I have a collection of 30+ mug rug and coaster patterns in my store — you’ll find the links in my profile.#mugrug #mugrugpattern #beginnersewingproject #scrapbustingsewing #aspoonfulofsugardesigns
My most‑made gift? The Bakers Buddy Mitt.Here ar My most‑made gift? The Bakers Buddy Mitt.Here are 3 reasons it’s always on my sewing table:
• No binding, which means it’s quick and beginner‑friendly
• Layers of Insul-Brite + batting to protect your hand
• A modern shape that looks beautiful in any stash fabricWant the pattern link? Comment BAKER and I’ll send it straight to your inbox.Perfect for gifting, scrap‑friendly, and such a satisfying make.Pattern details: Bakers Buddy Mitt (available in our Pattern Store and Etsy Shop).#quicksewingproject #beginnersewing #makersgonnamake #scrapbusting #giftideas
Why makers love this little pouch duo ✨The Hand Why makers love this little pouch duo ✨The Handy Drawstring Pouch + Mini Treat Pouch make such a sweet set — all beginner‑friendly, quick to sew, and perfect for using up your favourite fabric scraps. They’re lovely for gifting, organising, or adding a pop of colour to your sewing space.You’ll get both patterns in the bundle, and you’ll also save 25% — a thank you for choosing two of our most‑loved pouch designs.Which pouch would you sew first?Patterns linked in bio. Comment BAGDUO for the bundle link.Fabric: Tilda Songbird collection, kindly supported by @tilda_australia.#sewingcommunity #pouchmaker #beginnersewer #scrapfriendly #sewingpattern
The Scalloped Gift Bag is such a sweet little make The Scalloped Gift Bag is such a sweet little make — beginner‑friendly, quick to sew, and perfect for Easter or spring gifting. The colourful felt stars (or hearts!) are a lovely way to use your favourite felt scraps, and the scalloped edging adds that extra touch of charm.Comment SCALLOP for the pattern link.Pattern Details: Scalloped Gift Bag Pattern ( available in our Pattern Store & Etsy Shop)#scallopedgiftbag #sewingpattern #eastersewing #scrapfriendlysewing #aspoonfulofsugardesigns
The Ribbon Gift Box is back for Pattern of the Wee The Ribbon Gift Box is back for Pattern of the Week — and this fresh spring version in Tilda Creating Memories feels so sweet. It’s a reusable little box with a clever base, a ribbon closure, and it even folds flat for storage. A quick, satisfying make for Easter gifting or small treats.Comment BOX for the link — it’s 25% off this week only.#ribbongiftbox #sewingpattern #giftsewing #tildafabric #aspoonfulofsugardesigns
Tiny projects are my favourite way to use every la Tiny projects are my favourite way to use every last scrap — and these little Threaded Tokens are so quick and satisfying to sew.Here are 3 sweet ways to use them: • Add to a wrapped gift or treat bag • Use as a place card at your next gathering • Clip onto a pouch or zipper pull for a handmade touchThey’re perfect for fussy‑cutting tiny motifs (especially Songbird!) and make lovely little keepsakes.Comment TOKEN for a link to our free Threaded Tokens pattern. Happy sewing, friends 🌼#sewingproject #scrapbusting #tildafabric #tildalovers #fussycuts
Follow on Instagram

Featured Pattern

Travel Sewing Kit Pattern

Featured Tutorial

Retro Drawstring Bag

Featured Recipe

Lemon Pound Cake

Connect

  • Email
  • Facebook
  • Instagram
  • Pinterest
  • Threads
  • TikTok
SUBSCRIBE TO NEWSLETTER
×

Popular Posts

  • The Ultimate Resource for Vintage Haberdashery Lovers
  • Merry Little Christmas Sewing Projects
  • Hexie Pincushion {Free Sewing Tutorial}
  • Charm Square Fabric Tray
  • The Ultimate Guide to Drawstrings
  • Sew your Stash
  • Favourite Uses for Fabric Tape

Copyright © 2026 Lisa. K. Cox - A Spoonful of Sugar