A Spoonful of Sugar

Make. Bake. Create.

Menu
  • Home
  • About
    • About Us
    • Press
    • FAQ
    • Disclosure Policy
    • Contact Us
  • Crafts
    • Crochet
    • DIY
    • Embroidery/Cross stitch
    • Gift Wrapping
    • Knitting
    • Miscellaneous
    • Paper Crafts
  • Holidays
    • New Year’s
    • Australia Day
    • Back to School
    • Valentines Day
    • Easter
    • ANZAC Day
    • Mother’s Day
    • Father’s Day
    • Halloween
    • Christmas
  • Recipes
    • Appetizers
    • Bars & Slices
    • Bread & Pastries
    • Cakes
    • Cookies
    • Confectionery
    • Cupcakes & Muffins
    • Desserts
    • Drinks
    • Ice Cream
    • Jams/Preserves
    • Main Meals
  • Sewing
    • Sewing Tutorials
    • Quilting
    • Sewing & Quilting Patterns
  • Family
    • Back to School
    • Family Fun
    • Our Home
    • Parenting
    • Travel
  • Shop
    • Pattern Store
    • Etsy Store

Clay Ornaments

December 4, 2011 By A Spoonful of Sugar - 16 Comments

Last weekend, Sarah and I made some clay Christmas ornaments. It was a little like baking but without the calories! This would be great activity to do with kids of all ages.

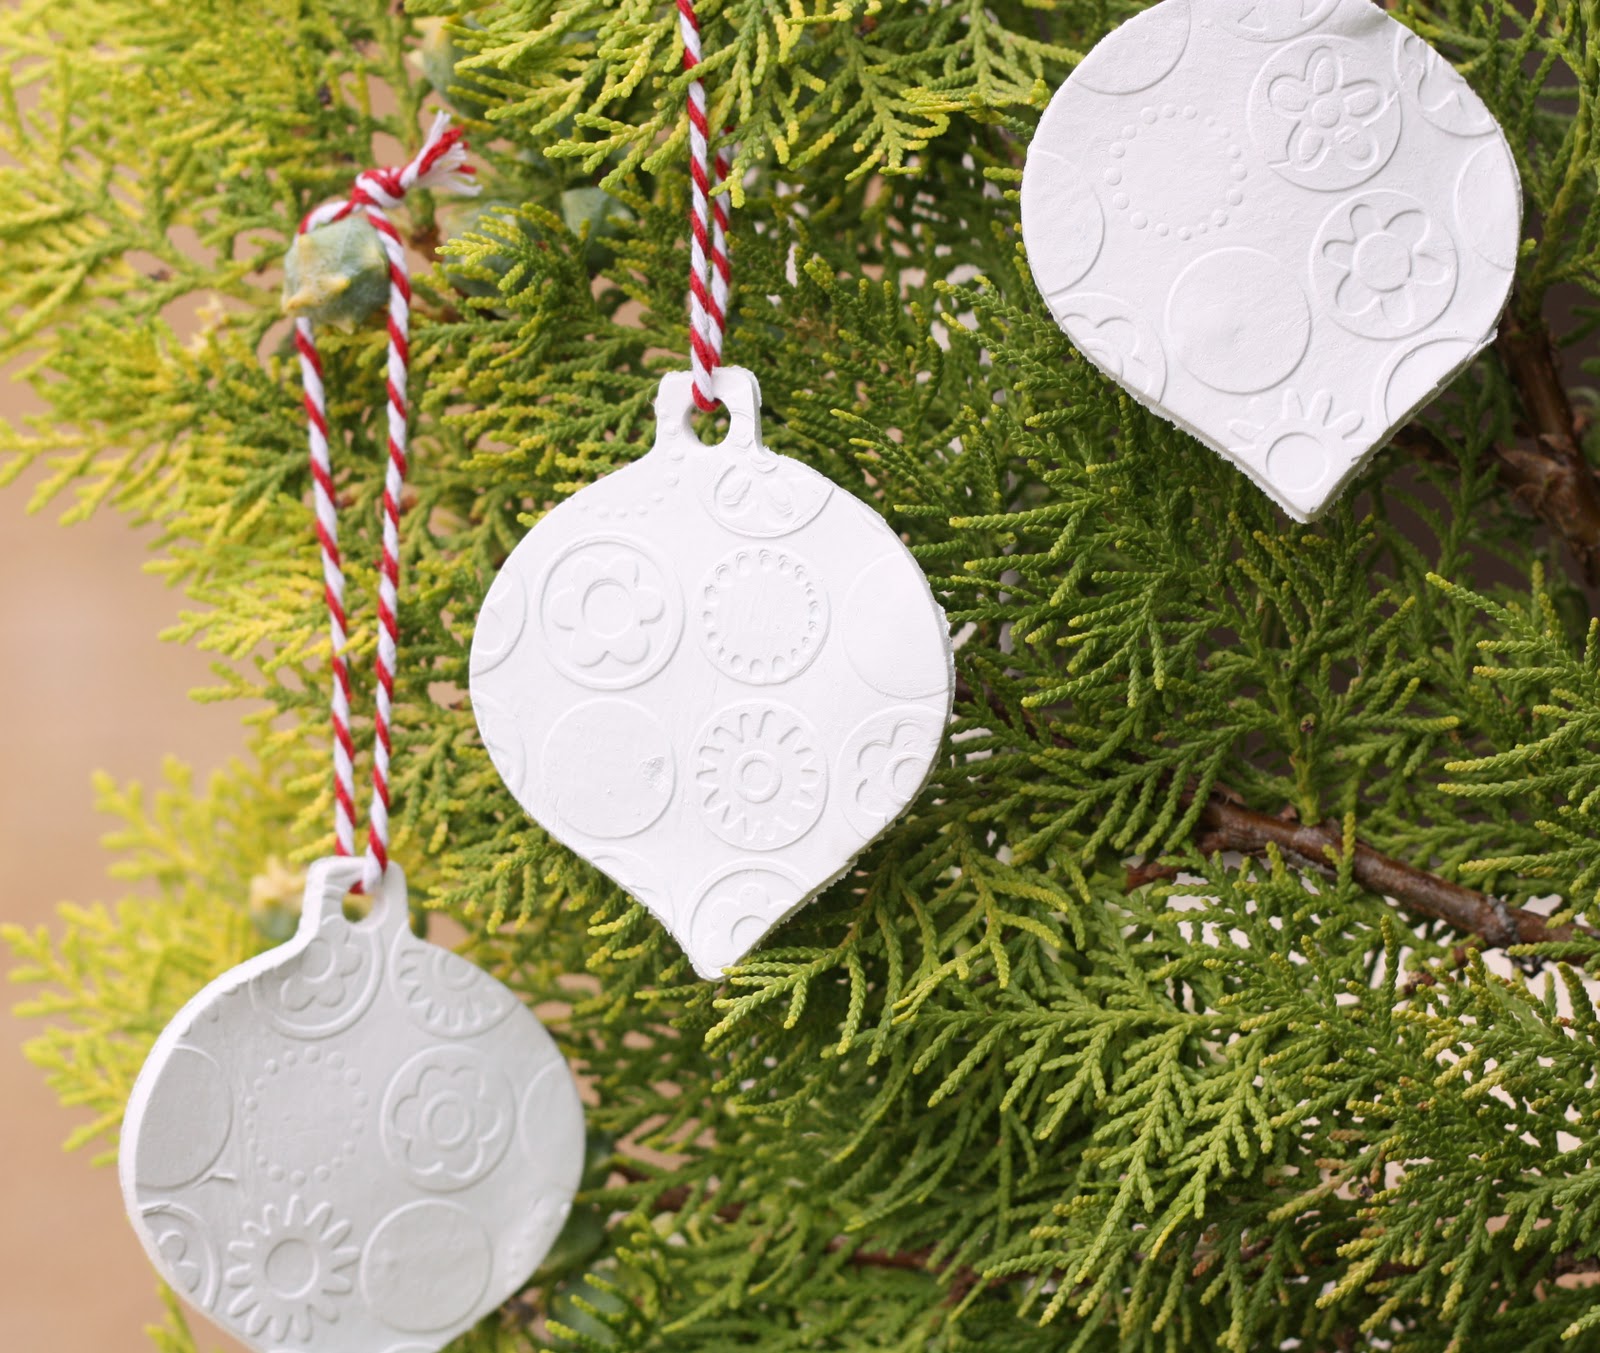
We used some air dry clay that we purchased from Riot. 500g was enough to make 35 small ornaments.We rolled the clay out on baking paper; embossed the clay using cuttlebug embossing folders or imprinted with rubber stamps; and then cut out the ornaments using Christmas cookie cutters. We also made a small hole for hanging.

We then laid the ornaments on baking sheets and left them to air dry for 48 hours, turning them every 8 hours or so.We then coated them with some spray on varnish to seal the clay.

Finally, we threaded some red and white bakers twine through and tied a knot.

We are planning on setting up the Christmas tree this afternoon – can’t wait to start getting our home ready to celebrate Christmas.

For your daily sugar fix you can subscribe or you can follow us on facebook and twitter.

Filed Under: Christmas, Miscellaneous Tagged With: ornaments

« Santa Sack
Banana Cupcakes »

Comments

  1. shez says

    December 4, 2011 at 12:47 am

    they look very nice Lisa

    Reply
  2. Pauline says

    December 4, 2011 at 12:57 am

    very cute ornies lisa..I saw some necklaces similar to this today..they were nice too…nice work!
    cheers

    Reply
  3. Linda says

    December 4, 2011 at 1:00 am

    Great idea Lisa & Sarah, and they look great.

    Reply
  4. Nat @ dear little house says

    December 4, 2011 at 1:08 am

    Very sweet! That would make for a striking tree 🙂

    Reply
  5. Luscious Lea says

    December 4, 2011 at 1:40 am

    Very pretty.

    Reply
  6. Bela says

    December 4, 2011 at 3:16 am

    Pure delight, dear Lisa!!!
    I love it!!!!
    Have a wonderful Sunday!!!
    Bela

    Reply
  7. Terriaw says

    December 4, 2011 at 8:33 am

    These ornaments are so beautiful! I love the simple white color against a lovely green tree. They look so easy too. What a fun project to do together.

    Reply
  8. Mary says

    December 4, 2011 at 11:08 am

    Love the ornaments. They will look so pretty on your tree.

    Reply
  9. Dora Ramalho says

    December 4, 2011 at 11:39 am

    wonderfull 🙂

    Reply
  10. Jenny of Elefantz says

    December 4, 2011 at 1:47 pm

    So pretty, Lisa! 🙂
    Hugs
    Jenny
    xx

    Reply
  11. Thimbleanna says

    December 4, 2011 at 8:47 pm

    So Cute Lisa — you and Sarah sure do some fun projects!

    Reply
  12. em's scrapbag says

    December 5, 2011 at 8:44 am

    What a fabulous idea! Thanks for sharing!

    Reply
  13. Pippa {Pepper+Buttons} says

    December 5, 2011 at 10:59 am

    They look gorgeous and not too difficult to make. Will have to try!

    Reply
  14. Mary says

    December 5, 2011 at 1:53 pm

    Hi.

    This is such a great idea! I like how you have embossed the patterns.

    Mary

    Reply
  15. Jodie @ The Haby Goddess says

    December 5, 2011 at 3:00 pm

    These look stunning! I love how they have been left white.

    Reply
  16. Talia says

    December 11, 2011 at 4:45 am

    These are gorgeous! I’ve been making salt dough ornaments, but might need to give clay ones a try too!

    Reply

Leave a Reply Cancel reply

Your email address will not be published. Required fields are marked *

  • Email
  • Facebook
  • Instagram
  • Pinterest
  • Threads
  • TikTok
SUBSCRIBE TO NEWSLETTER
×

Categories

Archives

PURCHASE PDF PATTERNS

We offer over 100 affordable PDF sewing patterns available for download from our store website or Etsy store. Each pattern includes detailed instructions, numerous photos, and templates.

WEB STORE ETSY STORE

Instagram

Adding a handmade label is one of my favourite way Adding a handmade label is one of my favourite ways to personalise a project — and these little fabric + felt labels are so quick and satisfying to make.For this Ribbon Pouch, I used the Liberty Gifts from the Garden collection, which has the sweetest fruit motifs. They make perfect tiny labels for pouches, bags, and gifts.Here’s how to make your own:Press a piece of double‑sided fusible web to the back of your fabric.Cut around your chosen motif.Peel off the paper backing.Press the motif onto wool felt.Trim the felt with scalloped scissors.Sew the label onto the front of your pouch.Such a simple detail, but it adds so much charm. Fabric kindly gifted by @regent_street_fabrics — thank you!If you’d like to sew the Ribbon Pouch (3 sizes), comment RIBBON and I’ll send the pattern link straight to you.#SewingInspiration #FabricLabels #DIYLabels #LibertyFabric #LibertyGiftsFromTheGarden
A lot can change in 10 years ❤️ It’s been fun look A lot can change in 10 years ❤️ It’s been fun looking back at where I was in 2016 and how far life has come since then. Swipe for a little trip down memory lane.Back in 2016, my priorities were firmly centred around family. I was working full‑time, sewing in the guest room, sharing tutorials on my blog, and slowly dipping my toes into selling a handful of patterns on Etsy. It was a busy, full season — and creativity was something I fitted in around everything else.  Fast forward to 2026… I’m now retired and living the creative life I once dreamed of. My kids have grown up and are living in their own homes nearby. My husband and I are free to travel, explore, and enjoy this stage of life. And I get to spend my days designing, sewing, and connecting with this beautiful community.Life looks different now — in the best possible way.Were you following me back then, or what has changed for you over the past 10 years? I’d love to hear your story too.Tagging the lovely makers of my quilt: @arabesquescissors @ministryoffabric @belloquacity @alittlepatchwork @sameliasmum coleandtaffy @quiltymamaof4 @shequiltsalot @downgrapevinelane @lizzierosesews @lovethatfabric @sew_mimi.k #2026isthenew2016 #10yeartransformation #sewingjourney #sewingcommunity #aspoonfulofsugardesigns
Fall in love with sewing all over again ❤️I’ve Fall in love with sewing all over again ❤️I’ve rounded up 10 heart‑themed makes — from quick gifts to charming quilt blocks — perfect for weekend stitching or using up your favourite scraps. Whether you’re sewing for Valentine’s Day, birthdays, or just because, there’s something sweet for every maker.Comment HEART and I’ll send you a link to my Heart Pattern Collection.#sewingproject #heartsewing #quiltblock #scrapsewing #easytosew
Raw edge appliqué doesn’t have to feel fiddly or i Raw edge appliqué doesn’t have to feel fiddly or intimidating. With a few simple techniques, you can create neat, crisp shapes — even tiny details like penguin beaks and hearts.I’ve put together My Top 5 Secrets for Raw Edge Appliqué to help you feel confident, whether you’re brand new to appliqué or looking to refine your finish. Save this for your next sewing session.If you’d love a quick, beginner‑friendly project to practise these tips, my Penguin Love Mugrug is the sweetest Valentine’s make — scrap‑friendly, gift‑ready, and such fun to sew.Comment PENGUIN and I’ll send you the link to the pattern. Available now in our Pattern Store and Etsy shop.  #rawedgeapplique #appliquetips #sewingtipsandtricks #mugrugpattern #penguinlove
If you’ve ever wanted to add eyelets or grommets t If you’ve ever wanted to add eyelets or grommets to your sewing projects, here’s a quick look at how I install them using my DK93 snap press. It’s the same tool I use for snaps — and it makes installing eyelets beautifully quick and consistent.For this Ribbon Pouch, I used the Liberty Gifts from the Garden collection (printed on Lasenby cotton and released in January 2026). The colours and motifs pair so well with the little ribbon tie detail.Here’s how to install the eyelets:Punch out the four holes using a hole‑cutting die.Place the eyelet into the hole.Press it into place using the snap press.That’s it — easy peasy, and it gives the pouch such an elevated, professional finish. I love how clean and sturdy the result is.Fabric is Gifts from the Garden by Liberty - kindly provided by @regent_street_fabrics — thank you!If you’d like the Ribbon Pouch pattern (it comes in 3 sizes), comment RIBBON and I’ll send the link straight to you.Ribbon Pouch Sewing Pattern: available in our Pattern Store and Etsy shop ( links in profile).#SewingInspiration #SewingProjects #Eyelets #Grommets #SnapPress
The Twirling Treasures Hot Pad & Placemat Set show The Twirling Treasures Hot Pad & Placemat Set showcases one of my favourite FPP designs — a stunning kaleidoscope‑style block that always turns out beautifully. Kaleidoscope blocks are some of my most popular FPP patterns, and this set is such a fun way to use them.  This set includes six sizes, making it incredibly versatile: use them as hot pads, trivets, placemats, or simply as a way to add a pop of colour to your kitchen.For these samples, I went with a monochromatic scrap‑busting approach, pairing fabrics from the same colour family with a low‑volume background. The black‑and‑white striped binding adds such a crisp, modern finish. It’s a wonderful project for building your FPP confidence — and a fantastic way to use up those treasured scraps.The Twirling Treasures Hot Pad set is our Pattern of the Week. It is currently 25% off this week in our Pattern Store and Etsy Shop.If you’d like to sew your own set, comment TWIRL and I’ll send the pattern link straight to you.Happy sewing! Lisa 🌸#FoundationPaperPiecing #Quilting #HotPads #ScrapBuster #KitchenSewing
Follow on Instagram

Featured Pattern

Travel Sewing Kit Pattern

Featured Tutorial

Retro Drawstring Bag

Featured Recipe

Lemon Pound Cake

Connect

  • Email
  • Facebook
  • Instagram
  • Pinterest
  • Threads
  • TikTok
SUBSCRIBE TO NEWSLETTER
×

Popular Posts

  • Charm Square Fabric Tray
  • Merry Little Christmas Sewing Projects
  • {Back to School} Tissue Cover
  • Hexagon Fabric Tray
  • Raw Edge Applique Tips
  • Sewing Gifts 101: Easy and Affordable Ideas for Your Crafty Friends
  • Finding More Time to Sew

Copyright © 2026 Lisa. K. Cox - A Spoonful of Sugar