A Spoonful of Sugar

Make. Bake. Create.

Menu
  • Home
  • About
    • About Us
    • Press
    • FAQ
    • Disclosure Policy
    • Contact Us
  • Crafts
    • Crochet
    • DIY
    • Embroidery/Cross stitch
    • Gift Wrapping
    • Knitting
    • Miscellaneous
    • Paper Crafts
  • Holidays
    • New Year’s
    • Australia Day
    • Back to School
    • Valentines Day
    • Easter
    • ANZAC Day
    • Mother’s Day
    • Father’s Day
    • Halloween
    • Christmas
  • Recipes
    • Appetizers
    • Bars & Slices
    • Bread & Pastries
    • Cakes
    • Cookies
    • Confectionery
    • Cupcakes & Muffins
    • Desserts
    • Drinks
    • Ice Cream
    • Jams/Preserves
    • Main Meals
  • Sewing
    • Sewing Tutorials
    • Quilting
    • Sewing & Quilting Patterns
  • Family
    • Back to School
    • Family Fun
    • Our Home
    • Parenting
    • Travel
  • Shop
    • Pattern Store
    • Etsy Store

{Back to School} Tissue Cover

January 18, 2013 By Spoonful of Sugar - 35 Comments

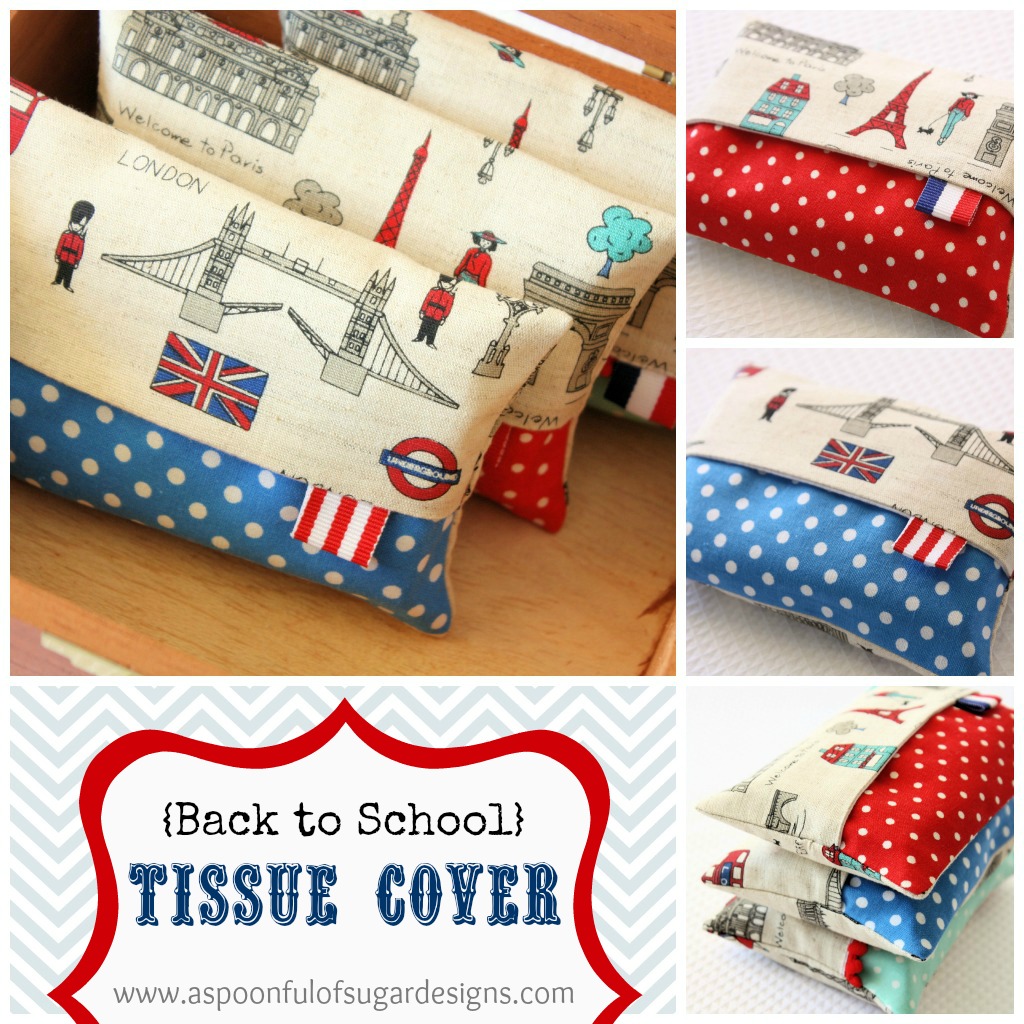
With the new school year looming, it is the perfect time to do some Back to School crafting. Sadly, my teens no longer want me to make them anything for the new academic year, but with some pleading on my part, Sarah agreed that she could use some Tissue Covers to keep in her school bag and locker. She has inherited my allergies, so always needs a steady supply of tissues. We tend to buy the travel packs of tissues in bulk!

After a look through our fabric stash we found the perfect fabrics. Polka Dots, Eiffel Towers, Union Jacks, and Cupcakes! (Our favourite themes). We found the French and British themed fabrics at Spotlight (they are a linen cotton blend). Wish I had of bought some of the Aussie themed one as well.

I didn’t use a pattern, and made up my own design as I went along. There are no doubt loads of tutorials around for Tissue Covers but if you want to make one like ours, I noted down the dimensions and took a few progress photos.

Tissue Cover

 Materials
    • 6 1/4 x 5 3/4 inches  (Main Fabric – Eiffel Tower)
    • 2 1/4 inch x 5 3/4 inch (Contrasting Fabric – Polka Dot)
    • 8 x 5 3/4 inch (Lining Fabric – white)
    • 1 1/2 inch of striped ribbon, 3/4 inch wide
    • 6 inch mini pom pom trim (optional)
    • Travel pack of tissues
Prepare Materials

Stitch the smaller rectangle (polka dot) to the larger rectangle (Eiffel Towers) along the 5 3/4 inch edge to form the front cover. Press. Fold the ribbon in half, and baste it in place, 1 inch from the top left hand side as shown in the photo.

Assemble Tissue Cover

With the right sides facing, layer the tissue cover on top of the white lining. Pin together. Stitch together along the top and bottom edges using a 1/4 inch seam allowance. Turn out the right way. Press.

Optional: If you want to add pom pom trim, stitch it on (along the edge with the ribbon), using a scant seam allowance.

Sew Front to Back

Lay the tissue cover on your table as shown in the photo above. Turn down the top edge 2 1/4 inches. Press. Turn up the bottom edge 1 3/4 inches (along the seam line where the Eiffel Tower fabric meets the polka dots). Press. The Tissue cover should measure 5 1/4 inches x 3 1/2 inches. Stitch both sides together as shown. Overlock raw edges. Clip corners. Turn out right way using a turning tool. Press.
Note: The top flap will overlap the bottom flap  by approx 1/2 inch.

Stitch Sides of Tissue Cover
Turn out the Right Way and Press.

The Tissue Covers are sized to hold a small pack of travel tissues. They are great to have on hand in your school bag, hand bag, or suitcase. Of course, I couldn’t stop at one and made up a few to use when travelling.

Check out our Liberty Tissue Covers for a different view of this same tutorial.Liberty Tissue Cover

You can find some of our other Back to School tutorials here –

8 Back to School Projects

You can find more of our sewing tutorials here.  If you enjoyed this tutorial, please consider sharing.

For your daily sugar fix you can subscribe or follow us on facebook, pinterest, twitter, and google plus.

Filed Under: Back to School, Sewing, Sewing Tutorials Tagged With: gifts

« Origami Box
Child’s Fleece Scarf »

Comments

  1. Patchwork and Play says

    January 18, 2013 at 5:54 pm

    I think I need to make one of these just so I can use some cute pop pom trim and ribbon! Very sweet!

    Reply
  2. Helen says

    January 18, 2013 at 7:05 pm

    these are very cute I am going to make some! A quick question, do the front flaps overlap at all, or but up against each other?
    Helen

    Reply
  3. Happy in red says

    January 18, 2013 at 7:19 pm

    That’s very pretty fabric!! Thanks for the tuto!!

    Reply
  4. A Spoonful Of Sugar says

    January 18, 2013 at 10:06 pm

    Helen – the top part of the flap will overlap the polka dot section by approx 1/2 inch. This keep it looking neat 🙂

    Reply
  5. Dawn says

    January 19, 2013 at 12:03 am

    Thanks for the Tut…excellent fabric choice, Spotlight at Clovercrest in South Australia still have the Aussie one if you want some…give them a call and they’ll post it…
    Hugs x

    Reply
  6. Jos says

    January 19, 2013 at 1:23 am

    L.O.V.E. Them!

    Reply
  7. Suzie says

    January 19, 2013 at 3:39 am

    I’ve been catching up with your posts, so many clever and delicious ideas! The chicken patties is one of my favourites, I also tried the vegetable muffins, but had to change a little because we don’t have self-raising flour. Your chocolate chip cookies are the best recipe, it’s always a success! And I love how you made the Patchwork Needle Book, just lovely!

    Reply
  8. Thimbleanna says

    January 19, 2013 at 7:25 am

    They’re adorable Lisa! I especially love the Brit fabric!

    Reply
  9. carole says

    January 19, 2013 at 10:19 am

    I love the tissue covers and your pattern is nicer than others I’ve seen. I’ll be making a few of these. Thanks

    Reply
  10. thingsforboys says

    January 19, 2013 at 3:49 pm

    Gorgeous! I think a lot of the NSW stores have the Melbourne print and the VIC stores have the Sydney print. Call the shop at home, it’s on clearance at a lot of stores so you might pick it up cheap!

    Reply
  11. karamino says

    January 19, 2013 at 5:57 pm

    Love the colours! and thank you for tutorial!

    Reply
  12. tubilinha tiacarminha says

    January 19, 2013 at 9:17 pm

    Obrigada MENINAS!!!!Adorei,vou fazer.Beijos do Brasil.

    Reply
  13. Chocolate Cat says

    January 20, 2013 at 3:26 am

    These would be great for when you just need a small gift. Thanks for sharing!

    Reply
  14. biaartesplasticasefotosmontagens says

    January 21, 2013 at 2:22 am

    Amei o tecido com a Toore Eifell, mas não tem aqui pra vender ! Que pena !!!

    Reply
  15. Kate says

    January 21, 2013 at 5:40 am

    These are the ‘spiffiest’ tissue covers that I’ve ever seen!!!! Thanks for including the tutorial, too. 🙂

    Reply
  16. Ginny Fierro says

    January 21, 2013 at 4:12 pm

    Love the Paris fabric. Where did you get it?

    Reply
  17. Sandy says

    January 22, 2013 at 6:42 am

    I love this! Would it be okay if I pinned it to my Sewing board on Pinterest? Thanks so much 🙂

    Reply
  18. cmoh says

    January 22, 2013 at 7:15 am

    Oh wow this is great! I always have those plastic tissue pouches in my purse and they just don’t stand up to two little girls so the tissues end up all over my purse or in an ugly sandwich bag. I am going to try and make on of these today.

    Thanks for sharing
    Hugs
    Caroline

    Reply
  19. Lins Artyblobs says

    January 22, 2013 at 1:33 pm

    This is something I was thinking of making so thanks for the tutorial. Great fabrics too.

    Reply
  20. Anonymous says

    January 22, 2013 at 6:47 pm

    Love, love, love these! Please tell us who is the fabric manufacturer so we can search for it in the U.S. Thanks so much for sharing!

    Reply
  21. Shannon says

    January 27, 2013 at 5:49 pm

    Cold and flu season has arrived, so this will be the perfect little pick-me-up project for sniffly friends. Thanks for posting, I am off to search my fabric scraps right this minute!

    Reply
  22. Tanna says

    July 29, 2013 at 4:43 pm

    who makes the union jack fabric? I was wondering if I could order some online. I am making a Union Jack quilt for my son, Jack and have been looking for some fabric. I am in the US. Thanks!

    Reply
  23. Palak says

    July 30, 2013 at 9:38 pm

    Hi! I love these tissue covers! I would like to feature them (as well as some of your other projects) at Sewistry.com (a frugal sewing site). I would use one picture and link back to you. Please let me know if you have any concerns.

    Reply
  24. Charlotte says

    March 3, 2015 at 11:41 am

    Looks great. I need to make a few!

    Also, can be use for kotex cover to put in your purse!

    Reply
    • A Spoonful of Sugar says

      March 7, 2015 at 8:03 pm

      Great idea to use as a cover for sanitary products.

      Reply
  25. Dog Saver says

    April 11, 2015 at 4:32 am

    How do you get the tissues out?

    Reply
    • A Spoonful of Sugar says

      April 11, 2015 at 7:38 am

      The tissues can be removed from the front of the cover, between the two layers that are slightly overlapped. They are easy to remove.

      Reply
  26. Patchwork Alley says

    July 3, 2015 at 8:52 am

    Thanks for the tutorial, like you said there are a few alternatives out there but I like the idea of the two tone fabrics and especially the addition of the little ribbon tab!
    I made a couple of these this evening, adjusting the size slightly as my tissue packets seem narrower and I boxed the corners too.
    Might try and hunt down some bobble trimming … it looks such fun! x patchworkalley

    Reply
    • A Spoonful of Sugar says

      July 3, 2015 at 11:24 am

      Thanks Alison – they are fun little projects to use some of your fabric “scraps”. Adding different trims and ribbons adds to the fun.:)

      Reply
  27. Jeanne says

    July 15, 2015 at 12:26 am

    These are so addictive…we just made 4 and are trying to think of more people to make them for. Super quick project and a fun way to use up scraps! Thanks for the tutorial!!

    Reply
    • A Spoonful of Sugar says

      July 16, 2015 at 8:53 pm

      You’re welcome Jeanne!

      Reply
  28. Jeannie M Neff says

    October 17, 2019 at 9:22 pm

    I just made 40 of these for my daughter’s Military pageant contestants. All were patriotic themed and turned out great. Thank you for the pattern.

    Reply
    • A Spoonful of Sugar says

      October 20, 2019 at 7:03 pm

      Wow – sounds amazing!

      Reply
  29. Teresa says

    January 4, 2026 at 10:53 pm

    Thank you for the tutorial.

    Reply

Leave a Reply Cancel reply

Your email address will not be published. Required fields are marked *

  • Email
  • Facebook
  • Instagram
  • Pinterest
  • Threads
  • TikTok
SUBSCRIBE TO NEWSLETTER
×

Categories

Archives

PURCHASE PDF PATTERNS

We offer over 100 affordable PDF sewing patterns available for download from our store website or Etsy store. Each pattern includes detailed instructions, numerous photos, and templates.

WEB STORE ETSY STORE

Instagram

There’s something so lovely about putting together There’s something so lovely about putting together a bright, happy self‑care gift… especially when it’s handmade.  I stitched a colourful set using Ruby Star Society fabrics - a Relaxation Eye Pillow and a Heavenly Heatpack - and styled them into a complete gift bundle.To make it feel extra special, I lined a small bamboo tray with soft tissue, added the two calming makes, tied them with a pink ribbon, and tucked in a few thoughtful extras: a candle, a box of speciality tea, and a tiny plant. It’s simple, cheerful, and such a beautiful way to show someone you care.Both projects are scrap‑friendly, beginner‑friendly, and quick to sew - perfect for weekend making or last‑minute gifting.If you’d like to sew your own self‑care set, comment SELFCARE and I’ll send you the link to the bundle. You’ll also save 25% on these two gift‑ready patterns when you buy the bundle.#selfcaresewing #beginnersewingproject #scrapfriendysewing #handmadegiftideas #aspoonfulofsugardesigns
The Large Quadra Pouch in this bright orange colou The Large Quadra Pouch in this bright orange colourway shows off everything makers love about this pattern — it folds completely flat for storage, has a clever structured base, four coordinated fabrics, and cinches closed beautifully. It’s quick to sew, gift‑ready, and so satisfying to pop open and fill.If you’d like to sew your own, comment QUADRA and I’ll send you the pattern link.Pattern Details: Quadra Pouch Pattern - available in our Pattern Store and Etsy shop.#QuadraPouch #SewingPatternDesign #HandmadePouch #SewingProjects #ASpoonfulOfSugarDesigns
One of my favourite features of the Quadra Pouch i One of my favourite features of the Quadra Pouch is how it folds completely flat between uses — perfect for travel, storage, or keeping your sewing space tidy. A quick press and it pops back into shape, ready to fill with treats, notions, or gifts.This version uses eight Tilda blenders for a scrappy, pretty finish that shows off the crisp base and four neat corners.If you’d like to sew your own, comment QUADRA and I’ll send you the pattern link.Pattern Details: Quadra Pouch - available in our Pattern Store and Etsy Shop.#ilovetilda #drawstringpouch #sewingpattern #scrapsewing #sewingcommunity
@tilda_australia
Thank you so much for the wonderful reception to t Thank you so much for the wonderful reception to the Quadra Pouch launch last week — I’m thrilled you’re loving this pattern as much as I do.Today I’m sharing a brand new Tilda version, stitched in the large size and made entirely from blenders. I used four Bellflower prints from the Wallflower range for the exterior, and four Stella prints from the Songbird collection for the lining — eight fabrics in total, making it delightfully scrappy.I love how easily Tilda collections mix and match, and how each corner of the pouch showcases a different print. The clever panel construction gives the pouch a neat flat base without boxed corners, and the result is both practical and beautifully structured.If you’d like to sew your own, the Quadra Pouch pattern is available in both my Pattern Store and Etsy Shop.Comment QUADRA and I’ll send the link straight to you.Pattern Details: Quadra Pouch (3 Sizes) - available in our Pattern Store and Etsy ShopFabric: Bellflower blenders and Stella blenders from Tilda, with thanks to @tilda_australia#tildafabrics #quadrapouch #sewingproject #scrapfriendlysewing #pouchpattern
There’s something so soothing about sewing small, There’s something so soothing about sewing small, comforting projects… especially the ones that feel as lovely to gift as they do to keep.This week I’ve been stitching up a little calm with this Self‑Care Bundle — a relaxing eye pillow and a soft, weighted heatpack designed for quiet moments, tired shoulders, and anyone who needs a gentle pause.Both projects are beginner‑friendly, scrap‑friendly, and quick to sew… the kind of makes that feel thoughtful without taking all weekend. Perfect for someone special, or for adding a little comfort to your own daily routine.This set is sewn in the beautiful Tilda Creating Memories collection - thank you to @tilda_australia for the gorgeous fabrics.If you’d like to sew your own set, I’ve bundled both patterns together with a 25% saving. Use the code word SELFCARE in the comments and I’ll send the link straight to you.Here’s to stitching a little calm into the week ahead 🤍#sewingproject #tildafabrics #makersgonnamake #sewinglove #handmadegifts
Threading a needle doesn’t have to be fiddly — the Threading a needle doesn’t have to be fiddly — these 9 simple tips make it so much easier. Perfect for beginners, tired eyes, or late‑night sewing sessions.Here are tools I use in my own sewing room:Easy‑thread needles, beeswax + scissors from @sohmo_au
Table‑top needle threader from @clovermfg
Glasses for close work from @opsm
Thread from @aurifilthread
(Not sponsored — just products I genuinely use and love.)Save this for your next sewing project ✨ Comment NEWSLETTER to sign up for my weekly newsletter - I share sewing tips, free tutorials, articles, and studio news every Sunday.Everyone has their own little threading tricks - share yours below!  #sewingtips #sewingforbeginners #sewingtools #sewinghacks #sewingroom
Follow on Instagram

Featured Pattern

Travel Sewing Kit Pattern

Featured Tutorial

Retro Drawstring Bag

Featured Recipe

Lemon Pound Cake

Connect

  • Email
  • Facebook
  • Instagram
  • Pinterest
  • Threads
  • TikTok
SUBSCRIBE TO NEWSLETTER
×

Popular Posts

  • Tips for Threading a Needle
  • Charm Square Fabric Tray
  • Sell What You Sew
  • Triangle Pouch
  • Pretty Handmade Gifts for Women: 15 Lovely Projects to Sew
  • Tutorial: Emergency Zippered Pouch
  • Make your own linen napkins Make Your Own Linen Napkins

Copyright © 2026 Lisa. K. Cox - A Spoonful of Sugar