A Spoonful of Sugar

Make. Bake. Create.

Menu
  • Home
  • About
    • About Us
    • Press
    • FAQ
    • Disclosure Policy
    • Contact Us
  • Crafts
    • Crochet
    • DIY
    • Embroidery/Cross stitch
    • Gift Wrapping
    • Knitting
    • Miscellaneous
    • Paper Crafts
  • Holidays
    • New Year’s
    • Australia Day
    • Back to School
    • Valentines Day
    • Easter
    • ANZAC Day
    • Mother’s Day
    • Father’s Day
    • Halloween
    • Christmas
  • Recipes
    • Appetizers
    • Bars & Slices
    • Bread & Pastries
    • Cakes
    • Cookies
    • Confectionery
    • Cupcakes & Muffins
    • Desserts
    • Drinks
    • Ice Cream
    • Jams/Preserves
    • Main Meals
  • Sewing
    • Sewing Tutorials
    • Quilting
    • Sewing & Quilting Patterns
  • Family
    • Back to School
    • Family Fun
    • Our Home
    • Parenting
    • Travel
  • Shop
    • Pattern Store
    • Etsy Store

Simple Christmas Ornaments

November 12, 2014 By A Spoonful of Sugar - 26 Comments

Simple Christmas Ornaments 2

We love making new Christmas ornaments each year to decorate our home. This year we are planning a winter wonderland theme using lots of pastel coloured decorations with gold accents. Even though Christmas falls in the middle of our Australian summer and are usually very hot, we can dream right? One year we spent Christmas in Colorado and it was lovely experiencing a white Christmas. We even went for a sleigh ride on Christmas Day.

Simple felt and fabric ornaments

If you have been following our blog since we began, you may recall our Charming Christmas ornaments from 2009. This year we have given them a makeover and made  these easy to construct felt and fabric stars.

Supplies to make felt and fabric stars

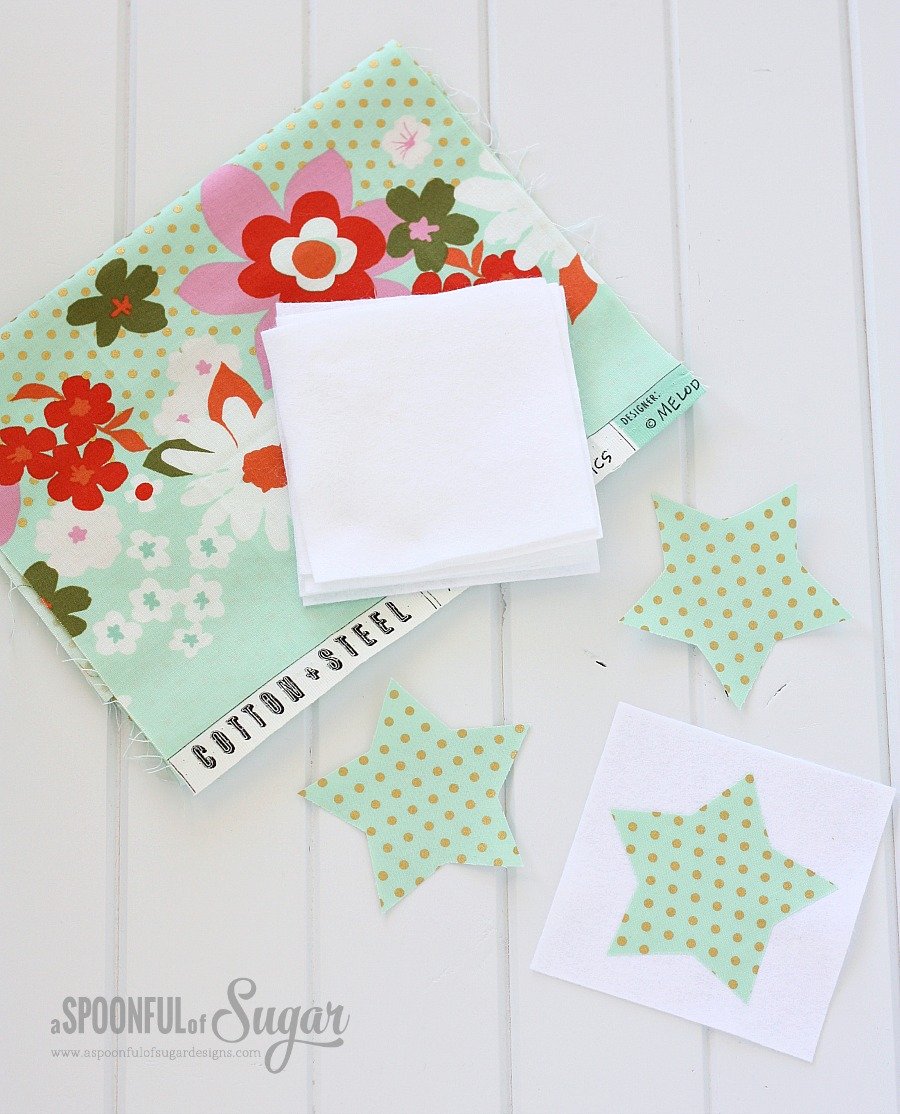
If you would like to make your own, you will need:

  • fabric
  • white felt
  • fusible appliqué web such as steam a seam
  • silver or gold thread
  • fibre fill or stuffing of your choice


Trace a star (or other Christmas shape – such as a bell, Christmas tree, etc) onto the paper side of the fusible web. Cut around the shape leaving a 1/4 inch clearance. Press the shape onto the back of the fabric, and cut it out. Peel off the paper backing, and fuse the fabric shape onto a square of white felt that at least 1 inch wider and longer than the shape.

Tip: Use medium sized Christmas cookie cutters as a template for the Christmas shapes.

Simple star decorations

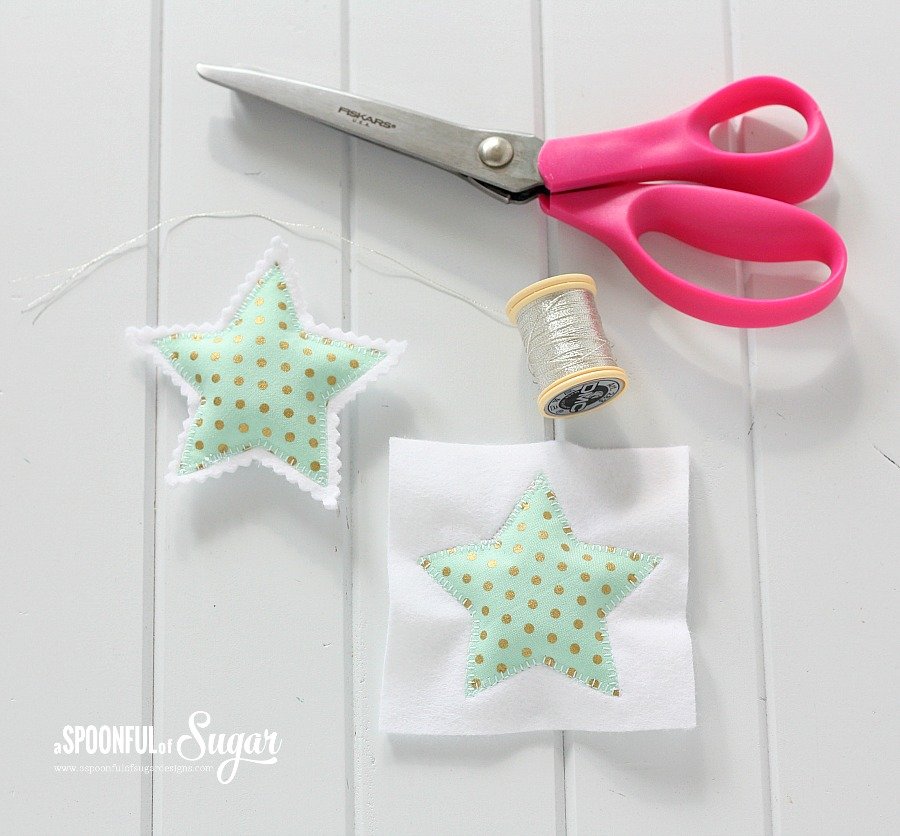
Layer the felt with the fabric appliqué shape onto a second square of felt the same size. Using your sewing machine, stitch a buttonhole stitch, around the outside of the shape, leaving a 1 inch gap in one side. Pull the felt layers apart near the gap and stuff gently with the filling. Use a chopstick to push the stuffing down inside the shape. Close the opening with some more buttonhole stitching.

Simple Christmas Decorations

Cut around the shape using pinking shears. Make a hanging loop with a length of metallic thread.

Festive Stars

The stars are a perfect match with my favourite tea set.

Simple fabric and felt Christmas decorations

If you love this post, check out Free Holiday Sewing Tutorials.

Hello! Are you new here?

If so, be sure to sign up for our newsletter here and receive a bonus sewing pattern and welcome discount. Our newsletter includes free tutorials, articles, and new patterns. Welcome to the world of sewing enthusiasts.

Filed Under: Christmas, Sewing Tutorials Tagged With: Christmas, Christmas decorations, felt, star

« Fabric Gift Pouch
A Spoonful of Sugar on Instagram »

Comments

  1. Ann says

    November 12, 2014 at 5:39 pm

    Sweet! An excellent and clever way to make a very neat stuffed star – I’ll be trying these. Thanks! 🙂

    Reply
  2. Kate says

    November 12, 2014 at 8:32 pm

    Your stars are beautiful!!! Thanks for showing how you made them.

    Reply
  3. Timi says

    November 12, 2014 at 10:21 pm

    It’s a greta idea!!! Thank you! :o)

    Reply
  4. Lily says

    November 13, 2014 at 3:07 am

    Lovely tea set… and pastels are my favourite :)) Thanks for sweet idea.
    It only bothers me that I don’t have pinking shears… ehh

    Reply
  5. Doris says

    November 13, 2014 at 5:41 am

    Great little stars. My grandgirl and I are making these next weekend 🙂

    Reply
    • A Spoonful of Sugar says

      November 13, 2014 at 9:01 am

      Thanks Doris! How lovely to have a grand daughter who shares your love of crafting!

      Reply
  6. Carla says

    November 14, 2014 at 6:14 pm

    How easy and yet how effective!

    Reply
    • A Spoonful of Sugar says

      November 15, 2014 at 9:04 am

      Thanks Carla!

      Reply
  7. Diane says

    November 18, 2014 at 6:20 am

    Adorable! Would love to know the pattern name of your delightful tea set…pretty please?

    Reply
    • A Spoonful of Sugar says

      November 18, 2014 at 7:21 am

      Thanks Fiane. It is Polka Rose by Royal Albert. My family have been buying me it for me over the past couple of years. It is such a sweet tea set:)

      Reply
      • Diane says

        November 18, 2014 at 8:30 am

        Thank you very much!

        Reply
  8. Tanya Gardner says

    November 20, 2014 at 6:47 am

    I love this ornament. It is darling! Where did you get the fabric? I would like to make these, but am having a hard time finding mint fabric with gold polka dots. Thank you!

    Reply
    • A Spoonful of Sugar says

      November 20, 2014 at 9:19 pm

      Thanks Tanya. It is Cotton and Steel Fabric which has a floral border print, but most of the fabric is mint and gold. It is by Melody Miller and part of the Mustang collection.

      Reply
  9. DADA says

    November 21, 2014 at 6:13 am

    Hello Lisa & Sarah
    Your star is so attractive and glittering
    The choice of your tissu is ideal for this project and so delicate
    I appreciate very much
    Congratulations

    Reply
    • A Spoonful of Sugar says

      November 21, 2014 at 7:32 am

      Thank you DADA! We love the fabrics with gold accents that are available at the moment.

      Reply
      • DADA says

        November 21, 2014 at 2:39 pm

        Thanks
        & Have a good day

        Reply
  10. Lily says

    December 17, 2014 at 2:19 am

    Hi, again, Lisa &Sarah
    I keep returning to these ornaments, and as I see photos I feel intrigued every time… because one star looks two-sided to me (the one lying flat) … So I keep wondering if you sewed 2 layers of felt or something… I mean there *is* a possibility of making this ornament look the same on the back, or not exactly the same,but using different print… am I right, and if so, how does one go about it? 🙂

    Reply
    • A Spoonful of Sugar says

      December 17, 2014 at 7:08 am

      Hi Lily – the back of the ornaments are plain white felt, but the two layers of felt are lightly stuffed which gives the ornaments a 3 D appearance. I guess you could add a fabric star to the back but you would need to ensure that both stars were perfectly aligned when you sewed the layers together.

      Reply
      • Lily says

        December 18, 2014 at 12:22 am

        Oh, thanks! I wasn’t reading attentively… nor looking, for that matter. So it’s *2* layers of felt before doing buttonhole stitch… Sorry 🙂 In my head there was a whole different ‘story’,.. a dilettante one, of course

        Reply
        • A Spoonful of Sugar says

          December 18, 2014 at 8:43 am

          🙂

          Reply
  11. Joy says

    April 12, 2016 at 5:06 pm

    I have just found you via Instagram and I love your work and will definitely be trying your star project. I mostly knit and crochet but I am loving your stars so sewing will be added to my crafting hobbies xx Joy xx

    Reply
    • A Spoonful of Sugar says

      May 1, 2016 at 9:35 pm

      Thanks so much Joy! Glad you found us 🙂

      Reply
  12. annie. g says

    November 4, 2016 at 4:43 pm

    merci pour cette jolie étoile

    Reply
  13. neene says

    January 9, 2017 at 12:06 pm

    Great tutorial! My 8 year old granddaughter will enjoy making these ornaments as she loves to sew with me. thanks for sharing your creative ideas with us.

    Reply
    • A Spoonful of Sugar says

      January 9, 2017 at 9:17 pm

      Thanks Neene – how fun to craft with your grand daughter!

      Reply

Leave a Reply Cancel reply

Your email address will not be published. Required fields are marked *

  • Email
  • Facebook
  • Instagram
  • Pinterest
  • Threads
  • TikTok
SUBSCRIBE TO NEWSLETTER
×

Categories

Archives

PURCHASE PDF PATTERNS

We offer over 100 affordable PDF sewing patterns available for download from our store website or Etsy store. Each pattern includes detailed instructions, numerous photos, and templates.

WEB STORE ETSY STORE

Instagram

A tiny hack that makes the cutest Bunny Coaster ta A tiny hack that makes the cutest Bunny Coaster tail — pompom trim! It’s quick, sweet, and adds the perfect little pop of texture to your spring makes.Comment BUNNY and I’ll send you the link to our Bunny Coaster pattern. It’s a favourite for Easter crafting and is available in both our Pattern Store and Etsy shop.Happy spring stitching! 🌸🐰✨#bunnycoaster #eastersewing #springsewing  #sewinghack  #sewistsofinstagram
This little Dice Bag does so much more than hold d This little Dice Bag does so much more than hold dice. Flat base, four mesh pockets, reversible design… it’s one of those clever makes you’ll use again and again.Comment DICE for the pattern link — it’s our Pattern of the Week, so it’s 25% off for the next few days.  Pattern Details: Dice and Drawstring Bag Sewing Pattern#dicebag #beginnersewing #drawstringpouch #sewingcommunity #dungeonsanddragonsdice
Small sewing projects are my favourite — quick to Small sewing projects are my favourite — quick to make, scrap‑friendly, and so handy around the sewing room. This little project is perfect for organising your tools, gifting, or keeping your supplies tidy on the go. Originally designed as a dice bag, this little pouch has so many other uses!If you love practical makes that sew up fast and get used again and again, this one’s for you.Comment DICE and I’ll send you the pattern link. This is our Pattern of the Week, so save 25% off this week only.Save this for your next weekend sewing session. ✨Pattern Details: Dice and Drawstring Bag Sewing Pattern (Available in our Pattern Store and Etsy Shop)Fabric: Tilda Jubilee range, with thanks to @tilda_australia#dicebag #sewingpattern #drawstringpouch #quicksew #beginnersewing
🍀 Feeling lucky? 🌈 Or just craving a pop of colour 🍀 Feeling lucky? 🌈 Or just craving a pop of colour? Here are some bright, happy projects to sew — perfect for St Patrick’s Day or any day you want a rainbow moment. Save this for later ✨ All patterns are available in my shop.  #sewingprojects #sewinginspiration #rainbowsewing #stpatricksdaycrafts #sewingpatterns
A tiny detail that makes the whole pouch feel more A tiny detail that makes the whole pouch feel more polished. These little end caps keep the cords neat, tidy, and just that bit more elevated — such a sweet upgrade for the Flower Power Pouch.Comment FLOWER and I’ll send you the pattern link. Save this if you love small sewing hacks. ✂️🌸Pattern: Flower Power Pouch Sewing Pattern (available in our Pattern Store and Etsy Shop).#sewingproject #sewingpattern #beginnersewing #sewistsofinstagram #sewinglove
A tiny gift bag that always gets a big reaction ✨ A tiny gift bag that always gets a big reaction ✨ The Mini Drawstring Gift Bag is one of our most loved patterns — quick to sew, beginner friendly, scrap friendly, and perfect for gifting. This sweet version is sewn in Tilda Songbird and is such a fun little make. Comment MINI for the pattern link.Pattern: Mini Drawstring Gift Bag Sewing Pattern ( available in our Pattern Srore and Etsy Shop).Fabric: Tilda Songbird. Thanks to @tilda_australia#sewingpattern #drawstringbag #scrapsewing #beginnersewing #tildasongbird
Follow on Instagram

Featured Pattern

Travel Sewing Kit Pattern

Featured Tutorial

Retro Drawstring Bag

Featured Recipe

Lemon Pound Cake

Connect

  • Email
  • Facebook
  • Instagram
  • Pinterest
  • Threads
  • TikTok
SUBSCRIBE TO NEWSLETTER
×

Popular Posts

  • Gathered Round Basket – 3 Sizes
  • Hexie Pincushion {Free Sewing Tutorial}
  • The Ultimate Resource for Vintage Haberdashery Lovers
  • Easter Projects to Sew
  • The Ultimate Guide to Drawstrings
  • Merry Little Christmas Sewing Projects
  • Tutorial: Gathered Round Basket

Copyright © 2026 Lisa. K. Cox - A Spoonful of Sugar