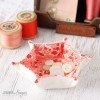
If you are like us and have some orphan charm squares in your sewing stash, you can put them to good use by whipping up some Charm Square Fabric Trays. These fabric trays are a quick beginner project. I shared photos of some that I made last week on instagram and was asked to put together some directions. These zakka style fabric trays have been in Japanese sewing magazines over the years and can be made in a variety of sizes. They are not my original design but this is my way of constructing them.
They can be made in around 10 minutes and are handy for storing all sorts of items in your sewing room or around your home. I have been using them to store wonder clips, buttons, jewellery, tea bags and more.
I used a white linen on the outside and a cotton lawn on the inside but you could use any cotton or linen fabrics.
If you would like to make one, you will need
- 5 inch square of white linen
- 5 inch square of cotton lawn (such as Liberty Tana Lawn)
- 5 inch square of cotton batting
- embroidery floss
Directions:
1. Place the batting down on a flat surface. Place the linen square on top with the right side facing upwards, then place the lawn square on top of that with the wrong side facing upwards. Make sure all straight edges are aligned and pin together. Stitch around the outside of the square using a 1/4 inch seam and leave a 1.5 inch gap on one side for turning.
2. Clip the corners and then turn out the right way through the gap. Poke out the corners and press.
3. Topstitch around the outside using a 1/8 inch seam allowance and enclosing the gap in the lining as you sew. Press. Using a hera marker, mark a 2 1/2 inch square in the middle of the tray. Stitch along the marked square to form the base. Press.
4. Fold the corners as shown in the photo below. Using two strands of embroidery thread, make a couple of stitches 1/2 inch in from each corner.
That is all there is to it. Such a simple project and would be a fun item to include in swap packages. You could also fill them with small gift items like chocolates and wrap in cellophane for a fun and useful gift item.


You can find our tutorial for a Hexagon Fabric Tray here.


Absolutely adorable and thank you for sharing!!
Thanks Kate – they are a fun project to make 🙂
Those are so adorable and I’ll be making me a few!
Happy sewing Jeannie! Thanks for stopping by.
So sweet. Love these easy little sewing projects. Thanks.
Thanks Gretchen – they are super quick and easy to make. Glad you enjoy our tutorials.
These are cute and so useful! Thank you…
Thanks Jackie! I am making more – so many uses for them 🙂
Cute idea!
Thanks heaps 🙂
What a lovely idea.
Thanks Christine! Hope you have a lovely weekend.
Love these! Such a quick project but so many things I could use them for…
Thanks Tonya – they are useful for some many items. Hope you have had a wonderful Mother’s Day.
une bien jolie idée, c’est ravissant
rose
Merci Rose 🙂
Hello dear Lisa!!
Your work always inspires me!!!!
So lovely!!
Thank you!!!!
Bela
Thanks so much Bela for your kind words! It really made my day, Lisa
So sweet! Thanks for the easy tutorial, but I’m drooling over your Liberty Tana Lawn fabric, so beautiful!!
Thanks Linda. I only recently started collecting some Liberty fabric – it is so lovely to work with.
Love using your website! Is there a sub-listing of tutes with pics and the subject? Or just an alphabetical list I can search for particular ones? Thank you!
Hi Denise – If you go to the sewing tab at the top and pull down the menu there is one called sewing tutorials. That will bring up a photo menu of all the sewing tutorials we have done. We have completed 110+ so far.
So cute! This would be a great little project for my granddaughters who have just starting sewing. Thanks for sharing.
Thanks Joan – it is the perfect beginner project. How lovely that your grand daughters are following in your footsteps.
In making a couple of these, are u sure it is a 2 1/2 ” square in the middle of the square?? I am sure that is incorrect. Looks like a 3 1/2 or 4″ square in the middle would be better. I did mine and mine looks small at 2 1/2″. I will correct this now.
Thanks for the great idea for those leftover pieces of fabric.
Hi Darlene – Yes it is 2 1/2 inches in the middle on the ones I have shown. Once the charm squares have been sewn together, they measure 4 1/2 inches. By sewing 2 1/2 inches in the middle, you have a 1 inch border around the outside which forms the sides.
Who can’t use one of these bowls they are great for any sewing room.
Thanks Linda – they certainly are handy for so many items.
If I were to make this with 10″ squares would I have a 5″ sq in the middle. Just a thought as I have some felt from a project.
It depends on the height you would like for the sides, as the square forms the base. I would suggest that a 6 1/2 inch square would work quite well for that size tray (that would give you sides of 1.5 inches in height) but you may wish to trial it and see what works best for you.
Thank you so much for this. I just made one and will put some mints in it to take to my sister. Now will make one for me. Such a neat idea and so quick.
pretty trays! I have a Craft Gossip post scheduled for later this morning that links to your tutorial:
http://sewing.craftgossip.com/?p=82521
–Anne
Thanks so much Anne! We always appreciate being featured on Craft Gossip 🙂 Enjoy your weekend, Lisa
This is so cute! It was just the item I needed for a swap extra—now I need to make some for my own use!!!! Thank you so much!!!
You’re welcome Michelle! Glad you had fun making them. Lisa
I can’t remember the website, but I saw a version of this, with a snap or velcro to attach the sides together. Then you could flatten it for travelling. When staying at a hotel, etc. you can keep personal items like keys, phone (depending on size of box), whatever, so you know where to find them.
Sounds like a great idea for travelling! Must give that idea a try next time I am going on holiday.
I was wondering if you could ModPodge these to give them a little stiffness and slickness for easy retrieval of small items.
Hi Robin – If you want to make them stronger I would suggest using a stiff interfacing int he construction. Not sure how mod Podge would work but I guess you could give it a try 🙂 Lisa
These are such a simple little make, just wondering if it’s okay to make them to fill and sell at our school market, I was thinking they’d be great to fill with hair clips for little girls!
Our tutorial are for personal use only. As you would like to make them for a school fundraiser, you are able to make some to sell but they need to be clearly labeled that they were made from a design by A Spoonful of Sugar.Thanks for your understanding.
Excellent, thank you so very much. More than happy to spread the love on this one. They really are so easy and quick to make, but look so darn cute!
I have made larger fabric trays that are similar. Thank you for sharing these charming charm square tiny trays. Uber Adorable…
Thanks Sherry – they are great in any size.
I just had to make one of these this morning – they are so cute! I posted a link on my blog. Thanks so much!
Thanks Roben – Your charm square tray looks great! Thanks heaps for linking.
I should have stopped by here last night to say thank you for your tutorial ^^
So thank you!
I was looking for something quick to give to a crafting friend I was due to meet for the first time today and your “only 10 minutes” project was perfect. So much so that, as you saw, I got slightly carried away ^^ My friend loved her little tray and I will be giving the others as little gifts to other crafting friends.
Your sweet comment has left a smile on my face 🙂 So glad the tray was a perfect project! I always like to come up with ways to use up those extra charm squares.
Fell in love with the trays and have made a dozen, plan to make more. Perfect gifts and I find more uses for them every day. Great for loose coins. I am so pleased that I found your site.
Anne
We are so glad you found us too Anne! They are so useful for all sorts if items.
Love these little trays. Was at a retreat this weekend and the sponsors made these for each of us. I’m going on a retreat later this month and will make them for the others going.
I also love the yard stick boxes. Where did you get those?
Thanks Debbie – retreats are so much fun! The boxes are from Temecula Quilt Company and are available in several sizes.
Thank you!
Thanks ever so much for posting this! What a super cute idea. I was wondering about “washing” them, in case they got dirty or maybe if you put some snack food in them. What would you suggest? Thank you!! Sue
PS I visited your site and it is filled with such great ideas and thoughts! Thank you for the effort!!
Thanks Sue. They should be fine to wash by hand. I would then suggest that you press them into shape when they have dried using an iron and some spray starch. Happy sewing!
I am definitely going to be making a few of these tests.
Do you think by applying modge podge to the entire tray would make it easier to wipe clean? Or would it ruin it’s integrity?
Just a thought.
Trays, I will be making trays….ha ha. Who wants to make a test?? Ay crumba!
I have just seen this tutorial on Pinterest, they will be going on my present making list for Christmas. x
Thanks Kay! They are a fun and quick little make.
Lovely to make ?? Charm Square Trays.
Thanks Sandy 🙂
I’ve been browsing your blog for years but this is the first project I actually make. I used leftovers from my latest quilt and embroidered the outside with feath stitch. No more bits of cut thread everywhere around my sewing machine, now they’ll go in the tiny tray and it’ll all be tidy!
Thanks for this tutorial, it was super quick and easy and the result is adorable.
Thanks Mathilde – your tray sounds lovely! Best wishes for a happy and creative 2017.
Thank you for this lovely tutorial, I’m going to make for Easter gifts and fill with chocolates 😊
Thanks Colleen – Have a wonderful Easter.
I made these for all my friends for travel and used velcro in the corners instead of floss and they fold flat to tuck in any corner.
Velcro sounds like an inspired idea – perfect for travelling!
These are adorable! I made a bunch for my sewing and crafting friends yesterday. Thank you!
These are just beautiful and useful for quick gifts.
Would you please advise what batting is best for these?
Thank you.
(PS: I’m a newbie sewer, as you can probably tell from my question!) 🙂 🙂
These look similar to some dice rolling traysI’ve seen people using as of late. With some tinkering (adding snaps at the corners to make them collapsible, as the ones I’ve seen are, and maybe making them stiffer), I can see these working!
Hi there
Your site is wonderful. My question is how to hand stitch the corners without having a knot show. I’m having trouble tying off. My threads look a bit ratty. Thanks!
Muchas gracias, muy lindo
I am fairly new to sewing anything. I came across your tray instructions and it seems to be a nice way to ease into projects. Thank you for sharing your Pattern .