A Spoonful of Sugar

Make. Bake. Create.

Menu
  • Home
  • About
    • About Us
    • Press
    • FAQ
    • Disclosure Policy
    • Contact Us
  • Crafts
    • Crochet
    • DIY
    • Embroidery/Cross stitch
    • Gift Wrapping
    • Knitting
    • Miscellaneous
    • Paper Crafts
  • Holidays
    • New Year’s
    • Australia Day
    • Back to School
    • Valentines Day
    • Easter
    • ANZAC Day
    • Mother’s Day
    • Father’s Day
    • Halloween
    • Christmas
  • Recipes
    • Appetizers
    • Bars & Slices
    • Bread & Pastries
    • Cakes
    • Cookies
    • Confectionery
    • Cupcakes & Muffins
    • Desserts
    • Drinks
    • Ice Cream
    • Jams/Preserves
    • Main Meals
  • Sewing
    • Sewing Tutorials
    • Quilting
    • Sewing & Quilting Patterns
  • Family
    • Back to School
    • Family Fun
    • Our Home
    • Parenting
    • Travel
  • Shop
    • Pattern Store
    • Etsy Store

Hexie Pillowcase

September 14, 2013 By A Spoonful of Sugar - 27 Comments

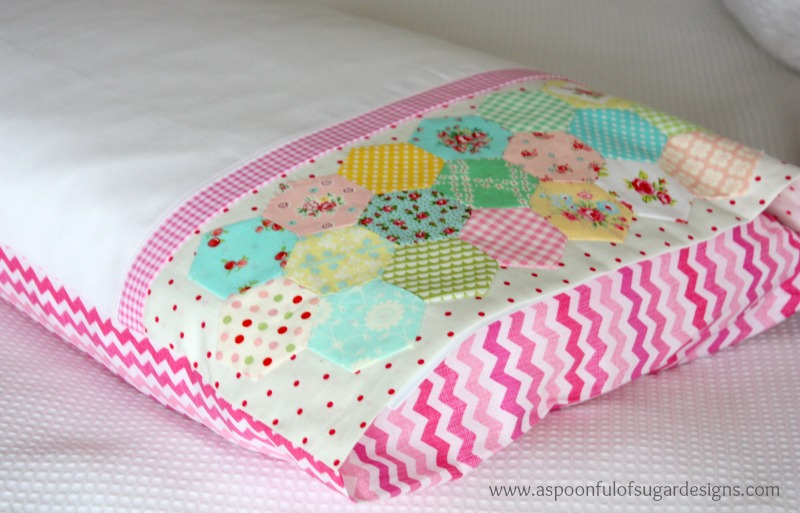
Remember the hexies I was making last weekend? They have now been incorporated into a Pretty Pillowcase.   Using pretty florals, ginghams, and polka dots in shades of pink, blue, yellow, and green, I made 22 Hexies. They were hand stitched onto the cuff of the pillowcase to add old world charm. This is a fun scrap buster project and makes a pretty pillowcase which would look sweet on an iron bed, topped with a pretty quilt to match. I am going to make up a stack of these hexie pillowcases to give as Christmas gifts.

The pillowcases are sized at 28 1/2 x 18 1/2 inch ( to fit a standard Australian pillow).

Materials:

  • 22 Hexagon papers that are 1 1/4 inch on each side
  • Assorted fabric scraps in florals, ginghams, polka dots (hexies)
  • Pink polka dot fabric – 19 x 17 inch (pillowcase cuff)
  • Pink gingham fabric – 19 x 2 1/2 inch (pillowcase cuff)
  • White homespun – 19 x 21 inch (pillowcase front)
  • Pink Chevron fabric – 19 x 35 1/2 inch(pillowcase backing)

Method:
1. Make 22 hexagons. Stitch together in three rows as shown. Press. Remove the papers and basting stitches, Press.

2. Fold the pink polka dot fabric in half, lengthwise. Position the hexagon panel so that it is 1/2 inch from the folded edge. Pin in place through one layer. Hand stitch in place.

3. Continue to make the pillowcase following the steps shown in our Pretty Pillowcase tutorial. 

The pillowcase features an internal flap to hide the pillow from view.

The Hexie Pillowcase is a variation of our Pretty Pillowcase tutorial which you can find here.

Check out our other Hexagon projects:
Hexagon Table Runner
Boutique Baby Bibs

Filed Under: Our Home, Sewing, Sewing Tutorials Tagged With: gifts, hexies, home décor, patchwork

« Hexies
{Book Review} Hoop-La – 100 Things to do with Embroidery Hoops »

Comments

  1. Linda says

    September 14, 2013 at 4:02 am

    oh wow this is so beautiful I love it so much

    Reply
  2. Pam @Threading My Way says

    September 14, 2013 at 5:51 am

    Very pretty… pinning this one!

    Reply
  3. Heleen Groot says

    September 14, 2013 at 6:35 am

    Thank you for this pattern. It looks adorable! I made 100 1,5″ hexies for practise…. I think I just found a way to use them!

    Reply
  4. Annerose says

    September 14, 2013 at 9:06 am

    Das sieht ja super schön aus, danke für die Anleitung.
    Liebe Grüße Annerose

    Reply
  5. CuteStuffInside says

    September 14, 2013 at 9:36 am

    That is pretty!

    Reply
  6. SIMPLESEW says

    September 14, 2013 at 9:46 am

    very lovely

    Reply
  7. freuleinmimi says

    September 15, 2013 at 12:50 am

    It looks great …. sleep well 🙂 I do with mine.
    Greetings from Switzerland, mimi

    Reply
  8. KaHolly says

    September 15, 2013 at 3:09 am

    So sweet and delicate looking!! Thank you so much for the instructions!!

    Reply
  9. ~Carla~ says

    September 15, 2013 at 5:53 am

    Beautiful!!! 🙂 Everything you make is gorgeous though!

    Reply
  10. Susanna Di Milo says

    September 16, 2013 at 2:05 am

    so gorgeous, beautiful colour combinations and so pretty.

    Reply
  11. Maríamanual says

    September 16, 2013 at 7:51 am

    Very beautiful.

    Reply
  12. Thimbleanna says

    September 17, 2013 at 7:14 am

    It’s Beautiful Lisa!

    Reply
  13. Mrs. Lucky says

    September 18, 2013 at 8:15 pm

    Since you posted this tutorial, it has been on my to-do list as I just fell in love with it! It was a nice surprise to see it featured on Craftgossip as well. It is just wonderful, I love it!

    Reply
  14. Gutukas says

    September 20, 2013 at 11:44 am

    Very beautiful and subtle and useful 😉 thanks 😉

    Reply
  15. Karen says

    September 20, 2013 at 3:58 pm

    The pillowcase is gorgeous! I have loads of hexies…so all I need is a few new pillowcases to sew them onto. What great Christmas gifts they will be. Thanks for the good idea!

    Reply
  16. stitchnsewcreates says

    September 24, 2013 at 12:32 am

    Thank you for this you have given me the perfect idea. I was looking for a project to make my nieces using pj’s of my late mother’s I’ve kept. I also get to satisfy my hexie fixation at the same time. Thanks again.

    Reply
  17. Marla's Crafts says

    January 1, 2014 at 5:13 pm

    That is beautiful. Love the colors. Another great idea. I will have to put that in my favorites. Thanks for showing.

    Reply
  18. Connie Rodriguez says

    March 17, 2014 at 2:41 am

    What a beautiful pillow case, the hexies are so cute. A great idea and it would make a nice gift. Thanks for sharing and the tutorial

    Reply
    • A Spoonful of Sugar says

      March 18, 2014 at 7:02 am

      Thanks Connie.

      Reply
  19. lisa says

    July 5, 2015 at 1:27 am

    Always SO pretty & cheerful..

    excellent..

    I prefer to call them Pillow Slips….. (retro 🙂

    Reply
    • A Spoonful of Sugar says

      July 5, 2015 at 9:16 am

      Thanks Lisa – I think Pillowcase is an Aussie word – Pillowslip does sound more appealing 🙂 Have a great weekend!

      Reply
  20. Judy says

    January 16, 2019 at 9:53 pm

    I just found this post and love the idea!
    When you attach the hexi panel, are you only stitching it yo the pillowcase on the outside edges?

    Reply
    • A Spoonful of Sugar says

      January 27, 2019 at 9:25 am

      That is correct Judy – the hexie panel is just stitched to the front, outer section of the pillowcase.

      Reply

Leave a Reply Cancel reply

Your email address will not be published. Required fields are marked *

  • Email
  • Facebook
  • Instagram
  • Pinterest
  • Threads
  • TikTok
SUBSCRIBE TO NEWSLETTER
×

Categories

Archives

PURCHASE PDF PATTERNS

We offer over 100 affordable PDF sewing patterns available for download from our store website or Etsy store. Each pattern includes detailed instructions, numerous photos, and templates.

WEB STORE ETSY STORE

Instagram

Sewing isn't just stitches - it's life lessons. Wa Sewing isn't just stitches - it's life lessons. Want to see all 12 lessons? Comment LESSON and I'll send you the link to our free blog article.Quilting is more than just a creative pastime- it's a journey filled with valuable  life lessons. Whether you're a beginner or an experienced quilter, the process teaches persistence, patience, problem solving and self-expression.Read our article to discover all the lessons you can learn. What has quilting taught you? Share your most important lesson in the comments.Love the pillow designs in this post? Find my sewing patterns in my Pattern Store - link in profile.#sewingpatterns #DIYhomedecor #quiltedpillow #handmadehome #sewingproject #scrapbuster #sewingforfun #beginnersewing
Introducing my latest make—the Dresden Needleboo Introducing my latest make—the Dresden Needlebook! ✂️💖This little beauty is practical, charming, and packed with personality. For this version, I dove into my stash of small Japanese florals, mainly from the fabulous Atsuko Matsuyama, pairing a pink and aqua Dresden plate with a bright yellow center for a pop of cheer. The base? Sweet polka dots, finished with aqua gingham binding for a classic touch!Inside, I added fruit labels and appliqués for extra charm, and the felt pages (in a stunning pink wool felt!) keep pins and needles neatly in place. Plus, with two internal pockets, there’s space for all those little sewing essentials.The Dresden Needlebook has been one of my most-loved patterns this year! Want the pattern? Comment DRESDEN below, and I’ll send you a DM with the link! 🧵✨What are you sewing this week?#sewingpatterns #modernquilting #ʜᴀɴᴅᴍᴀᴅᴇᴡɪᴛʜʟᴏᴠᴇ #sewmuchfun #diycrafts #sewingaddict #creativemaker #sewinginspiration #fabriclover
Calling all pet lovers 🐾The Dog Paw Coaster P Calling all pet lovers 🐾The Dog Paw Coaster Pattern is perfect for your morning coffee or as a cute gift for a fellow dog lover! In my reel I'm showing the final steps of construction, trimming with pinking shears and turning the coaster right side out.Want the pattern? Comment PAW and I'll send you a DM with the link.This pattern is great to practice strip piecing and basic raw edge applique. You can quickly and easily make them  from your scraps.#dogpawcoaster #doglover #sewcute #sewfun #scrapsewing #giftstosew #sewsewsew #creativelife #makerlife #doglife
Roll in style with a DIY Dice Tray. 🎲Keep you Roll in style with a DIY Dice Tray. 🎲Keep your dice contained and rolling smoothly with this quick and easy fabric tray. Made from charm squares (5 inch precuts), this beginner friendly project is a fantastic scrap buster - perfect for your favourite fabric leftovers.🌟 Dice trays are great for game nights, RPG adventures, and tabletop fun.🌟 Make a matching Dice bag using our Dice and Drawstring (DnD Bag) Pattern - available in our Pattern Store and Etsy Shop ( store links in our profile).Want to make your own Dice Tray? Comment DICE for a link to the free tutorial and start making your custom Dice Tray today.#dicetray #sewingfun #sewingtutorial #gamenightessentials #beginnersewing #tabletopaccessories #dragonmaster #handmadegaming
DIY Bias Tape - the perfect finishing touch! ✨️Making your own bias tape is a game changer. With custom colours, quality fabrics, and endless possibilities, homemade bias tape takes your project to the next level.✂️ Start by cutting bias strips - cut on the diagonal for endless flexibility.
🪡Join the strips with a diagonal seam to keep length continuous.
🎀 Use a bias tape maker to fold and press the fabric with a hot iron.
🧵 Wrap the tape around a bobbin for easy storage.
🌟 Use the tape to enclose raw edges on items like pot holders, placemats, and Blossom Oven Mitt for a professional finish.Save this post as reminder for next time - there is nothing better than perfectly matched bias tape made just for your project.#diybiastape #handmadefinishes #sewinghacks #sewingtips #quiltinglife #sewhandmade #blossomovenmitt #sewingproject #fabricaddict
Looking for a quick, practical, and beginner frien Looking for a quick, practical, and beginner friendly sewing project? These reusable makeup pads are easy to make and are also great alternative to single use cotton rounds. Sew up a set using soft fabrics from your stash, and enjoy a gentle, eco- friendly addition to your skincare routine.Best part? This pattern is free! Comment MAKEUP below and I'll send you a link to the free pattern.What is your favourite ecofriendly item to sew?#freesewingpattern #ecosewing #sewpractical #giftstosew #beginnersewing #scrapsewing #quicksew
Follow on Instagram

Featured Pattern

Travel Sewing Kit Pattern

Featured Tutorial

Retro Drawstring Bag

Featured Recipe

Lemon Pound Cake

Connect

  • Email
  • Facebook
  • Instagram
  • Pinterest
  • Threads
  • TikTok
SUBSCRIBE TO NEWSLETTER
×

Popular Posts

  • Easter Baskets to Make
  • Liberty Tissue Cover
  • Pretty Liberty Drawstring Pouch
  • Bunny Egg Cosy Tutorial
  • Bunny Coaster
  • Sewing with Liberty Fabric
  • {Back to School} Tissue Cover

Copyright © 2025 Lisa. K. Cox - A Spoonful of Sugar