BB 20";padding-right:7px;padding-right:.7rem}.sidebar ul>li:last-child{margin-bottom:0}.sidebar .widget{margin-bottom:20px;margin-bottom:2rem}.post-stats{font-size:9px;font-weight:700}@media only screen and (-webkit-min-device-pixel-ratio:1.5),only screen and (-moz-min-device-pixel-ratio:1.5),only screen and (-o-min-device-pixel-ratio:3/2),only screen and (min-device-pixel-ratio:1.5){.header-image .site-header .wrap{background:url(/wp-content/themes/foodie/images/logo@2x.png) no-repeat top left;background-size:320px 136px}}@media only screen and (max-width:1139px){.header-image .title-area{width:50%}.site-inner,.wrap{max-width:960px;overflow:hidden}.content{width:620px}.genesis-nav-menu a{padding:16px;padding:1.6rem}.sidebar-primary,.title-area{width:300px}}@media only screen and (max-width:1023px){.content,.sidebar-primary,.site-inner,.title-area,.wrap{width:100%}.header-image .title-area{height:150px}.site-inner{padding-left:5%;padding-right:5%}.entry,.sidebar .widget,.site-header{padding:0}.genesis-nav-menu li{float:none}.genesis-nav-menu,.site-description,.site-header .title-area{text-align:center}.site-title{height:120px;margin:6px 0 0}}@media only screen and (min-width:941px){.nav-primary{display:block!important}}@media only screen and (max-width:940px){.menu-toggle span{border-top:1px solid #777;border-bottom:1px solid #777;display:block;visibility:visible;text-align:center;margin:0 auto}.menu-toggle span a{display:block;color:#333;font-size:12px;font-size:1.2rem;letter-spacing:2px;letter-spacing:.2rem;line-height:1.5;padding:16px 0;padding:1.6rem 0;text-transform:uppercase}.nav-primary{display:none}.nav-primary .genesis-nav-menu{border-top:medium none;margin-bottom:-1px;padding-bottom:1px}.nav-primary .genesis-nav-menu .menu-item{display:block}.nav-primary .genesis-nav-menu a{border:none;border-bottom:1px solid #9d9d9d;padding:15px 5%;padding:1.5rem 5%;width:100%}.genesis-nav-menu .sub-menu{left:0;margin:0;opacity:1;position:relative;width:100%}.nav-primary .genesis-nav-menu .sub-menu a{padding:15px 8%;padding:1.5rem 8%}}@media only screen and (max-width:480px){.header-image .site-header .wrap{background:url(/wp-content/themes/foodie/images/logo-480.png) no-repeat top left;background-size:320px auto;margin:4px 0 0}.header-image .title-area{height:80px}}.entry-time{display:none}.entry-header .entry-meta{display:none}.entry-title{margin-bottom:11px}.header-image .site-title a{background-image:url("https://aspoonfulofsugardesigns.com/wp-content/uploads/2024/11/A_Spoonful_of-_Sugar-Logo.svg");margin-top:-28px;margin-bottom:10px;background-repeat:no-repeat;min-height:160px}:root{--wpforms-field-border-radius:3px;--wpforms-field-border-style:solid;--wpforms-field-border-size:1px;--wpforms-field-background-color:#fff;--wpforms-field-border-color:rgba(0,0,0,.25);--wpforms-field-border-color-spare:rgba(0,0,0,.25);--wpforms-field-text-color:rgba(0,0,0,.7);--wpforms-field-menu-color:#fff;--wpforms-label-color:rgba(0,0,0,.85);--wpforms-label-sublabel-color:rgba(0,0,0,.55);--wpforms-label-error-color:#d63637;--wpforms-button-border-radius:3px;--wpforms-button-border-style:none;--wpforms-button-border-size:1px;--wpforms-button-background-color:#066aab;--wpforms-button-border-color:#066aab;--wpforms-button-text-color:#fff;--wpforms-page-break-color:#066aab;--wpforms-background-image:none;--wpforms-background-position:center center;--wpforms-background-repeat:no-repeat;--wpforms-background-size:cover;--wpforms-background-width:100px;--wpforms-background-height:100px;--wpforms-background-color:rgba(0,0,0,0);--wpforms-background-url:none;--wpforms-container-padding:0px;--wpforms-container-border-style:none;--wpforms-container-border-width:1px;--wpforms-container-border-color:#000;--wpforms-container-border-radius:3px;--wpforms-field-size-input-height:43px;--wpforms-field-size-input-spacing:15px;--wpforms-field-size-font-size:16px;--wpforms-field-size-line-height:19px;--wpforms-field-size-padding-h:14px;--wpforms-field-size-checkbox-size:16px;--wpforms-field-size-sublabel-spacing:5px;--wpforms-field-size-icon-size:1;--wpforms-label-size-font-size:16px;--wpforms-label-size-line-height:19px;--wpforms-label-size-sublabel-font-size:14px;--wpforms-label-size-sublabel-line-height:17px;--wpforms-button-size-font-size:17px;--wpforms-button-size-height:41px;--wpforms-button-size-padding-h:15px;--wpforms-button-size-margin-top:10px;--wpforms-container-shadow-size-box-shadow:none}.css-button{font-family:Arial,Helvetica,sans-serif;color:#fff;font-size:14px;border-radius:5px;background-color:#80ceca;display:flex;align-items:center;margin:18px auto 0 auto;width:285px}.css-button-icon{padding:7px 10px 10px 22px}.css-button-icon svg{vertical-align:middle;position:relative}.css-button-text{padding:12px 20px 12px 0}.modal{display:none;position:fixed;z-index:999;padding-top:100px;left:0;top:0;width:100%;height:100%;overflow:auto;background-color:#000;background-color:rgba(0,0,0,.4)}.modal-content{background-color:#fefefe;margin:80px auto;padding:20px;width:810px}@media only screen and (max-width:810px){.modal-content{width:400px}}.close{color:#aaa;float:right;font-size:28px;font-weight:700}body{top:0!important}@media screen{#simple-social-icons-4 ul li a{background-color:#7cddd2!important;border-radius:30px;color:#fff!important;border:0 #fff solid!important;font-size:16px;padding:8px}}
One of the many things we love about Christmas is having family from interstate come to stay with us. We love to create a welcoming guest room. This year we freshened up the guest bed with some pretty new pillowcases. They are so easy to run up and were a great way to use some of the pretty florals and polka dot fabrics from the Vintage Modern range we had in our stash.
The Pillowcase is white with a contrasting double thickness cuff on the front, and an internal flap to hide the pillow from view. You can mix and match your favourite prints to make a colourful range of bed linen. It is a nice way to jazz up your bedroom, and they would make a lovely Christmas gift – for friends and family, young and old.
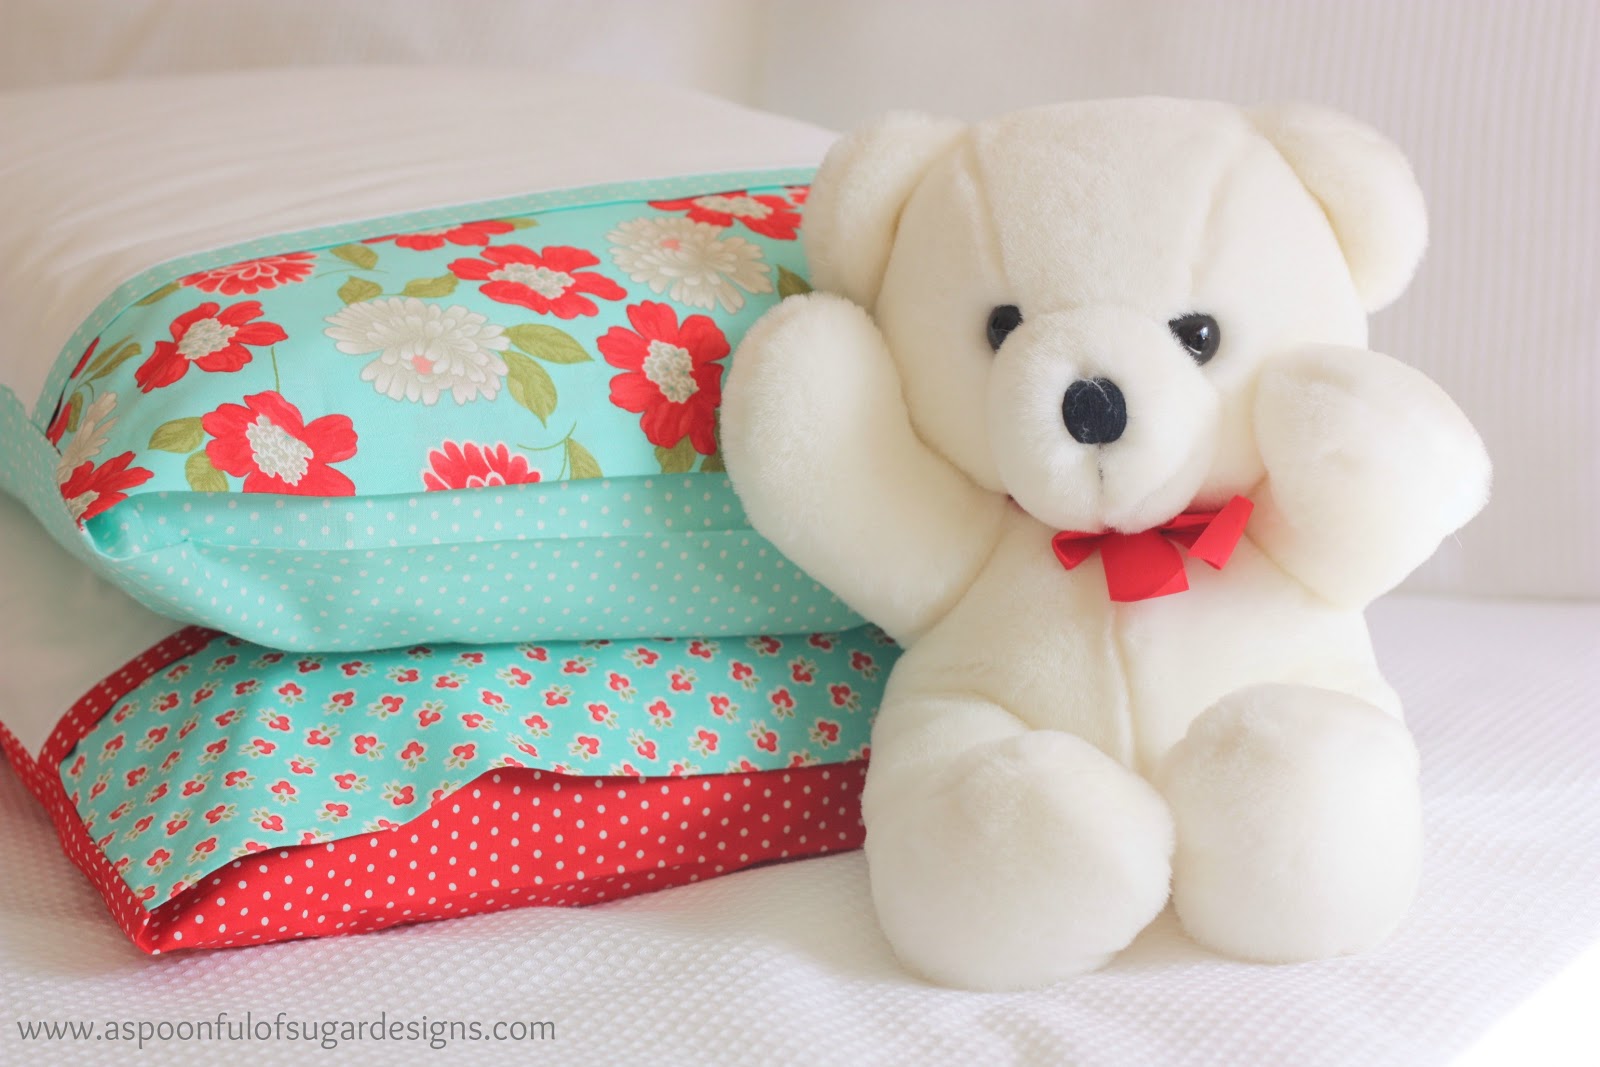
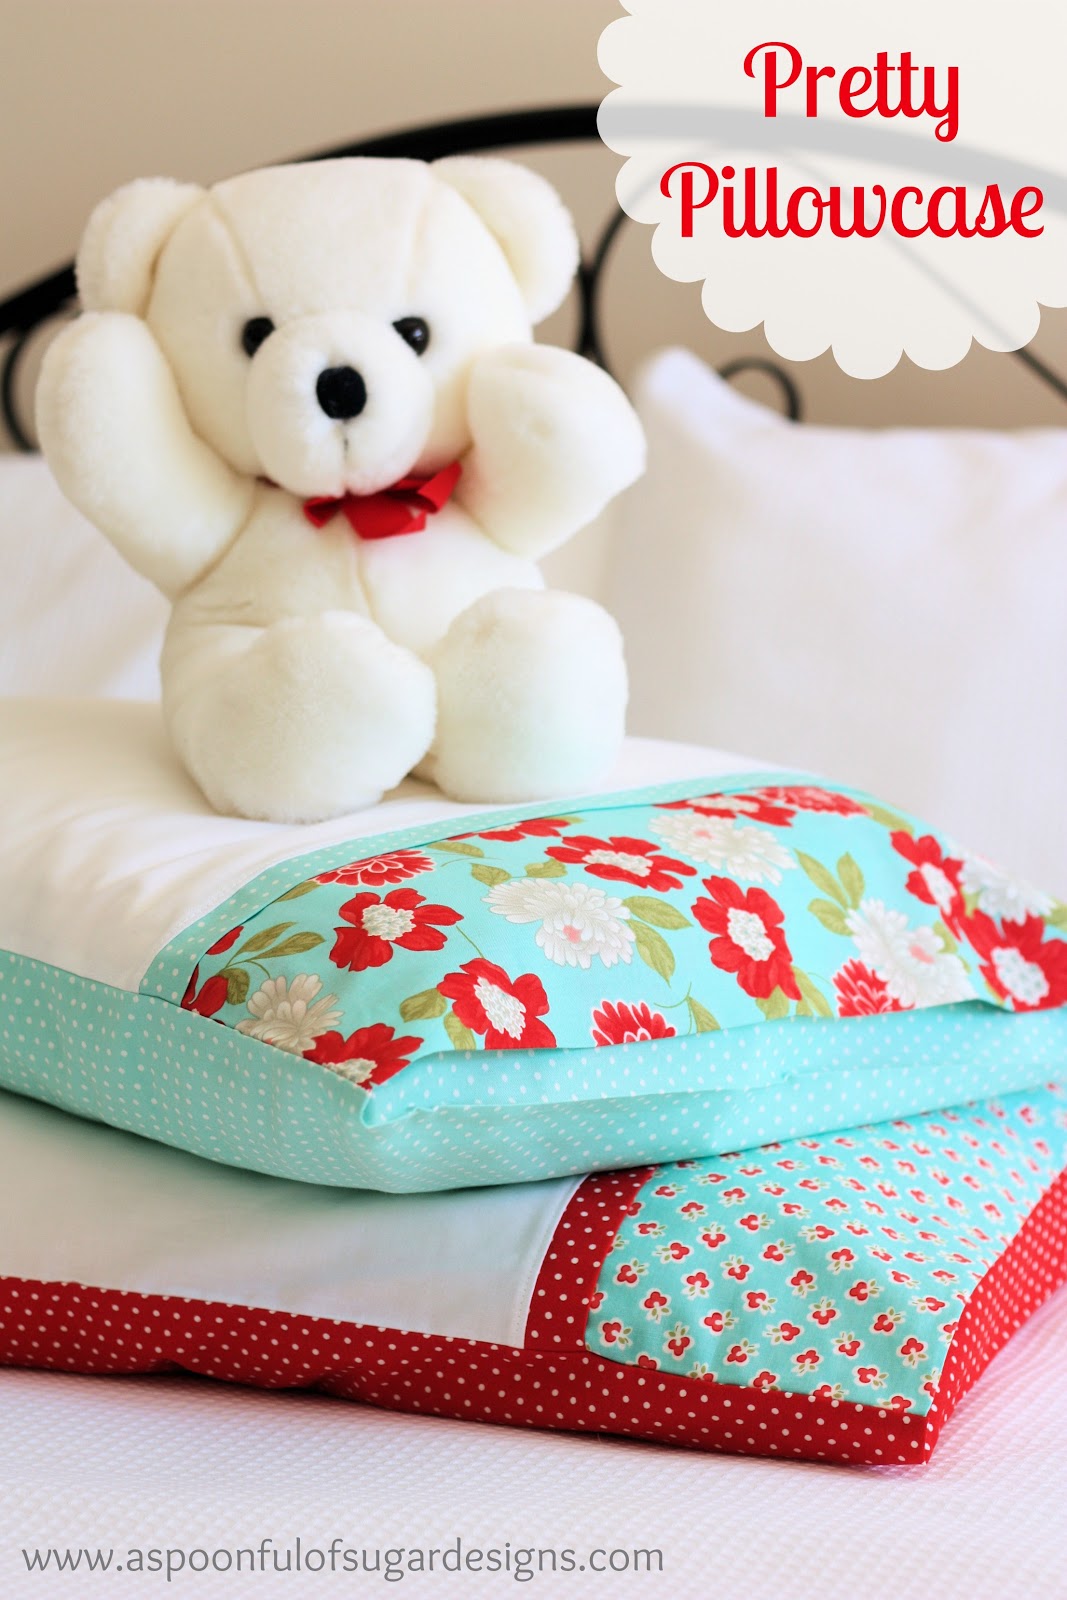
Finished Pillowcase Size: 28 1/2 x 18 1/2 inches (This is sized to fit a standard Australian pillow. Check your pillow size if you live elsewhere and adjust accordingly).
Materials:
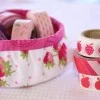
Pillowcase Front: 19 x 23 inches (white homespun)
Pillowcase Cuff: 19 x 13 inches (floral); and 19 x 2 1/2 inches (polka dot)
Pillowcase Back: 19 x 35 1/2 inches (polka dot)
Method:
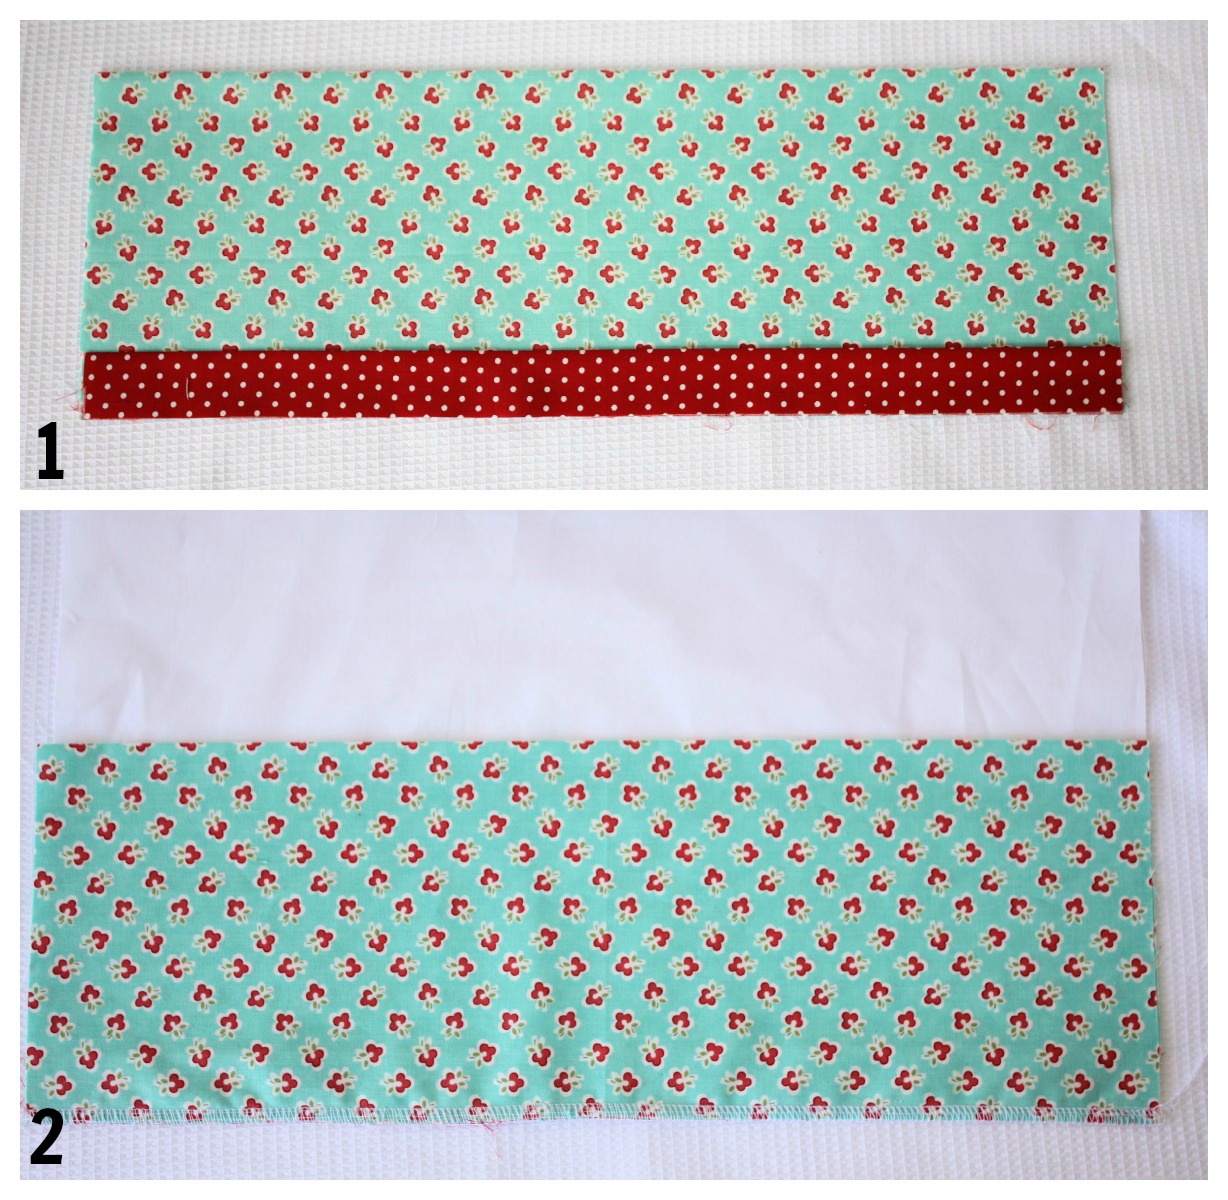
1. Press both fabrics for the pillowcase cuff in half lengthwise, with wrong sides facing. Place the folded dot strip, on top of the folded floral strip, with the raw edges aligned. Baste together.
2. Lay out the pillowcase front with right side facing upwards. Place the cuff on a short edge, so that the right sides are facing and the raw edges are aligned. Pin in place. Stitch the cuff to the pillowcase front. Overlock (serge) the raw edges.
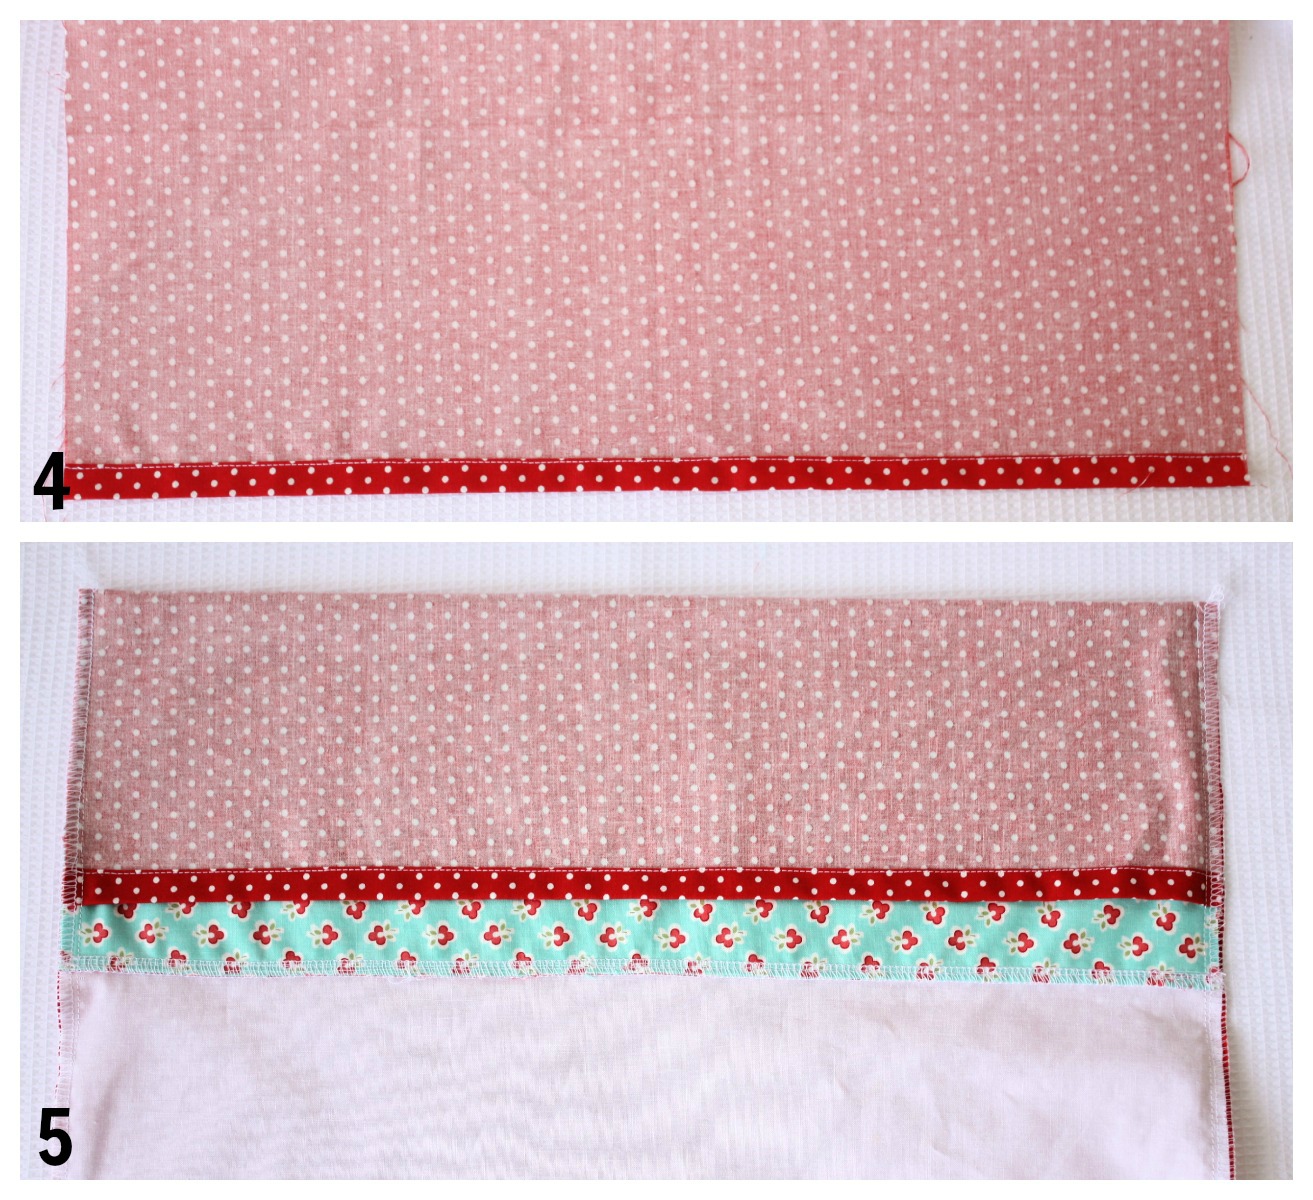
3. Press the cuff. Topstitch 1/8 inch from seam.
4. Take the pillowcase back panel. To create a hem, fold over 1/2 inch along a short edge. Press. Fold up another 1/2 inch. Press. Stitch in place.
5. Lay the pillowcase front on top of the pillowcase back with the right sides facing, and the short, unfinished edges aligned. Pin in place. To create the flap, fold the hemmed edge of the pillowcase back, back over the cuff. Pin in place. Stitch along the two long sides and the short edge. Overlook raw edges. Turn pillowcase out the right way, and press.
We will be making more pillowcases – they really are a quick project!
I remember when my teens were in primary school. One summer holidays, I took them to a fabric store to pick out three fabrics each for a pillowcase to match their bedrooms. It was a great first sewing project for them, with lots of straight seams.They were so proud to use their new pillowcase that night.
Thanks to our sponsor, XO Gigi Fabrics for supplying the fabric for this project.
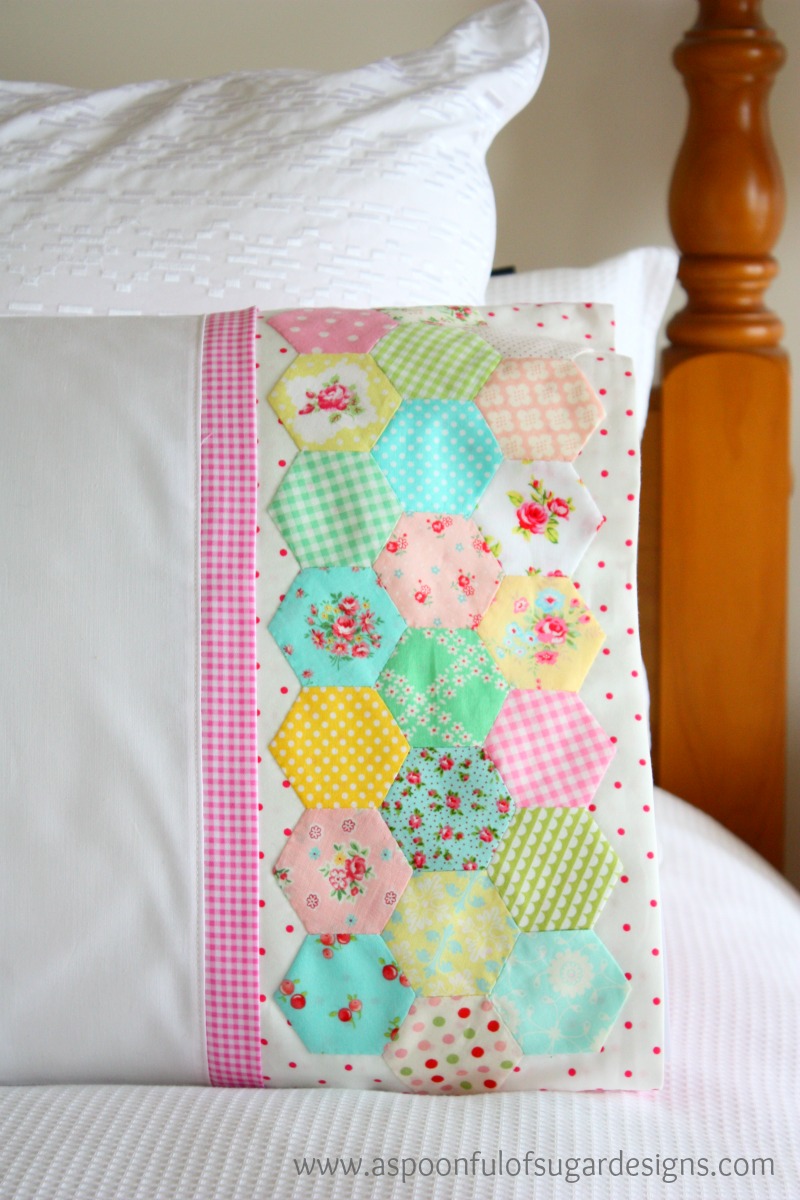
Check out our Hexie Pillowcase, which is a variation of this tutorial. Full details over here.
If you enjoyed this project, check out our tutorial for a Santa Sack – it is made from a pillowcase with a handy drawstring feature, so it can double as a Santa Sack for those difficult to wrap presents.
If you enjoyed this tutorial, please consider sharing it 🙂
I love your pillowcases! Whilst they would be delightful for my nieces, I think I will be making some for me with left over fabric from some of the quilts which I have stashed to make for my new bed.
Thank you so much for the great tutorial! I am working on a pillow case for my son right now. 🙂 Very excited when he will get it for Christmas! I love you blog so much! You are really inspiring! Thank you so much for sharing your crafs!
Great tutorial, thank you so much. I’ve adjusted the measurements to fit smaller, square size and I’ve just finished two pillowcases for a Christmas gift to Grandma.
I just made four of these in one sitting!! WOW! Loved how fun it was to mix and match the fabrics. I was able to use some smaller pieces of fabric that most pillowcase patterns were too big for! Thanks so much!
I made something like these for my family for Christmas and they loved them. I plan on making some of these too using some calico prints quilting fabric, also team fabric would do great too. I think I can adjust the newspaper pattern I made from a kit to work on this pattern. By the way these and the others I have and will make are great fun to do. I am sure these will be just as big a hit as my other ones were. Thank you so much for this pattern.
I made a cuff on the top of the sheet to match with the flowered as the main piece and the poka dot as the small 1.2 inch trim between the main sheet and the cuff used 12 inches folded in half with a hem turned under on both sides making it 4 inches over the normal hem that is on all sheets. Tucked a folded piece of the Poka dot with about 1/2 inch showing below the hem of the main trim. Really made the bed cute for visitors
I love how you finished the end, so that the pillow can’t be seen. I am going to have to try that technique. I also love your Hexie Pillowcase. It’s beautiful!
My friend shared your tutorial with me. Just made my first set…and it will not be my last. Nicest pillowcases ever, and they go together so beautifully! Thanks for sharing this tutorial!
Thanks for the tutorial. I, too, love the little inside flap. I adjusted the measurements for a toddler pillow to match a little quilt that I made. This will be my go to pillowcase pattern.
I made your pillows and featured them on my blog last week. So easy and turned out great. Today I adapted your pillows to a smaller size for my granddaughters and posted them on my blog. Thank you so much for your inspiration and tutorial!
I think I’m going to make pillow sacks to place clean sheet sets in and also they would be great for laundry bags in the kids rooms…. could use applique letters for whites and darks, could also use them as toys bags.
The measurements for a larger pillowslip would be:
20.5 inches x 29 inches for white homespun
20.5 x 15 inches for floral cuff
20.5 x 2.5 inches for polka dot cuff
20.5 x 43 inches for pillowslip back
This will be a firm fit on a kingsize pillow. If you want it a bit roomier, just add another 1/2 – 1 inch to each dimension. You may wish to make a sample one out of an old sheet first to check the sizing is to your requirements.
I just used this pattern to make a Christmas pillowcase tonight and it turned out great
I’m planning To make more for my nieces and nephews, but would like to personalise them with their name down the side on the cuff. Do you have any suggestions on what to bring use? Eg iron on transfers
these are called ‘housewife’ pillow cases. the frugal way to make them would be to cut across the fabric, as opposed to lengthwise, though I can see that you cut lengthwise to make use of the pleated border. Thank you for the beautiful pictures and the detailed tutorial!
Oh I hope I can find time to try some of these….
Oh how cute!! :o)
The pillowcases are so pretty. Lucky guests!
Pillowcases always make for great gifts to giveaway!! Love the bright colors 🙂
Angelina
I love your pillowcases! Whilst they would be delightful for my nieces, I think I will be making some for me with left over fabric from some of the quilts which I have stashed to make for my new bed.
Love the cuff and the fabric. Thanks
Thank you so much for the great tutorial! I am working on a pillow case for my son right now. 🙂 Very excited when he will get it for Christmas!
I love you blog so much! You are really inspiring! Thank you so much for sharing your crafs!
Where did you get the bear? Nice pillow cases, by the way!
The Bear was given to Sarah as a baby gift nearly 16 years ago:)
I love the pcases you made and want to make my own. Also, I have several great thrift-store pcases I will ise to make the sacks. Much thanks!
Great tutorial, thank you so much. I’ve adjusted the measurements to fit smaller, square size and I’ve just finished two pillowcases for a Christmas gift to Grandma.
Thank you so very much for sharing this tutorial with us.
Just beautiful. I can hardly wait to start making.
Hugs Lynne from OZ
I just made four of these in one sitting!! WOW! Loved how fun it was to mix and match the fabrics. I was able to use some smaller pieces of fabric that most pillowcase patterns were too big for! Thanks so much!
I made something like these for my family for Christmas and they loved them. I plan on making some of these too using some calico prints quilting fabric, also team fabric would do great too. I think I can adjust the newspaper pattern I made from a kit to work on this pattern. By the way these and the others I have and will make are great fun to do. I am sure these will be just as big a hit as my other ones were. Thank you so much for this pattern.
I am sharing this on my site tomorrow on my DIY Mothers Day Gift Guide, and I can’t wait to make some for myself! Thanks for the great tutorial!
Just the inspiration I needed! Straight on ebay for fabric to co-ordinate with current theme …..now just waiting for the postman to arrive.
I made a cuff on the top of the sheet to match with the flowered as the main piece and the poka dot as the small 1.2 inch trim between the main sheet and the cuff
used 12 inches folded in half with a hem turned under on both sides making it 4 inches over the normal hem that is on all sheets. Tucked a folded piece of the Poka dot with about 1/2 inch showing below the hem of the main trim. Really made the bed cute for visitors
I have recently made my second set of these pillowcases, I love them!
I made a blog post about a cushion cover I made to match and linked to this tutorial 🙂
http://parttimeladyofleisure.blogspot.com.au/2014/01/bunting-cushion.html
What a great tutorial. I have seen lots of pillowcase tutorials but these have the flap to hide the pillow, so are better by far. Thanks for posting.
Son preciosas estas fundas de almohada.
I love how you finished the end, so that the pillow can’t be seen. I am going to have to try that technique. I also love your Hexie Pillowcase. It’s beautiful!
Thanks Grace 🙂 I do like pillowcases with the internal flap – so much nicer than seeing the pillow itself.
They are so beautiful.
Thanks Nella.
My friend shared your tutorial with me. Just made my first set…and it will not be my last. Nicest pillowcases ever, and they go together so beautifully! Thanks for sharing this tutorial!
Thanks Cheryl – glad you enjoyed making them. It is fun to co-ordinate the different fabrics.
Thanks for the tutorial. I, too, love the little inside flap. I adjusted the measurements for a toddler pillow to match a little quilt that I made. This will be my go to pillowcase pattern.
Thanks Maria – your toddler pillow sounds like a fun addition to a quilt gift.
I made your pillows and featured them on my blog last week. So easy and turned out great. Today I adapted your pillows to a smaller size for my granddaughters and posted them on my blog. Thank you so much for your inspiration and tutorial!
Love your pillows Kathy! Glad you enjoyed our tutorial.
I think I’m going to make pillow sacks to place clean sheet sets in and also they would be great for laundry bags in the kids rooms…. could use applique letters for whites and darks, could also use them as toys bags.
Great ideas Kathy!
I love your pillowcase tutorial and am anxious to make some for my king size bed pillows.
Would you be able to help me with the dimensions for king size pillows? I really don’t want to cut my fabric pieces too small.
Any suggestions will be appreciated.
Thanks,
Pam Frederick
I commented previously but, I failed to mention that I live in the US. A king size bed pillow here is 20 inches x 36″
Any help you can provide on what sizes to cut the fabrics for the pillowcase will be appreciated.
Thanks,
P. Frederick
Hi Pamela
The measurements for a larger pillowslip would be:
20.5 inches x 29 inches for white homespun
20.5 x 15 inches for floral cuff
20.5 x 2.5 inches for polka dot cuff
20.5 x 43 inches for pillowslip back
This will be a firm fit on a kingsize pillow. If you want it a bit roomier, just add another 1/2 – 1 inch to each dimension. You may wish to make a sample one out of an old sheet first to check the sizing is to your requirements.
Thank you SO much for the measurements. I look forward to trying this tomorrow.
Have a great weekend!
Pam
In step 5 do you really mean to “overlook” raw edges ? Should it be to overlock ?
My favourite pillow slip pattern, just made 2 more.
Wow – thanks so much Kaylee!
You’re welcome, this is a link to a photo of them on my FB page.
https://www.facebook.com/ponycharlie.com.au/photos/pcb.1896264413963626/1896264243963643/?type=3&theater
I just used this pattern to make a Christmas pillowcase tonight and it turned out great
I’m planning To make more for my nieces and nephews, but would like to personalise them with their name down the side on the cuff. Do you have any suggestions on what to bring use? Eg iron on transfers
Thanks
Thank you for sharing this! I have made around 7 of these so far. So quick and easy, and I love that the pillow is hidden inside.
these are called ‘housewife’ pillow cases. the frugal way to make them would be to cut across the fabric, as opposed to lengthwise, though I can see that you cut lengthwise to make use of the pleated border. Thank you for the beautiful pictures and the detailed tutorial!