A Spoonful of Sugar

Make. Bake. Create.

Menu
  • Home
  • About
    • About Us
    • Press
    • FAQ
    • Disclosure Policy
    • Contact Us
  • Crafts
    • Crochet
    • DIY
    • Embroidery/Cross stitch
    • Gift Wrapping
    • Knitting
    • Miscellaneous
    • Paper Crafts
  • Holidays
    • New Year’s
    • Australia Day
    • Back to School
    • Valentines Day
    • Easter
    • ANZAC Day
    • Mother’s Day
    • Father’s Day
    • Halloween
    • Christmas
  • Recipes
    • Appetizers
    • Bars & Slices
    • Bread & Pastries
    • Cakes
    • Cookies
    • Confectionery
    • Cupcakes & Muffins
    • Desserts
    • Drinks
    • Ice Cream
    • Jams/Preserves
    • Main Meals
  • Sewing
    • Sewing Tutorials
    • Quilting
    • Sewing & Quilting Patterns
  • Family
    • Back to School
    • Family Fun
    • Our Home
    • Parenting
    • Travel
  • Shop
    • Pattern Store
    • Etsy Store

Tutorial: Emergency Zippered Pouch

March 26, 2012 By A Spoonful of Sugar - 43 Comments

Thanks for all the lovely comments on our Emergency Zippered Pouch. We had a number of requests for a tutorial so you can make your own. They really are a handy size and perfect to put a few first aid supplies in your handbag.

Best of all, they only take an hour to make! They would make a nice gift with a gift card, cash or some other emergency supply inside!

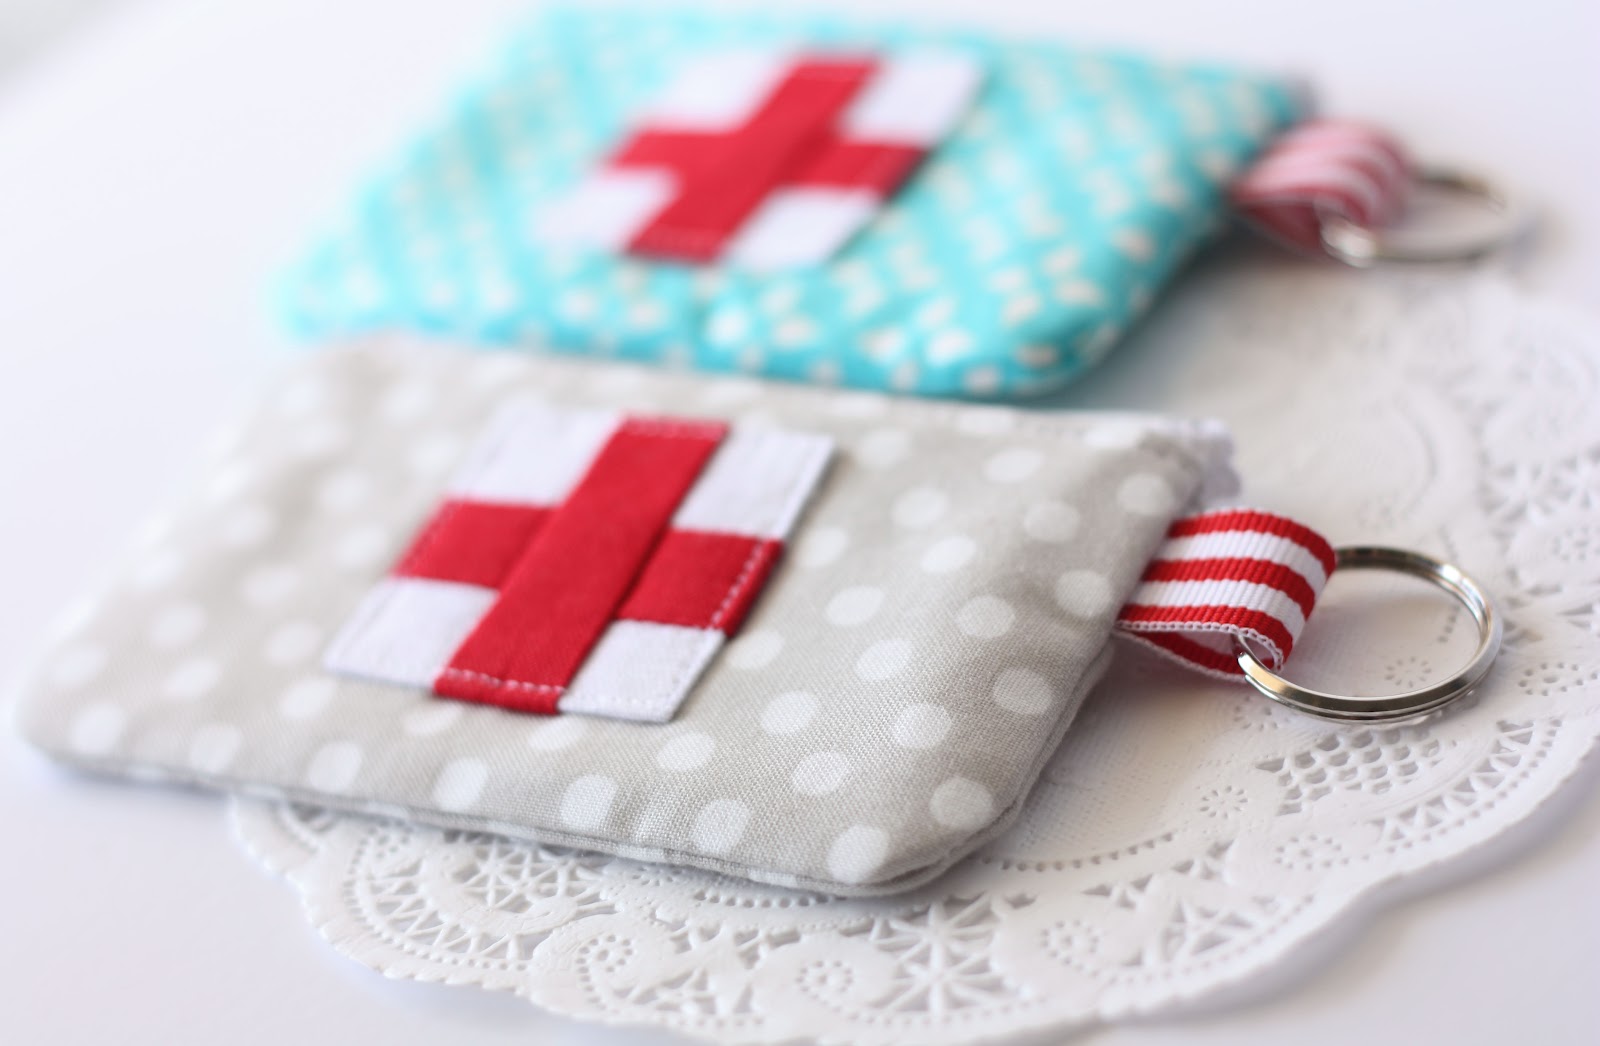
Finished pouch is: 2 3/4 x 4 1/2 inches (7 x 11.5 cm)

Materials:

  • 4 charm squares (5 x 5 inches), two each for pouch outer and lining
  • small piece of flannel for wadding
  • scrap of white linen
  • scrap of red homespun
  • scrap of ribbon
  • split ring
  • 4 inch zipper
Materials

Cut fabrics:


White Linen – cut four squares, 1 x 1 inch
Red Homespun – cut 2 squares, 1 x 1 inch; cut rectangle 1 x 2 inch.
Outer fabric – cut 2 rectangles, 5 x 3 inches.
Lining fabric – cut 2 rectangles, 5 x 3 inches
Flannel – cut 2 rectangles, 5 x 3 inches
Ribbon – cut one piece, 2 inches in length.

Sew Red Cross Patch:

Red Cross Patch Pieces

Referring to the photograph for placement, stitch a white square onto opposite sides of a red square. Press seams towards the red square.

Stitch a red/white unit to either side of the red rectangle. Press.

Cut a piece of cardboard that is 1 1/2 inches square. Lightly spray the red cross patch with spray starch. Place the patch wrong side up on your ironing board. Centre the cardboard square on the patch. Using the cardboard as a guide, press the seams inwards. Allow to cool, and them remove the piece of cardboard. Your patch is now ready to stitch onto the pouch.
Press under seams

Install Zipper


Layer a piece of the outside fabric onto a piece of flannel. Layer the zip on top with the right sides together and the long edge aligned, and stitch in place. Press, and then top stitch. Repeat for other side of the zip.
Pin the red cross to the middle of the pouch front and stitch in place. Fold the ribbon over the split ring and baste in place – referring to the photograph for placement.

I wanted a rounded bottom to my pouch so marked in some curved corners with a water erasable pen (I used a cotton reel as a template). With the zip open, and the wrong side of the pouch facing, pin in half. Stitch along sides and bottom of the pouch. Trim and clip corners.

With the right sides of the lining piece facing, pin together and mark the rounded corners. Stitch the lining sides and bottom together. Trim and clip corners. Press under 1/4 inch along the top edge.

Turn the pouch out the right way and press. Position the lining inside the pouch and attach in place by hand using a slip stitch. (For smaller pouches, I find hand stitching the lining gives a better result).

For more photographs of the Emergency Pouch – check out What’s Your Emergency?

You can find more of our free tutorials here, and we also have a range of  pdf sewing and quilting patterns in our etsy store.

Filed Under: Sewing, Sewing Tutorials, Travel Tagged With: bag, zipper

« All Around The Town Baby Quilt
Bon Voyage! »

Comments

  1. Little Red Emo Hood says

    March 26, 2012 at 3:14 am

    I’m so happy you made a tutorial for this! I was loving it when it went up on the blog last week, and now I can make one for myself! AWESOME! x

    Reply
  2. Ashleigh says

    March 26, 2012 at 3:29 am

    Great tutorial, actually the best I’ve seen in a long time very well set out!! I’ve avoided zips for a long time now but you make them look soo easy. Thanks ladies.

    Reply
  3. Pauline says

    March 26, 2012 at 3:35 am

    great tutorial…love it

    Reply
  4. ally says

    March 26, 2012 at 4:11 am

    Oh they are so cute…

    Reply
  5. Zoey says

    March 26, 2012 at 6:03 am

    Thanks for the great tute. I think I will make one of these for a little something extra to put in a friend’s birthday card next month.

    Reply
  6. Yvette Klepinger says

    March 26, 2012 at 6:12 am

    Thank you s muchh for creaing this tutorial!! I love itandIm definitely goin to make some of these for myself and my daughter too! YAY! I cant wait! 🙂

    Reply
  7. Terriaw says

    March 26, 2012 at 7:25 am

    You are always so generous with your tutorials! This is really an adorable pouch, and such a great idea for organizing first aid supplies. Thanks for sharing such a cute project with your fans!

    Reply
  8. Jennifer Trevors says

    March 26, 2012 at 10:22 am

    Adorable! I must make one 🙂

    Reply
  9. Barbara says

    March 27, 2012 at 5:05 am

    I love useful and cute ! many thanks for the tut.

    Do you by any chance know the name of the cream color dot fabric ?

    Reply
  10. Anonymous says

    March 27, 2012 at 11:53 am

    Lot this! Thanks for the tutorial.

    Reply
  11. Amanda Deniger says

    March 27, 2012 at 7:01 pm

    Do you make them to sell? I do not sew and would love a few.

    Reply
  12. ChaoticallyCreative says

    March 27, 2012 at 9:36 pm

    You must have read my mind. I was just imaging this very thing but with a special little tweak. I will definitely need to use this tutorial when I create my emergency pouch because I haven’t even sewn a zipper yet. I will surely link to this wonderful post. I’m so glad I found this! Great job!

    Reply
  13. Little Ladybird says

    March 31, 2012 at 1:00 pm

    Very cute pouches! (love the name of your blog!) TAsh (www.littleladybird.com.au)

    Reply
  14. KB Design says

    April 9, 2012 at 2:20 am

    This comment has been removed by the author.

    Reply
  15. KB Design says

    April 10, 2012 at 8:18 am

    Vielen Dank für die schöne Anleitung! Ich habe ein etwas grösseres Täschchen genäht und in hier:
    http://kb-design-blog.blogspot.com/2012/04/notfall-set-taschchen.html
    in meinem Blog gezeigt.

    Liebe Grüsse
    Brigitte

    Reply
  16. susan says

    April 30, 2012 at 10:18 am

    this is so cute it hurts!
    great tute
    i cannot wait to make one!!!
    thank you so much

    Reply
  17. punk punkartkaietsi says

    May 22, 2012 at 1:24 am

    Great work and tutorial even for the ones that know little about sewing …!

    Reply
  18. becky says

    June 5, 2012 at 6:51 pm

    Thank-you for this tutorial it will be handy for many different items.I am glad i saw your site on sew can she tutorials.You definitely {?} have a new follower.Thank-you again. Becky

    Reply
  19. Ana Lopes says

    June 26, 2012 at 4:46 am

    Hi Lisa and Sarah,
    I just found your lovely blog and since now I’m your fan!!!! Thanks so much for sharing this really cute emergency pouch tutorial. I’m just crazy for sewing some .
    I’ll be glad if you visit my recently blog 🙂

    http://www.lovecraft2012.blogspot.com

    A friendly hug from Portugal
    Ana Lopes

    Reply
  20. Brenda Cox says

    August 13, 2012 at 9:57 am

    I need a new coin pouch. This will work great. thanks for sharing.

    Reply
  21. Heather says

    August 15, 2012 at 7:33 pm

    I love this tutorial…the little emergency bag couldn’t be cuter. I found you from sew mama sew I’m excited to see all of your great projects

    Reply
  22. Mike says

    November 4, 2012 at 5:05 pm

    This is great. I always get frustrated because the boxes that come with bandits break so easily and are hard to open and close. This is both cute and easily assessable.

    Reply
  23. Abi Makes says

    December 19, 2012 at 2:46 am

    love this little purse, i had a go at my own version, but it turned out a bit wonky! pics here http://abimakes.blogspot.co.uk/2012/12/tiny-zipped-pouch.html

    Reply
  24. Marian says

    August 10, 2013 at 4:27 pm

    Thank you so much for this tutorial!! I’m making this for a friend; it’s almost finished and it looks adorbs! Will post photos on my blog after her birthday. 🙂

    Reply
  25. sallydglenn says

    September 8, 2013 at 6:15 am

    Cute, cute, cute! I never can figure out how to make what’s in my head. You did that! Need this for my cell phone and stadium manual to hook onto my belt at work for the Texas Ranger Baseball Club. With a slight shape and size adjustment, stiffer fabric in team colors with a sleeve on the back for my belt it will be perfect!

    Reply
  26. DebS says

    October 14, 2013 at 1:58 pm

    Love it! Top save time I made my cross out of two pieces of 1/2 inch red ribbon and made it just big enough for an epi-pen.

    Reply
  27. AC says

    November 15, 2014 at 1:17 am

    This is SO cute, and being a nursing student I absolutely have to make this! One question: how did you make the pouch lining? I would have assumed you’d made it the same way you made the outside of the pouch, but in the picture they are different shapes so I’m confused. I’m a total beginner so bear with me if this is obvious!

    Reply
    • A Spoonful of Sugar says

      November 15, 2014 at 9:04 am

      Hi AC – the lining is made the same way. Then you fold down 1/4 inch around the top opening of the lining, then place it inside the pouch and hand stitch it close to the inside of the zipper. Hope this helps to clarify it for you! Good luck with you nursing studies!

      Reply
  28. Kate says

    August 11, 2015 at 8:00 pm

    I’m allergic to bees and carry an Allerject for emergencies but it’s in a sort of nondescript sort of pouch. This worries me because if I can’t inject myself it won’t stand out as something to use in an emergency. This tutorial gave me an idea. I’m going to have to tweek the dimensions a bit but it’ll work. Thanks so much!!!!

    Reply
    • A Spoonful of Sugar says

      August 14, 2015 at 8:06 am

      Thanks Kate – a couple of other readers have enlarged the pattern to store epi-pens of allergic emergencies. Happy sewing!

      Reply
  29. Renee says

    January 4, 2016 at 2:17 am

    Hi, I just found this tutorial and i love it! Can you please confirm that you are using 1/4 in seam allowance for everything, including the charm square? Thank you.

    Reply
    • A Spoonful of Sugar says

      January 4, 2016 at 9:23 pm

      Hi Renee – Glad you found us! Yes, I use 1/4 inch seam allowances until stated. Happy New year!

      Reply
  30. Judy says

    August 16, 2016 at 10:55 pm

    I JUST LOVE THIS.I NEED TO MAKE FOR MY GRAND CHILDREN FOR MY GREAT GRAND CHILDREN.WILL MAKE CUTE LITTLE CHRISTMAS GIFTS..THANKS SO MUCH

    Reply
    • A Spoonful of Sugar says

      August 17, 2016 at 2:04 pm

      Thanks Judy – happy sewing!

      Reply
  31. Susan says

    June 23, 2018 at 8:32 pm

    Hiya,
    Great tutorial but I just wanted to mention that the Red Cross is protected under the Geneva Convention Act and it isn’t legal to use it. Change the colours perhaps so the idea is there but the Red Cross symbol is not used.

    Reply
  32. E says

    November 18, 2018 at 11:03 pm

    Thank you, GREAT tutorial!!! Will be making these gifts for teacher friends/ mommies .

    Reply
  33. Linda says

    June 13, 2022 at 11:29 pm

    Thanks for the tutorial. It is so easy to sew. When you sew the lining in by hand, I found it easier to turn it inside out when sewing the zip head end .it turned out beautifully.

    Reply

Leave a Reply Cancel reply

Your email address will not be published. Required fields are marked *

  • Email
  • Facebook
  • Instagram
  • Pinterest
  • Threads
  • TikTok
SUBSCRIBE TO NEWSLETTER
×

Categories

Archives

PURCHASE PDF PATTERNS

We offer over 100 affordable PDF sewing patterns available for download from our store website or Etsy store. Each pattern includes detailed instructions, numerous photos, and templates.

WEB STORE ETSY STORE

Instagram

If your scrap basket is overflowing after holiday If your scrap basket is overflowing after holiday sewing, this one’s for you. Ten quick, satisfying projects to help you sew through your stash and start 2026 feeling organised and inspired. These projects are scrap‑friendly, beginner‑friendly, quick to sew, and perfect for gifting. Save this for your next sewing session.If you’d like the patterns, comment SHOP and I’ll send you the link to my pattern store. 25% off storewide ends soon.#scrapbusting #scrapsewing #sewingprojects #sewinglove #beginnersewing
Small Scraps? Sew This!Got small scraps piling u Small Scraps? Sew This!Got small scraps piling up? Here’s a quick, satisfying make that turns the smallest offcuts into something useful and adorable. The Bitsy Basket is perfect for storing clips, threads, treats — or adding to your gift‑ready box. Save this for your next scrap‑busting session.Comment BASKET for a link to the pattern. 25% off storewide ends on January 1 2026 - be quick!#scrapbusting #sewingprojects #sewistsofinstagram #sewingpatterns #aspoonfulofsugardesigns
Got tiny scraps you can’t bear to throw away? Here Got tiny scraps you can’t bear to throw away? Here are three quick, satisfying makes that turn the smallest offcuts into something useful and adorable. Perfect for a cosy afternoon sew — and a great way to build up your supply of gifts for the year ahead. Save this for your next scrap‑busting session!Patterns featured: 
Zakka Card Wallet (aqua)
Rotary Cutter Pouch (yellow)
Cosy Cat Mitt (navy)P.S. Our 25% off store‑wide sale ends 1 January — now is the perfect time to stock up on patterns you’ve had your eye on.Comment SALE and I'll send you a link to the pattern store.#scrapbusting
#sewingprojects
#sewistsofinstagram
#sewingpatterns
#aspoonfulofsugardesigns
What a year of sewing it’s been. As we wrap up 202 What a year of sewing it’s been. As we wrap up 2025, I wanted to take a moment to celebrate the patterns you loved most — the ones you stitched for gifts, for joy, for your sewing room, and just because it felt good to make something with your hands.From iconic favourites to fast‑rising new releases, these patterns have been at the heart of our creative community this year. I’m endlessly grateful every time you choose one of my designs, share your makes, or send a message saying how much you enjoyed a project. It truly means the world.Swipe through to see the patterns that shone in 2025 — the beginner‑friendly wins, the scrap‑busters, the seasonal stars, and the little gems that deserve a moment in the spotlight.To say thank you, all patterns are 25% off until December 31. If you’d like a direct link to the pattern store, just comment SALE and I’ll send it straight to your DMs.Here’s to a year of creativity, colour, and tiny joyful stitches. And I can’t wait to share what’s coming in early 2026 — so many sweet new projects are on the way.Thank you for being here and for making this community such a warm, inspiring place to create. 💛🧵  #SewingPatternDesign #ModernSewingProjects #BeginnerSewingPatterns #SewingCommunityLove #ScrapFriendlySewing
Here are three little habits I’m taking into 2026 Here are three little habits I’m taking into 2026 — nothing fancy, just the things that make sewing feel joyful, calm, and creative.1️⃣ Tidying my sewing room between projects2️⃣ Adding all the cute details3️⃣ Using my scraps more intentionallyWhat about you — what’s one thing you’re taking into the new year?P.S. You may spot a few tools/products from SOHMO — I love discovering and using beautiful tools from Aussie sewing brands. @sohmo_au#sewingreels #sewingcommunity #sewistsofinstagram #sewinginspiration #beginnersewingprojects
My Year in NumbersWhat a year it’s been! I’ve lo My Year in NumbersWhat a year it’s been! I’ve loved looking back at 2025 through a few fun little numbers — the patterns released, the scraps used, the cups of tea enjoyed, and all the tiny moments of creativity that made this year feel so full.Thank you for being part of this community. Whether you’ve sewn one pattern or twenty, left a kind comment, shared a photo, or simply followed along quietly — it all means more than you know.If you’d like to join me for an even more creative 2026, comment NEWSLETTER and I’ll send you the link to sign up for my weekly newsletter. It’s where I share new projects, behind‑the‑scenes peeks, and little sewing treats you won’t want to miss.And I’d love to get to know you a little more — tell me something about yourself in the comments. Where you’re from, what you love to sew, or your favourite make of the year.A little reminder too: all patterns are 25% off until the end of the year — my small thank‑you for your support.Here’s to a year of making, learning, and creating together. 💛#SewingCommunity #SewingInsiration #Sewing Patterns #BeginnerSewingProjects #SewistsofInstagram
Follow on Instagram

Featured Pattern

Travel Sewing Kit Pattern

Featured Tutorial

Retro Drawstring Bag

Featured Recipe

Lemon Pound Cake

Connect

  • Email
  • Facebook
  • Instagram
  • Pinterest
  • Threads
  • TikTok
SUBSCRIBE TO NEWSLETTER
×

Popular Posts

  • Maker’s Gift Guide: 15 Handmade Stocking Stuffers
  • Merry Little Christmas Sewing Projects
  • Fabric Gift Pouch
  • 10 Projects to Sew for Men
  • Folded Hexagon Ornament
  • Gifts to Sew for Sewists
  • Sewing Gifts 101: Easy and Affordable Ideas for Your Crafty Friends

Copyright © 2025 Lisa. K. Cox - A Spoonful of Sugar