A Spoonful of Sugar

Make. Bake. Create.

Menu
  • Home
  • About
    • About Us
    • Press
    • FAQ
    • Disclosure Policy
    • Contact Us
  • Crafts
    • Crochet
    • DIY
    • Embroidery/Cross stitch
    • Gift Wrapping
    • Knitting
    • Miscellaneous
    • Paper Crafts
  • Holidays
    • New Year’s
    • Australia Day
    • Back to School
    • Valentines Day
    • Easter
    • ANZAC Day
    • Mother’s Day
    • Father’s Day
    • Halloween
    • Christmas
  • Recipes
    • Appetizers
    • Bars & Slices
    • Bread & Pastries
    • Cakes
    • Cookies
    • Confectionery
    • Cupcakes & Muffins
    • Desserts
    • Drinks
    • Ice Cream
    • Jams/Preserves
    • Main Meals
  • Sewing
    • Sewing Tutorials
    • Quilting
    • Sewing & Quilting Patterns
  • Family
    • Back to School
    • Family Fun
    • Our Home
    • Parenting
    • Travel
  • Shop
    • Pattern Store
    • Etsy Store

Gingerbread Houses

December 4, 2010 By Spoonful of Sugar - 23 Comments

Sarah and I had the best time today at a Gingerbread House and Christmas Cookie Workshop at Cake Tinz and Thingz. It was heaps of fun to decorate our house while sampling all the lollies.

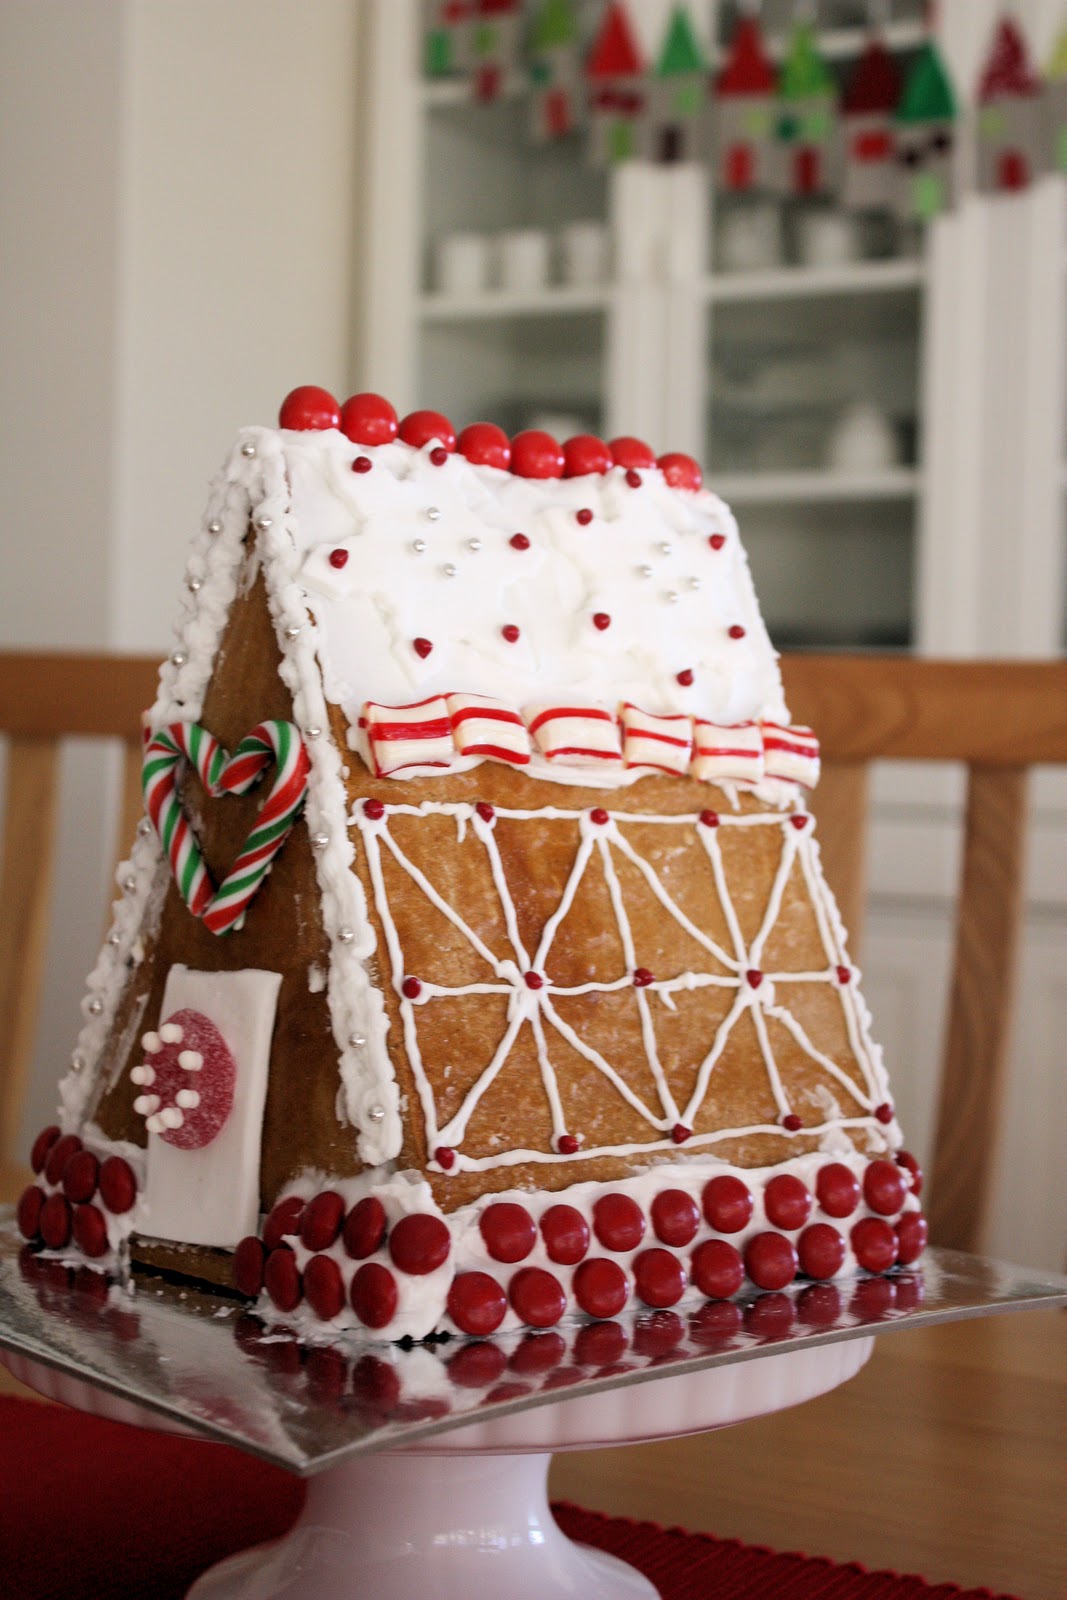
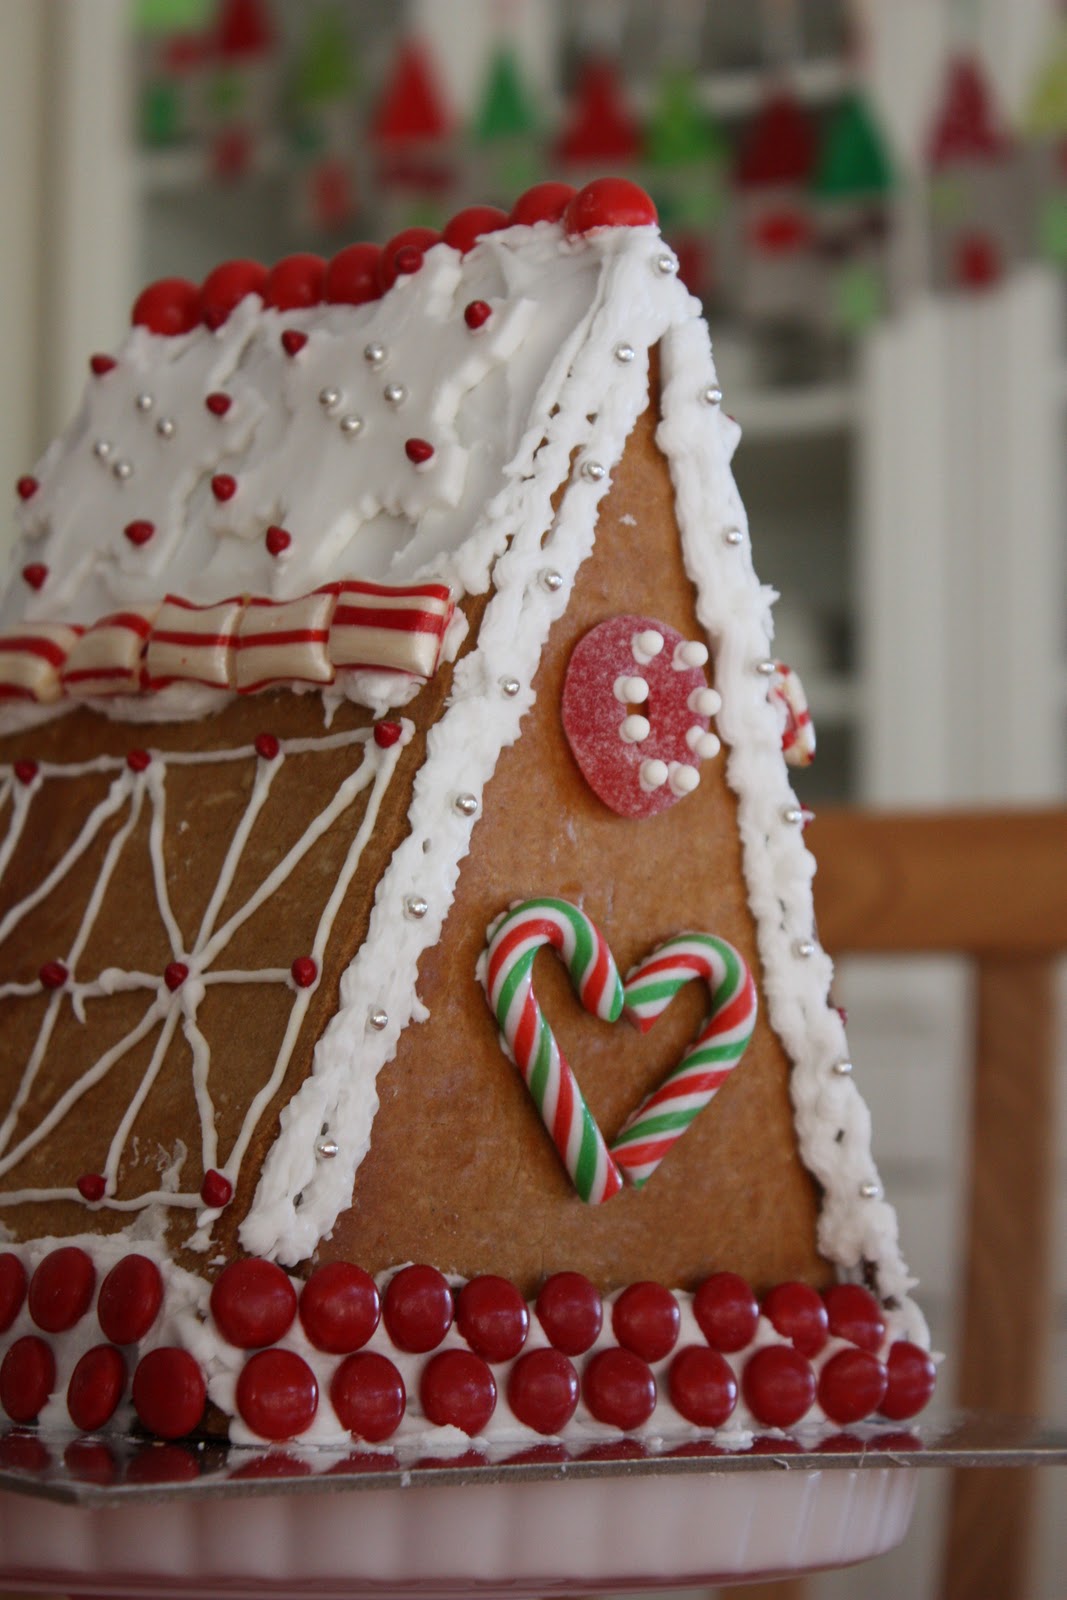
I went for a Red and White House to match our Christmas Table….

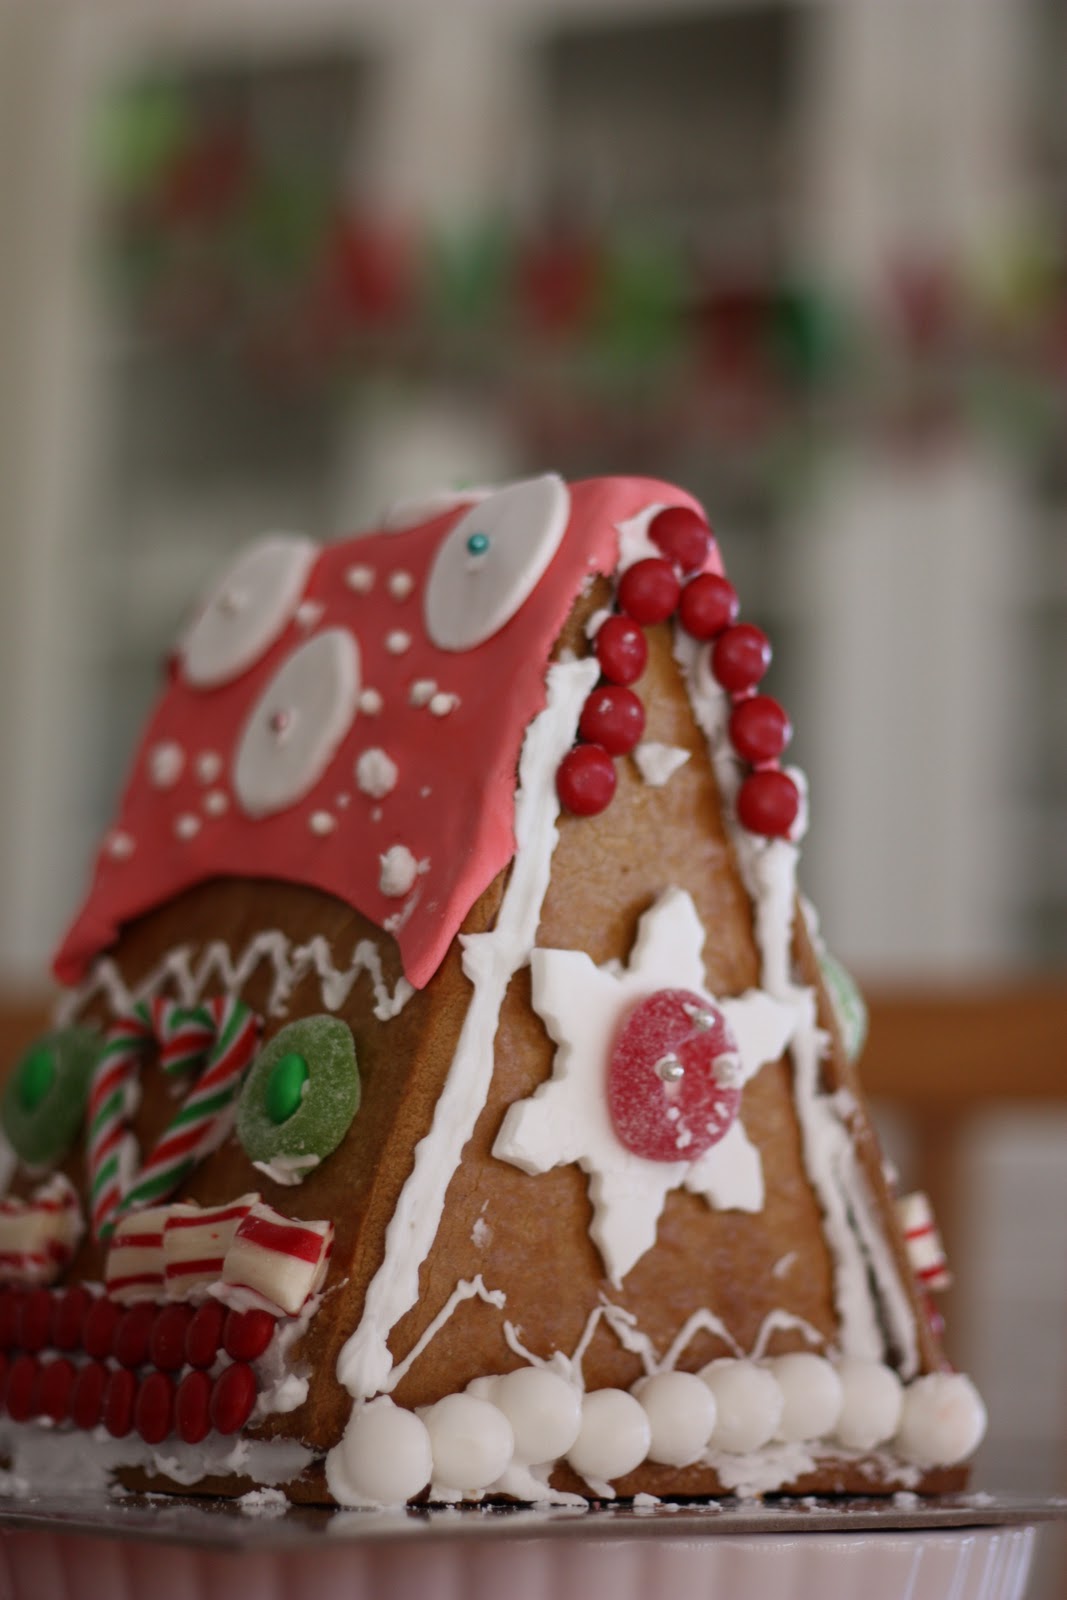
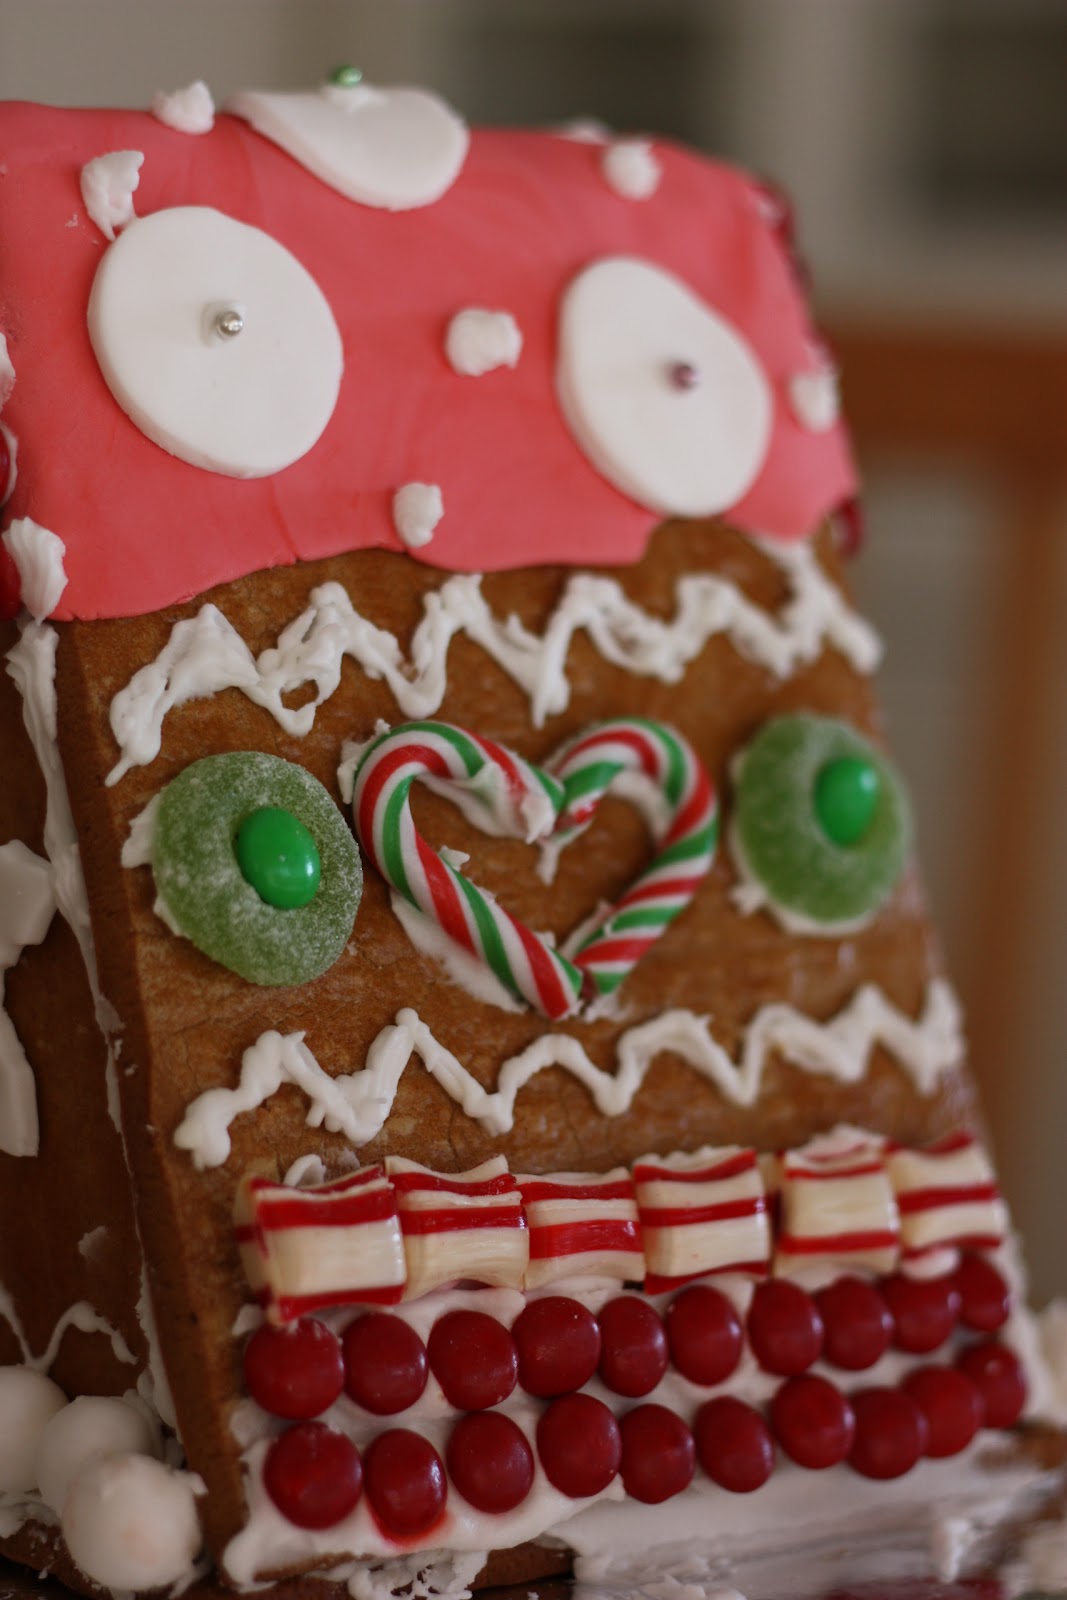
Sarah went for a polka dot roof which was very effective.

They look lovely all wrapped in cellophane.

We also learnt some techniques for decorating Christmas cookies. Here is the Rudolph Reindeer that I made. It was the first time we have used the edible markers to write on cookies.

Here is the house our teacher made during the workshop. I think Gingerbread House making will become a tradition for us. Now we have mastered the basics and used royal icing, we will enjoy improving our technique next year!

Thanks  Parentmap for featuring our Festive Garland in their article on Holidays Crafts for Kids.   It is a great article featuring 30 holiday crafts, activities and goodies for December.


Filed Under: Christmas

« Christmas Decorating
Chocolate Spice Cupcakes »

Comments

  1. two hippos says

    December 4, 2010 at 2:22 am

    Sounds like such a great workshop! My daughter and I have made a gingerbread house for quite a few years, although we cheat and use a fab house biscuit cutter set as the template. Although I’ve never mastered the icing, its always lots of fun.

    Reply
  2. Margaret says

    December 4, 2010 at 2:19 am

    I like gingerbread and enjoy a gingerbread house, do you know how it became a tradition ? and your look yummy.

    Reply
  3. Christy says

    December 4, 2010 at 2:27 am

    christmas cuteness galore! your gingerbread creations are so wonderful!

    Reply
  4. Stephanie says

    December 4, 2010 at 4:24 am

    Simply beautiful and how much fun! We did gingerbread houses every year when my kids were little, a very simplified version however. (graham crackers on small milk cartons for the base and LOTS of candy for decorating and eating.)

    Reply
  5. Leanne says

    December 4, 2010 at 4:34 am

    Gingerbread houses are so much fun and that is after you have made your self sick on the lollies.

    Reply
  6. Anita says

    December 4, 2010 at 5:03 am

    Ooo I just love the gingerbread houses!! They look yummy. Great job guys! Kind regards, Anita.

    Reply
  7. Sue Barreau says

    December 4, 2010 at 6:24 am

    They look great! I have only made Gingerbread Houses for Christmas presents once, the Christmas of 2007, and I made FIVE!!! It was also very hot, sticky, humid, weather (as I live in South Australia) – so I had the air-conditioner going full blast, as well as a fan going in the kitchen, as things were melting when they shouldnt have!! …lol… Four were for gifts, and one I kept for us to have on the Christmas Lunch table etc. It was fun, but lots of work. I must dig out the photos to show you one day! Hugs n Blessings from Sue of Oz

    Reply
  8. Bela says

    December 4, 2010 at 10:14 am

    The gingerbread houses are cute, girls!!! They look delicious as well!!! I can imagine how fun it was for you to have this kind of lessons:o)
    Have a great great weekend!! Bela.

    Reply
  9. Thimbleanna says

    December 4, 2010 at 1:52 pm

    Very, very cute Lisa! Isn’t it fun? We love gingerbread house parties in our family!

    Reply
  10. Terriaw says

    December 4, 2010 at 5:06 pm

    Wow, what a fun workshop! I have always wanted to make a gingerbread house. I love both versions you and Sara made. Great to see such wild inspiration from the instructor too. All those cute little details… yum.

    Reply
  11. em's scrapbag says

    December 4, 2010 at 7:37 pm

    What a fun workshop. Your houses turned out great!

    Reply
  12. Dogwood says

    December 4, 2010 at 8:11 pm

    Such beautiful gingerbread houses. I love all the colors and red & white one you made.

    My 40+ daughter and I made a gingerbread house this year and it was so much fun.

    Enjoy…

    Reply
  13. Janellybelly says

    December 5, 2010 at 12:41 am

    Wow, they both look amazing 🙂 I’m sure they’ll taste great too.
    See you Wednesday
    Love Janelle xx

    Reply
  14. suzitee says

    December 5, 2010 at 5:31 pm

    You are making my mouth water this morning Lisa! They look fantastic, and such a fun decoration for Christmas.

    Reply
  15. Tania McCartney says

    December 6, 2010 at 1:46 am

    Adorable! and I want that reindeer – now!! x

    Reply
  16. Tine says

    December 6, 2010 at 6:24 am

    That’s a great way to make a gingerbread house! It looks so pretty. Maybe this year we will make one, the kids and I 😉

    Reply
  17. Shannon says

    December 6, 2010 at 8:12 am

    Thanks for posting pictures – your houses look too pretty to eat! What a great way to enjoy mother/daughter time.

    Reply
  18. Tracy says

    December 7, 2010 at 5:12 am

    Sooo PRETTY! We’re back from our Thanksgiving/USA trip–had wonderful time! I’m slowing getting to visiting and such though, as I’ve not been feeling too well in recent days–but getting there. Great to be catching up with you and back in blogland. :o) Happy Days ((HUGS))

    Reply
  19. Sew Useful Designs says

    December 7, 2010 at 10:52 pm

    Oh My Goodness!!!

    Those houses are to die for! I’ve never seen any so pretty!

    And as always, your photography is truly captivating!

    Hugs!
    Vikki xo 🙂

    Reply
  20. Suzie says

    December 10, 2010 at 9:29 am

    I love you gingerbread houses! So much fun, so sweet!

    Reply
  21. Corrie says

    December 11, 2010 at 9:43 pm

    beautiful and yes its a wonderful tradition! I can’t believe I lived 33 years of my life without doing gingerbread houses at christmas! wrapping in cellophane is also the best way to keep it uneaten! if mine wasn’t wrapped it would be gone!

    Reply
  22. Jill says

    December 12, 2010 at 3:44 pm

    OH these look great! And edible markers?? Fantastic!! I’m going to try a gingerbread house with my girls for the first tme this year! Hope it turns out even half as well as yours!

    Reply
  23. Shez says

    December 19, 2010 at 3:41 pm

    just luv this blog very inspirational,keep up the good work and have a great xmas and a safe and happy new year.

    Reply

Leave a Reply Cancel reply

Your email address will not be published. Required fields are marked *

  • Email
  • Facebook
  • Instagram
  • Pinterest
  • Threads
  • TikTok
SUBSCRIBE TO NEWSLETTER
×

Categories

Archives

PURCHASE PDF PATTERNS

We offer over 100 affordable PDF sewing patterns available for download from our store website or Etsy store. Each pattern includes detailed instructions, numerous photos, and templates.

WEB STORE ETSY STORE

Instagram

If you love quick, practical sewing projects, the  If you love quick, practical sewing projects, the Baker’s Buddy Mitt is such a fun one to make. It’s scrap‑friendly, gift‑ready, and perfect for anyone who loves to bake.The Bakers Buddy Mitt is 25% off this week only. Comment BAKER and I’ll send you the link to the pattern.  #SewingProject #ScrapFriendlySewing #KitchenSewing #SewingGifts #SewingCommunity
Adding a handmade label is one of my favourite way Adding a handmade label is one of my favourite ways to personalise a project — and these little fabric + felt labels are so quick and satisfying to make.For this Ribbon Pouch, I used the Liberty Gifts from the Garden collection, which has the sweetest fruit motifs. They make perfect tiny labels for pouches, bags, and gifts.Here’s how to make your own:Press a piece of double‑sided fusible web to the back of your fabric.Cut around your chosen motif.Peel off the paper backing.Press the motif onto wool felt.Trim the felt with scalloped scissors.Sew the label onto the front of your pouch.Such a simple detail, but it adds so much charm. Fabric kindly gifted by @regent_street_fabrics — thank you!If you’d like to sew the Ribbon Pouch (3 sizes), comment RIBBON and I’ll send the pattern link straight to you.#SewingInspiration #FabricLabels #DIYLabels #LibertyFabric #LibertyGiftsFromTheGarden
A lot can change in 10 years ❤️ It’s been fun look A lot can change in 10 years ❤️ It’s been fun looking back at where I was in 2016 and how far life has come since then. Swipe for a little trip down memory lane.Back in 2016, my priorities were firmly centred around family. I was working full‑time, sewing in the guest room, sharing tutorials on my blog, and slowly dipping my toes into selling a handful of patterns on Etsy. It was a busy, full season — and creativity was something I fitted in around everything else.  Fast forward to 2026… I’m now retired and living the creative life I once dreamed of. My kids have grown up and are living in their own homes nearby. My husband and I are free to travel, explore, and enjoy this stage of life. And I get to spend my days designing, sewing, and connecting with this beautiful community.Life looks different now — in the best possible way.Were you following me back then, or what has changed for you over the past 10 years? I’d love to hear your story too.Tagging the lovely makers of my quilt: @arabesquescissors @ministryoffabric @belloquacity @alittlepatchwork @sameliasmum coleandtaffy @quiltymamaof4 @shequiltsalot @downgrapevinelane @lizzierosesews @lovethatfabric @sew_mimi.k #2026isthenew2016 #10yeartransformation #sewingjourney #sewingcommunity #aspoonfulofsugardesigns
Fall in love with sewing all over again ❤️I’ve Fall in love with sewing all over again ❤️I’ve rounded up 10 heart‑themed makes — from quick gifts to charming quilt blocks — perfect for weekend stitching or using up your favourite scraps. Whether you’re sewing for Valentine’s Day, birthdays, or just because, there’s something sweet for every maker.Comment HEART and I’ll send you a link to my Heart Pattern Collection.#sewingproject #heartsewing #quiltblock #scrapsewing #easytosew
Raw edge appliqué doesn’t have to feel fiddly or i Raw edge appliqué doesn’t have to feel fiddly or intimidating. With a few simple techniques, you can create neat, crisp shapes — even tiny details like penguin beaks and hearts.I’ve put together My Top 5 Secrets for Raw Edge Appliqué to help you feel confident, whether you’re brand new to appliqué or looking to refine your finish. Save this for your next sewing session.If you’d love a quick, beginner‑friendly project to practise these tips, my Penguin Love Mugrug is the sweetest Valentine’s make — scrap‑friendly, gift‑ready, and such fun to sew.Comment PENGUIN and I’ll send you the link to the pattern. Available now in our Pattern Store and Etsy shop.  #rawedgeapplique #appliquetips #sewingtipsandtricks #mugrugpattern #penguinlove
If you’ve ever wanted to add eyelets or grommets t If you’ve ever wanted to add eyelets or grommets to your sewing projects, here’s a quick look at how I install them using my DK93 snap press. It’s the same tool I use for snaps — and it makes installing eyelets beautifully quick and consistent.For this Ribbon Pouch, I used the Liberty Gifts from the Garden collection (printed on Lasenby cotton and released in January 2026). The colours and motifs pair so well with the little ribbon tie detail.Here’s how to install the eyelets:Punch out the four holes using a hole‑cutting die.Place the eyelet into the hole.Press it into place using the snap press.That’s it — easy peasy, and it gives the pouch such an elevated, professional finish. I love how clean and sturdy the result is.Fabric is Gifts from the Garden by Liberty - kindly provided by @regent_street_fabrics — thank you!If you’d like the Ribbon Pouch pattern (it comes in 3 sizes), comment RIBBON and I’ll send the link straight to you.Ribbon Pouch Sewing Pattern: available in our Pattern Store and Etsy shop ( links in profile).#SewingInspiration #SewingProjects #Eyelets #Grommets #SnapPress
Follow on Instagram

Featured Pattern

Travel Sewing Kit Pattern

Featured Tutorial

Retro Drawstring Bag

Featured Recipe

Lemon Pound Cake

Connect

  • Email
  • Facebook
  • Instagram
  • Pinterest
  • Threads
  • TikTok
SUBSCRIBE TO NEWSLETTER
×

Popular Posts

  • Charm Square Fabric Tray
  • Merry Little Christmas Sewing Projects
  • {Back to School} Tissue Cover
  • Hexagon Fabric Tray
  • Raw Edge Applique Tips
  • Sewing Gifts 101: Easy and Affordable Ideas for Your Crafty Friends
  • Finding More Time to Sew

Copyright © 2026 Lisa. K. Cox - A Spoonful of Sugar