A Spoonful of Sugar

Make. Bake. Create.

Menu
  • Home
  • About
    • About Us
    • Press
    • FAQ
    • Disclosure Policy
    • Contact Us
  • Crafts
    • Crochet
    • DIY
    • Embroidery/Cross stitch
    • Gift Wrapping
    • Knitting
    • Miscellaneous
    • Paper Crafts
  • Holidays
    • New Year’s
    • Australia Day
    • Back to School
    • Valentines Day
    • Easter
    • ANZAC Day
    • Mother’s Day
    • Father’s Day
    • Halloween
    • Christmas
  • Recipes
    • Appetizers
    • Bars & Slices
    • Bread & Pastries
    • Cakes
    • Cookies
    • Confectionery
    • Cupcakes & Muffins
    • Desserts
    • Drinks
    • Ice Cream
    • Jams/Preserves
    • Main Meals
  • Sewing
    • Sewing Tutorials
    • Quilting
    • Sewing & Quilting Patterns
  • Family
    • Back to School
    • Family Fun
    • Our Home
    • Parenting
    • Travel
  • Shop
    • Pattern Store
    • Etsy Store

Enchanted Forest Party

September 11, 2009 By A Spoonful of Sugar - 39 Comments

Thanks for all the lovely comments about our Master Chef Party. It features in the latest edition of Silver Magazine, along with some ideas for an Enchanted Forest Party. We had a lot of fun putting together ideas and projects for kids parties. Now my children are older (12 and 15 years) I don’t have a lot of opportunity to be as creative with their birthdays. Sarah enjoyed collaborating with me on this issue and did all the graphics (i.e the invitations, recipe cards, cupcake toppers etc). We make a great team!

Here are are some of the photos and text from the Magazine, in case you want to plan your own Enchanted Forest Party!

Preschoolers will love the magic of the Enchanted Forest Party! (All images in this post are taken from Silver Magazine).

Lollipop Centrepiece

(You might remember this project from the peeks I gave here and here. )


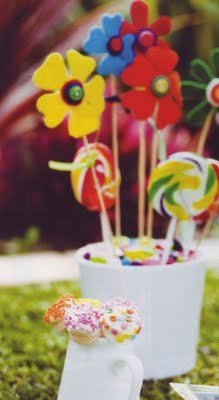
Decorate your party table with this sweet centrepiece! 

Materials:
Felt
Buttons
Bamboo skewers
Cotton
Plant pot
Floristry foam
Lollipops
Jelly beans

Cut flower shapes out of the felt. Using a button as the flower centre, stitch onto a bamboo skewer. Fill the flower pot with a piece of floristry foam. Arrange the felt flowers in the pot. Add a few lollipops, and cover the foam with assorted jelly beans.

Invitation Wands


If you are hand delivering the invites, wands are the perfect choice!

Materials:
Colour card
Dowel – cut into 30 cm lengths for each wand
Glitter
Ribbon

Cut out a star shape from the card and write the party details on it. Attach it to a length of dowel and decorate it with glitter and ribbon. 
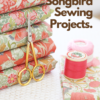
Mushroom Bag

Make a fabric mini tote bag as a thank you for guests. 

Materials (per bag)
Printed cotton fabric, 20 cm x 50 cm (for bag)
Assorted plain fabric, approx 10 x 15 cm (for pocket)
Cotton Twill, 50 cm
Coloured card
Small peg

To make the pocket, fold over 1 cm at the top edge, press. Fold over another 1 cm, and stitch in place. On the remaining three sides, press 0.5 cm under. Position the pocket on the front of the bag, and top stitch close to the edge of the pocket. Fold the printed cotton in half with right sides facing. Sew the side seams using an overlocker (serger). Fold under 1.5 cm at the bag opening, and press. Fold under another 1.5 cm and stitch in place. Cut the twill into two lengths of 25 cm for the handles. Stitch the handles in place. Write the child’s name on a piece of card and attach to the pocket with a small peg.

Flower Cupcakes


These colourful cupcakes are sure to delight.

Materials:
Coloured card
Coloured lollies
Bamboo skewers
Cupcakes
Green frosting
Green sprinkles

Bake up a batch of basic vanilla cupcakes. Frosting with green icing and decorate with sprinkles. Cut out assorted flower shapes out of coloured card. Place two flower shapes on the end of a skewer and secure with a lolly. Place the flowers in the cupcakes close to serving. 

Water Bottles

Make it easy for children to identify their drink with personalised water bottles. 

Materials:

Water bottles
Scrap booking paper
Double sided tape
Die cut apples
Curling ribbon

Remove the existing label on the water bottle. Cover the centre of the water bottle with a length of scrap booking paper cut to fit and secure with double sided tape. Write the child’s name on the apples and attach to the water bottle. Finish off with some curling ribbon.

We have a busy weekend planned here so it may be a few days before I get to my ever growing list of emails! There is now only two weeks of the school term left and we are counting down to our two week break. Sarah and I have lots of crafts planned including these adorable Sticky Note Mini Clipboards.

Lisa and Sarah

Filed Under: Uncategorized

« Master Chef Party!
A Most Exciting Week….. »

Comments

  1. Cascade Lily says

    September 11, 2009 at 4:50 am

    I have bookmarked this post! Some great ideas for the next time I am silly enough to self-cater!

    Reply
  2. Cathy says

    September 11, 2009 at 5:10 am

    I’m bookmarking this post too, how wonderful, thanks for the fabulous pics and instructions xo

    Reply
  3. Karens Hopes says

    September 11, 2009 at 5:22 am

    Some lovely ideas, pity I dont have any small children..I know I’ll have a party of my own…
    Karen

    Reply
  4. Terriaw says

    September 11, 2009 at 5:24 am

    I adore this enchanted forest theme even more than the Master Chef party! I especially love the lollipop centerpiece and the magic wands. The best part is everything looks so easy to make. I could see doing something like this for Halloween or even an adult party!

    Reply
  5. Nicole-Lynn says

    September 11, 2009 at 5:39 am

    So so cute.

    Reply
  6. CourtneyKeb says

    September 11, 2009 at 5:49 am

    I love everything about this post! I’ve even saved some pictures for inspiration for my daughter’s first birthday in February. Never to early to plan ;).
    Thanks for sharing!!!

    Reply
  7. LissyLou says

    September 11, 2009 at 6:09 am

    oooh thank you for that – how lovely!

    Reply
  8. méri says

    September 11, 2009 at 7:09 am

    You really are a beautiful and successful team!
    Congratulations!

    Reply
  9. Kellie says

    September 11, 2009 at 7:49 am

    Wow Lisa there are some fantastic things going on here!!! You put me to shame!!! Everything just looks fantastic! Hope you are all well!

    Reply
  10. Purple and Paisley says

    September 11, 2009 at 7:53 am

    you and sarah are so creative and have so much fun together…and eek! on the little post it note clipboards! thank you for the link – how adorable! ☺

    Reply
  11. em's scrapbag says

    September 11, 2009 at 8:04 am

    How fun for you and Sarah to work together! You truly are a great team. Love all your fun ideas

    Reply
  12. Dogwood says

    September 11, 2009 at 9:00 am

    So, so, so sweet!!!!!!!!!!! That would be the most fun party to attend. Everything is so perfect and colorful. Happy weekend. Dogwood

    Reply
  13. goldenbird says

    September 11, 2009 at 9:35 am

    Wow, I love your ideas for the enchanted forest party. I wish I had kids in my life so I could throw one! Or maybe I could just come to one of your parties? :o)

    Reply
  14. Miss Muffin says

    September 11, 2009 at 10:00 am

    Oh so cute!

    Reply
  15. Sandrine says

    September 11, 2009 at 4:04 pm

    Nest time I plan a kids party I must come and visit your space…but I am scare it will take me 6 months to decide…soo many great ideas! 😉

    Reply
  16. Renee says

    September 11, 2009 at 4:49 pm

    Lisa if I am reborn as a child, can I be yours.

    xoxox

    Reply
  17. clare's craftroom says

    September 11, 2009 at 6:05 pm

    Beautiful as usual ! Love the wand invitations especially .

    Reply
  18. Margaret says

    September 11, 2009 at 6:35 pm

    What great ideas for a ” back to” party. We are all still kids at theart

    Reply
  19. Janis says

    September 11, 2009 at 10:36 pm

    Your posts are always a delight but this one is packed with ideas that are so FUN and whimsical! And all the instructions too?! You are too good!!! Thanks for sharing. 🙂

    Reply
  20. Christy says

    September 12, 2009 at 3:34 am

    OMG! How beautiful! I want this theme for my birthday party! Congrats on a project well done!

    Reply
  21. Tamara says

    September 12, 2009 at 3:46 am

    All those gorgeous decorations would have gone beautifully with the gardening party I did for my girl Kate last year.

    Love party ideas girls, thanks

    Reply
  22. Michelle says

    September 12, 2009 at 4:35 am

    love the enchanted forest party…
    fabulous idea and so well done…
    the projects are so bright and just lovely…
    and would easy for anyone to make…which is really great!!!

    Reply
  23. Rumi says

    September 12, 2009 at 4:54 am

    I’m sure your memorable parties are a great hit with your little guests! Wonderful ideas!

    Reply
  24. Rosezilla says

    September 12, 2009 at 5:34 am

    All of your birthday ideas are great! It’s so exciting that the two of you are getting your ideas featured in magazines. Way to go! This brought fond memories; hubby and I used to have a lot of fun planning our kids’ b’day parties.

    Reply
  25. Bianca Jae Makes Stuff says

    September 12, 2009 at 7:37 am

    Perfect timing! Miss now 6 is having her party next weekend. Really like the water bottles and gift bags.

    Reply
  26. Handmade in Israel says

    September 12, 2009 at 10:50 am

    As always, this post is delightful and beautifully executed. You fill me with wonderful ideas for the next few birthday parties. Thank you!

    Reply
  27. Cheryl says

    September 12, 2009 at 12:46 pm

    Boy I will be tucking these ideas away for baby Polka Dot…great ideas and wonderful photos. Have missed my visits to our wonderful blog!

    Reply
  28. GUGAW says

    September 12, 2009 at 1:36 pm

    love the lollipop centrepiece!

    Reply
  29. Selina says

    September 12, 2009 at 1:55 pm

    what a fantastic idea for both boys and girls party! love it

    Reply
  30. Jenny says

    September 12, 2009 at 5:59 pm

    Some more wonderful ideas-I especially like the wand invitations-you are certainly a great team you two-looks like you are having a lot of fun:)

    Reply
  31. Bev C says

    September 13, 2009 at 8:23 pm

    Lots of great idea’s here. I especially like the one with the water bottles. Happy days.

    Reply
  32. Melissa Goodsell says

    September 13, 2009 at 8:40 pm

    They’re are some lovely ideas here Sarah, thanks for sharing!

    Reply
  33. Annette says

    September 14, 2009 at 4:27 am

    This is adorable!

    Reply
  34. Tania says

    September 14, 2009 at 6:38 am

    Just gorgeousness girls! And I know someone who would take quite a shine to those florally cupcakes!

    Reply
  35. LollyChops says

    September 14, 2009 at 1:21 pm

    I love all the lollies in this post. Makes me feel so homey. The mushroom bags might be my favorites though!

    Monday HUGS!

    Reply
  36. Philigry says

    September 14, 2009 at 5:05 pm

    this post is full of great ideas!
    thankss for sharing.

    Reply
  37. Tracy says

    September 15, 2009 at 3:17 am

    Those are all soooo cute and festive! You girls sure know how to party ! ;o) Happy Days ((HUGS))

    Reply
  38. Rachael Rabbit says

    September 16, 2009 at 7:54 am

    Ok – the little bunny needs to grow up quickly so I can begin planning children’s birthday parties 😉

    Reply
  39. Simone de Klerk says

    September 18, 2009 at 1:09 am

    Lisa, these projects and the one in the former post are sooooo pretty. Thank you for the wonderful ideas. I will post them to my youngest sister, since she still has young children and these are wonderful suprises for a party or a treat.
    Lots of fun on the ‘chef’ party on Saturday! What a great idea!

    Reply

Leave a Reply Cancel reply

Your email address will not be published. Required fields are marked *

  • Email
  • Facebook
  • Instagram
  • Pinterest
  • Threads
  • TikTok
SUBSCRIBE TO NEWSLETTER
×

Categories

Archives

PURCHASE PDF PATTERNS

We offer over 100 affordable PDF sewing patterns available for download from our store website or Etsy store. Each pattern includes detailed instructions, numerous photos, and templates.

WEB STORE ETSY STORE

Instagram

If you love foundation paper piecing, you’re going If you love foundation paper piecing, you’re going to enjoy this one — a bundle of four woven‑style FPP quilt blocks, each with its own beautiful twist. These blocks look intricate, but the FPP method makes them wonderfully achievable, even if you’re still building your skills.They’re perfect for using up scraps, experimenting with colour, or creating striking mini quilts, cushions, bags, or table decor. Each block has that satisfying “woven” illusion that always gets a second look.Whether you prefer bold brights, soft pastels, or a monochromatic palette, these designs shine in every colourway. And the best part? You get all four blocks together in one bundle.If you’d like the pattern set, comment WOVEN and I’ll send the link straight to you. Woven bundle is available in our Pattern Store.#SewingInspiration #FPP #FoundationPaperPiecing #QuiltBlocks #WovenQuiltBlock
If you love quick, practical sewing projects, the  If you love quick, practical sewing projects, the Baker’s Buddy Mitt is such a fun one to make. It’s scrap‑friendly, gift‑ready, and perfect for anyone who loves to bake.The Bakers Buddy Mitt is 25% off this week only. Comment BAKER and I’ll send you the link to the pattern.  #SewingProject #ScrapFriendlySewing #KitchenSewing #SewingGifts #SewingCommunity
Adding a handmade label is one of my favourite way Adding a handmade label is one of my favourite ways to personalise a project — and these little fabric + felt labels are so quick and satisfying to make.For this Ribbon Pouch, I used the Liberty Gifts from the Garden collection, which has the sweetest fruit motifs. They make perfect tiny labels for pouches, bags, and gifts.Here’s how to make your own:Press a piece of double‑sided fusible web to the back of your fabric.Cut around your chosen motif.Peel off the paper backing.Press the motif onto wool felt.Trim the felt with scalloped scissors.Sew the label onto the front of your pouch.Such a simple detail, but it adds so much charm. Fabric kindly gifted by @regent_street_fabrics — thank you!If you’d like to sew the Ribbon Pouch (3 sizes), comment RIBBON and I’ll send the pattern link straight to you.#SewingInspiration #FabricLabels #DIYLabels #LibertyFabric #LibertyGiftsFromTheGarden
A lot can change in 10 years ❤️ It’s been fun look A lot can change in 10 years ❤️ It’s been fun looking back at where I was in 2016 and how far life has come since then. Swipe for a little trip down memory lane.Back in 2016, my priorities were firmly centred around family. I was working full‑time, sewing in the guest room, sharing tutorials on my blog, and slowly dipping my toes into selling a handful of patterns on Etsy. It was a busy, full season — and creativity was something I fitted in around everything else.  Fast forward to 2026… I’m now retired and living the creative life I once dreamed of. My kids have grown up and are living in their own homes nearby. My husband and I are free to travel, explore, and enjoy this stage of life. And I get to spend my days designing, sewing, and connecting with this beautiful community.Life looks different now — in the best possible way.Were you following me back then, or what has changed for you over the past 10 years? I’d love to hear your story too.Tagging the lovely makers of my quilt: @arabesquescissors @ministryoffabric @belloquacity @alittlepatchwork @sameliasmum coleandtaffy @quiltymamaof4 @shequiltsalot @downgrapevinelane @lizzierosesews @lovethatfabric @sew_mimi.k #2026isthenew2016 #10yeartransformation #sewingjourney #sewingcommunity #aspoonfulofsugardesigns
Fall in love with sewing all over again ❤️I’ve Fall in love with sewing all over again ❤️I’ve rounded up 10 heart‑themed makes — from quick gifts to charming quilt blocks — perfect for weekend stitching or using up your favourite scraps. Whether you’re sewing for Valentine’s Day, birthdays, or just because, there’s something sweet for every maker.Comment HEART and I’ll send you a link to my Heart Pattern Collection.#sewingproject #heartsewing #quiltblock #scrapsewing #easytosew
Raw edge appliqué doesn’t have to feel fiddly or i Raw edge appliqué doesn’t have to feel fiddly or intimidating. With a few simple techniques, you can create neat, crisp shapes — even tiny details like penguin beaks and hearts.I’ve put together My Top 5 Secrets for Raw Edge Appliqué to help you feel confident, whether you’re brand new to appliqué or looking to refine your finish. Save this for your next sewing session.If you’d love a quick, beginner‑friendly project to practise these tips, my Penguin Love Mugrug is the sweetest Valentine’s make — scrap‑friendly, gift‑ready, and such fun to sew.Comment PENGUIN and I’ll send you the link to the pattern. Available now in our Pattern Store and Etsy shop.  #rawedgeapplique #appliquetips #sewingtipsandtricks #mugrugpattern #penguinlove
Follow on Instagram

Featured Pattern

Travel Sewing Kit Pattern

Featured Tutorial

Retro Drawstring Bag

Featured Recipe

Lemon Pound Cake

Connect

  • Email
  • Facebook
  • Instagram
  • Pinterest
  • Threads
  • TikTok
SUBSCRIBE TO NEWSLETTER
×

Popular Posts

  • Charm Square Fabric Tray
  • Merry Little Christmas Sewing Projects
  • {Back to School} Tissue Cover
  • Hexagon Fabric Tray
  • Raw Edge Applique Tips
  • Sewing Gifts 101: Easy and Affordable Ideas for Your Crafty Friends
  • Finding More Time to Sew

Copyright © 2026 Lisa. K. Cox - A Spoonful of Sugar