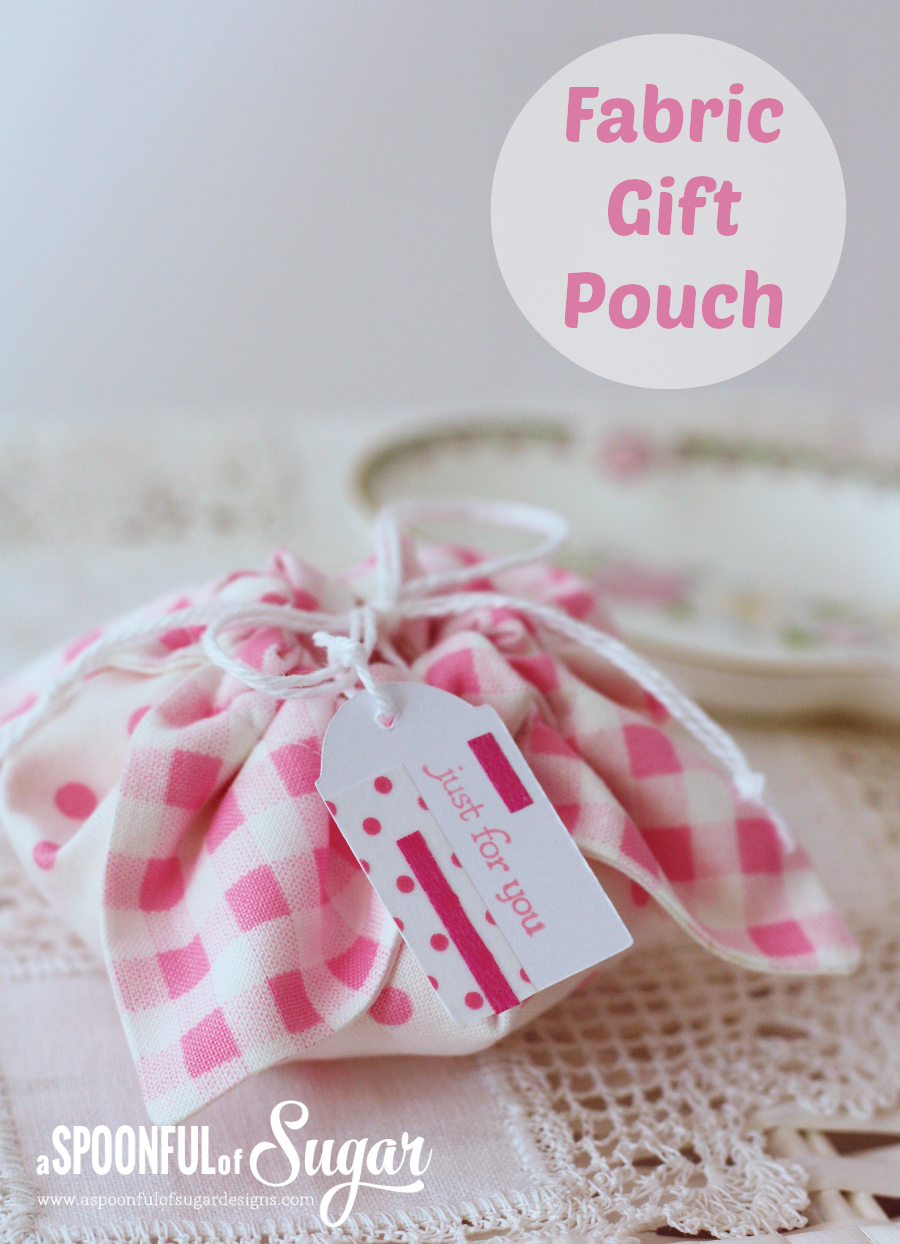
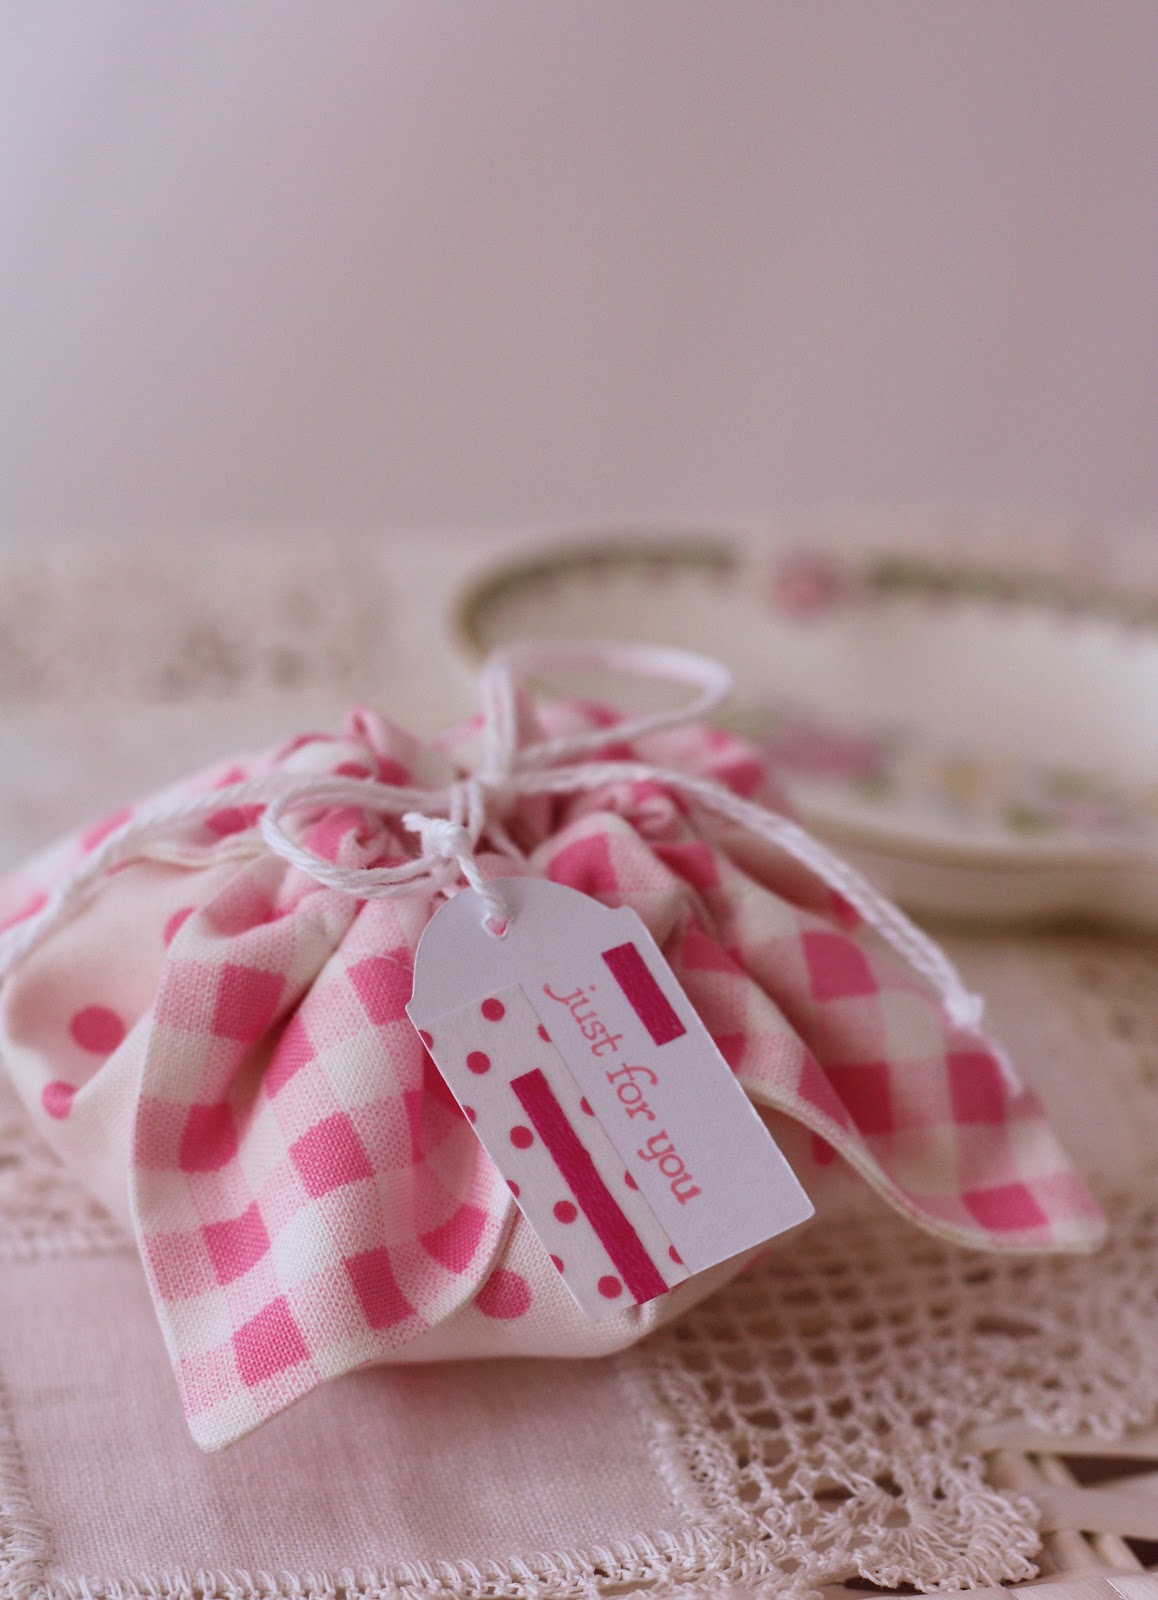
Here is a little fabric gift pouch – it is the perfect size to gift some jewellery or other small item. The inspiration came from a Japanese magazine.
They are really quick to make.
Edit: November 2014 – Check out our new and improved tutorial.
Materials:
- 2 squares of cotton fabric 8 1/2 inches x 8 1/2 inches (22 cm x 22 cm)
- 40 inches ( 1 m ) white crochet cotton or similar
Method:
1. Position the squares of fabric so that the right sides are facing. Stitch around each side using a 1/4 inch seam allowance. Leave a 3 inch gap on one side for turning. Clip corners and turn right side out. Press. Use a slip stitch to close the gap.
2. Mark 3 1/4 inches from each corner. Fold the corners in where marked and press. Stitch the corners down, 1/2 inch from the edge. (Refer to photo)

4. Cut the crochet cotton in half. Thread a length of cotton twine through the channels on the corners and then tie the ends together. Starting from the opposite side, thread the other length of cotton through the channels and tie. (Refer to photo)

5. Pull the ends of the cotton to gather up the pouch. Pop in your gift, tie a bow, and trim the ends of the cotton twine as desired.

Of course I couldn’t resist adding a small tag – fortunately I had the perfect colour of Japanese washi tape to match 🙂


a perfect pouch, wonderful wrapping for a special gift!
Such a pretty little gift idea. Love the fabrics too. Thanks for sharing another tutorial…
Love the new header, I’m a bit behind on my blogging lately.
This is SO cute!
I added a link your project to my Inspirational Projects section on my blog!
http://www.theclayfamilyblog.blogspot.com
Lovely! It’s going on my ‘to-do’ list too!
Very cute Lisa…and so easy by the looks of it! Now…if only I could find my craft desk 🙂
Now this is so good, I must try it too, thanks!
what a great quick idea,will have to try this one.
cheers shez
Wow what a fab idea, thank you for sharing 🙂
what an amazing idea! It looks so fab and seems relatively easy to make… Thank you so much for sharing, have a great Sunday!
Love, Maaike
Oh my goodness, this is the cutest little bag ever! I have finally found out that all of the trials and tribulations I’ve been having with my sewing machine were down to it needing a service, apparently it hasn’t worked properly for well over 10 years. It’s a Singer one so I’m going to see if I can get someone to have a look at it. If it all works out I’ll be taking on some of your nifty tutorials! Thank you x
Gorgeous,I love this sooooo much.
What a lovely idea, nice colourscheme too.
I love these little bags, I have made them some time ago as well… if you use red and green, this makes them look a little like strawberries and they are also good for some easter chocolates … I have thought of making them again as little easter surprises. Your choice of fabrics is really really cute!
Jule
Thank you so much, for this great tutorial. so simple and yet so very pretty!
So cute – I used to have a swim bag made exactly the same way – I had forgotten all about it…
Oh, this is so cute! I will definitely use it. Thanks for sharing this lovely idea!
Great little idea, thanks!
Cute
This is so cute and so easy. Thank you very much for the tut. It is exactly what I needed for a little gift.
Jossie
Great idea Lisa and its a good way to use left over fabric.
This is gorgeous. Thanks for sharing.
Anne
That is gorgeous. I can see that simple little design coming in very handy. Thanks for sharing.
Oh Lisa, needless to say I love this cute project!!! I will sew some and show you them!!! Promise!
Much love!
Bela
OMG! How simple and how cute!! I’m propped up in bed with my 1st cup of coffee, and I want to jump right up and go make one. Right now! Thanks so much for sharing!! ~karen
That is so cool!!!
The Japanese sure do know how to make cute stuff!!
What a sweet gift pouch! I love the way the string goes through the corners to tie into a pretty little package. This is an adorable gift in and of itself!
will try this,..
This is a very cute idea!
Thank you for sharing this cute idea!
~Judy
Adorable!
Guess what I am going to sew this afternoon…
Thanks!
This is such a pretty little pouch! I linked to your tutorial over at Craft Gossip Sewing:
http://sewing.craftgossip.com/tutorial-drawstring-fabric-gift-pouch/2011/02/20/
–Anne
Ohhh i loved it!!!!!!!!!
Oh so pretty! I imagine this could be resized for a slightly bigger pouch and would also be wonderful for packaging yummy homemade treats too! Thanks so much for sharing this gorgeous idea.
Thanks for this how-to, it’s adorable!
Oh I’m definately trying these, would they fit a nice soap in them?
Thanks for always being so generous and sharing.
Thats gorgeous, I’m thinking of Christmas already.
What a clever idea!
super, thanks = )
this is such a cute idea!!!! thank you for sharing!! 🙂
Hi, Lisa! What a clever idea… the shape is wonderful! A nice departure from the “usual” drawstring variety. Thanks for showing us how! :o) So nice to catch up with you here. The days are so busy of late, my online time is a little less then it was. But we all know how that is… LOL! Happy Days ((HUGS))
Hi Lisa…
It is so cute and easy to do project. very lovely… love to give sweets to my little niece . thanks for sharing…
I am your new follower too
Hope you would like to spare a little bit of your time for my new post, its something different I hope you enjoyed
http://craftaworld.blogspot.com/
Love
Farah
Oh, gotta make me some of those! Very cute and clever. Thanks!
That’s adorable Lisa — thanks for sharing such a fun idea!
how sweet … and simple to do. I’ve been trying to figure out a neat way to wrap a gift for my bee friends. This will be perfect. Thank you for sharing!
That’s so cute!!!!
I too love the little pouch, so sweet!
Hello,
My name is Alessandra and I write from Italy, I wanted to compliment you on the blog and the beautiful creations.
I’ll take inspiration from your ideas, I hope not to offend …
you’ll see everything I do on my blog, if you like …
here’s the link: http://lamargheritarosa.blogspot.com/
Alessandra
I love your ideas, they are so cute!!!!!!! I am from Brazil and always see your blog! Congratulations!!!!
Thank you for a wonderful idea!
only one word is appropriate for this gift bag ” Beautiful”
super cute!
i made 2 of these yesterday with fun Easter fabric, very sweet. then I got clever and tried to make one with a pentagon instead of a square to make a 5 pointed flower at the top and HA! it doesn’t work. made a cute little thing, but not a draw string bag.
Oh this is great!! I just discovered fabric origami this week and made a bag – this looks nice and simple – and will use up some scraps! I’m off to try it straight away!
Thanks for sharing!
No one, but no one, no how to wrap (and unwrap!) like the Japanese. x
The little gift bag is so sweet. I’m going to try it today. Thanks for sharing such a cute idea.
Great idea! …and you used so pretty fabrics! Thanks for sharing!
Hugs Doris
Oh how sweet is this – I love it, thank you! I’d like to ask your permission to use your pic and link on my blog, every month I make a list of tutorials for my readers and I would love to show them this!
I made several of the gift bags. They came out really cute…I love them. I have posted pics on my blog.
Your tutorial was very easy to follow. Thank you.
Gostei do seu blog.Amei esta bolsinha.Lindos trabalhos.òtima semana para você.Com carinho.Beijos da Lada
Soooo that is great!!!!!
Tank you so match ….
greatings send you Conny
This is so very sweet! Thank you for sharing the directions.
This is just so pretty! I’ll be making a few of those I think!
Veramente carino! Magari con le stoffine giapponesi; ci proverò. Grazie!
How sweet is this pouch! I don’t know how I missed this post! Love it!
Thanks for sharing!
merci pour ce tuto superbe bises jojo
Adorei muito fofo!
usarei para colocar meus sabonetes!
It´s great.
Thanks für this lovely idea.
Now, I have a nice present for mum, with strawberries filled in.
These would be so cute made out of cloth napkins or hankies
hai 😉
so cute this craft!!!!
i must try 😉
Simplismente Perfeito
ja estou seguindo
gatanolaco.blogspot.com , me faz uma visitinha
Bjos
Wonderful post! I love all fabric handbag! The Kitty Handbag so adorable! Lovely weekend to you.Thanks for sharing this post so much.
Lovely pouch, i love it very much. Thanks for sharing
That’s the cutest thing I’ve seen in a long time! Very clever!
I love this idea. Thank for sharing such a great project and tutorial.
I would like to thank SMS for posting this today! If only they h ad posted it sooner, my sister’s gift would be in a nice little pouch like this rather than a cheap organza drawstring bag. *sigh* I’m going to make some today!
I have a jewelry pouch that is made similiar to this and I love it. Wonder if I could add a third layer and make this a jewelry pouch too?
Love this pouch! Love the colors and I think I’ll try to make a bigger one for bigger gifts, maybe add a hair bungee for added effect.
Thank you,
Diane, NJ
simple yet soo cute. Thanks
je le trouve superbe….bravo
merci pour le tuto!!!!
super mignon et facile à faire. Merci pour le tuto c’est une très bonne idée…bonne continuation.
seeing the end result, I thought the design was much more complicated.
Simple and effective …. Thank you for this tutorial
beutiful and practise, I will put the link in my blog.
Paylaşımınız için teşekkürler. Paylaşımlarınızın devamını dilerim yazılarınızı takip ediyorum teşekkürler.
This has brought back memories of my time as a Girl Scout leader. We made these out of bandanas for Girl Scouts and called them Ditty Bags. My co-leader and I made them as Christmas Gifts for our Brownies one year.
I saw this pattern on your blog just before Christmas and made about 2 dozen of them in Christmas fabric. I filled them either with foil-covered chocolates (4 Ferrero Rochers for example) or with chocolate coins and tiny bottles of nail varnish/hairbands etc. So I always had a small gift for unexpected visitors. They went down very well -everyone expected them to be very difficult to make.
Thank you for the pattern! I can see so many uses for this.
Oh, thanks for the tutorial!~ I still a beginner in sewing, and I was thinking of the most ridiculously complex way to sew a pouch. Thank God I found this site before I even started. And thank YOU for your nice tutorial.
This little gift pouch is sooooooo adorable….I had to get right off my PC and Make one right away….It was super super simple and turned out so sweet…. I found a cute Christmas Pattered fabric in my stash and a contrasting one for the lining inside…..I Used thin Red silk ribbon for ties since I didn’t have any crochet cotton….Thanks so much for sharing….Hugs and God Bless
Pam
I heart you so much!
I love this!!! you can make it bigger with some satin or lamee and have the hottest evening bag at the party!!! gonna try this right now!!!!
Hi All,
I will be making one of these cuties with Breast Cancer Awareness fabrics and thin pink/white ribbon as opposed to string/crochet cotton…..can’t wait to make it. Will post pics if I make it.
Enjoy!!!
I love giving presents in fabric bags. This one is adorable!!!
What a fabulous idea, i love this would it be ok if I added a link to this tutorial on my blog had a go at making my own but its no where near as nice as yours.
Hope to hear from you soon, take care jojo
thanks for sharing
Thanks, this is so simple but so clever and looks gorgeous! on my to do list for sure!
Cute, easy, and not expensive!! I made one tonight as a trial run. I will be making about 20 more for foster moms. We’ll fill with candy. How cool is that? THANK YOU for such a delightful tutorial! I see a lot of these in my future!
Thank you for this great tutorial! Last year I made 60 of these pouches to give as gifts to my friends. I have just started a blog titled “Gifts for all my friends” and I’ll be sharing a link to your tutorial. I hope you don’t mind! If you get a chance, please stop by my blog at giftsforallmyfriends.blogspot.com.
Thank you!!
I love it. Super cute and great for beginners!
this is so simple and cute..i tried to pin up this project onto my pinterest. Unfortunately they are so many follower try to reach this project..wish i could pin into my board
So cute!! I love it!
Thanks Karen.
We’re a non-profit quilt guild and we’re looking for some items to sell at our upcoming quilt show. Would you mind if we sold a few of these?
Hi Tammy, Thanks for your message. You are welcome to sell some pouches using our design. We would appreciate if you used a tag that mentioned they were made suing our free pattern.
thanks
Lisa
Encontre este maravilloso tutorial. Divina bolsita, tratare de hacerla con otro tamaño- Gracias.